Many Ways To Convert Color To Black & White

color
lightondark
darkonlight
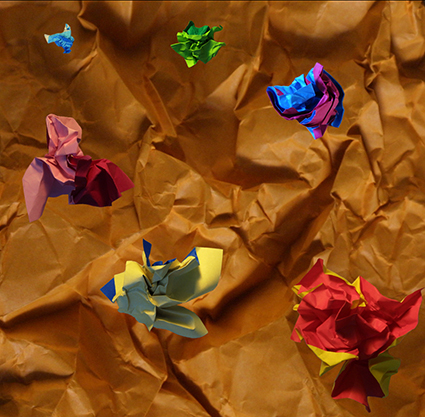
 There are at many ways to convert an image from color to black and white. Here's a roundup and evaluation of the top seven plus a set of considerations to help you choose the best one for your needs.
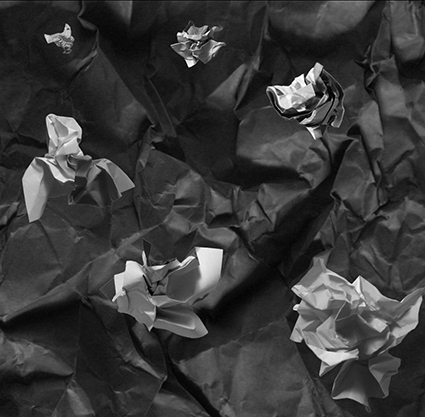
1          Desaturate
Desaturate or use the Saturation slider to make all the channels the same without control over the mix. Desaturaton is useful for near neutral images, otherwise it produces compressed tonal structure.
2          Convert Mode To Grayscale
Grayscale conversions eliminate all channels but one. The default mix is 59% Green, 29% Red, 11% Blue. This can be customized by targeting a single channel before conversion, to get 100% of any channel in any color space, including Lab. Quick and direct, this method eliminates future flexibility; its limited use is to create Grayscale images for reproduction but it's not the best way to make a conversion from color to black and white.
3          Channel Mixer
The Channel Mixer set to Monochrome allows you to customize the mix of channels and can be used as an adjustment layer, which allows you to change the mix at any time in the future.


Insights Members can login to read the full article.
Email:
or Sign up

How Gray is Gray?

howgraygray_425

In the vernacular the phrase “black and white” can be used to describe definitive answers, while the use of the phrase “gray areas” often means an area defies easy definition making it difficult to draw hard and fast lines.

While there is a general consensus as to what constitutes the colors black, white and gray, opinions vary significantly when it comes to identifying absolute blacks, whites, and grays.

Which of these colors is absolutely neutral? Which are warmer than neutral? Which are cooler than neutral? All of them are nearly neutral when compared to fully saturated colors. More importantly, which colors do you prefer? Which colors would most enhance the images you are producing?

It‘s helpful to sensitize yourself to these many possibilities and to identify your personal preferences.

Read more in my Black & White lessons.
Learn more in my digital photography and digital printing workshops.

Black & White Photography Styles

5_bwpalettes_light

high key

1_bwpalettes_alt

mid key full scale

2_bwpalettes_classic

mid key high contrast

3_bwpalettes_highcontrast

high contrast

4_bwpalettes_dark

low key

Most successful artists define a consistent palette for their life’s work, for periods during their careers, or for individual bodies of work. It’s one of the primary things that creates an easily recognizable signature style. This is as true for black and white photographers as it is color photographers.

You can precisely describe black and white palettes by identifying the overall lightness or key (high – light, medium, low – dark) and the amount of contrast (high, medium, low, none) held in three ranges of tones – shadows (zones 0-3), midtones (zones 4-7), and highlights (zones 8-10). Put more broadly, the dominant range of tone is identified first and then each range of tone can be described as expanded or compressed; a range of tone that does not exist in an image could be described as fully compressed.


Insights Members can login to read the full article.
Email:
or Sign up

Expanding the Definition of Black & White Photography

Suffusion XX

neutral image

The division between color and black and white in photography has been overemphasized based on the limitations of 20th century processes. 21st century processes are significantly different and beg a reconsideration of this division. Today, when we make black and white images we typically capture, process, and print with color.

When people use the term black and white they generally mean neutral (without saturation or bias towards one or more hues). Typically the use of the phrase “black and white” also encompasses warm and cold toned monochromatic images, cross-toned duochromatic images, and in some cases subtly tinted polychromatic images. The guiding principle behind these related but varied palettes is an emphasis on luminosity values, along with a restrained use of hue and very low levels of saturation.


Insights Members can login to read the full article.
Email:
or Sign up

Enhancing Local Contrast In Black & White Images

AntarcticaLIV_after_425

After

AntarcticaLIV_before_425

Before

Color to black and white conversions are radical transformations of an image. They establish the tonal foundations of a neutral image, creating tonal relationships by determining which areas of an image become light and which are dark. While this process can generate some localized effects (all blues become darker or lighter), this is quite different than selectively lightening and darkening an image to accentuate existing tonal relationships (only select blue areas become darker or lighter). Selectively enhance a tonal structure after conversion, rather than before. Selective enhancement may yield dramatic results.
Here are two ways.


Insights Members can login to read the full article.
Email:
or Sign up

Color To Black & White Conversions – A Strategic Overview

Alignment XXIII


There are many ways to convert color images to black and white.
Here’s my preferred method.

1       Optimize Color

Start with an optimized color original; set black point, white point, and lightness; clear color casts; boost saturation to reasonably high levels; avoid clipping. Use Lightroom or Camera Raw.

2       Establish a Tonal Structure
Establish a tonal structure - the relative lightness and darkness of diverse image areas. For basic global conversions use Lightroom or Camera Raw. For advanced local conversions use dual adjustment layers – Hue/Saturation below Black & White.

(The primary goal of a black and white conversion is to set the overall structure of the tonal relationship in an image. During color to black and white conversions, you'll be tempted to perfect the lightness and contrast of an image. Resist this temptation, if it leads you to creating too much contrast, loss of shadow and highlight detail.)

3       Enhance Global Lightness and Contrast
Enhance global lightness and contrast, the relative relationships of tone, after you establish the tonal structure, the fundamental tonal relationships. Use Curves.


Insights Members can login to read the full article.
Email:
or Sign up

Converting Images to Black and White in Lightroom 4 – Julianne Kost


“In this episode of The Complete Picture Julieanne demonstrates the best way to convert images to Black and White in Lightroom as well as how to save presets to increase your productivity.  Click here to download the presets discussed in the video. Note: although this video was recorded in Lightroom, the same techniques are available in Adobe Camera Raw in Photoshop CS6.”
Read more with my B&W ebooks.
View more in my DVD B&W Mastery.
Learn more in my B&W Digital Printing workshop.

Top 5 Ways To Add Color To B&W


Colorless black-and-white images are beautiful, but sometimes it’s nice to add a little bit of tone. By adding color to your b&w photos, you can enhance their expressive qualities.

These days, you can add color to your black-and-white digital images in virtually unlimited ways. Sure, the choices before you can be dizzying. Fortunately the techniques are simple, and the experimentation process for determining which tone qualities work with specific images is easy and fun. Here are five go-to ways for bringing color back into monochrome images in Adobe Photoshop.

1 Colorize With Hue/Saturation

2 Split Tone With Curves

3 Restore A Percentage Of Original Color

4 Add Color By Hand

5 Selectively Tone With Masks


For all the details visit PopPhoto.com.

Read more in my Black & White lessons.
Learn more in my digital photography and digital printing workshops.

Epson Advanced B&W Photo

Black and white printing presents several significant challenges; the ability to produce a neutral color, the ability to maintain that neutral appearance under different light sources (reduced metamerism), the ability to attain graybalance (consistent color throughout the entire tonal scale); the ability to achieve a very dark black (high Dmax) without sacrificing shadow detail (low dot gain), and longevity. All of these things are now easily attainable.

Black and white inkjet printing has come of age. In past years, there have been many compelling solutions for making black and white prints with inkjet technology; some have been fraught with problems (third party quadtone ink sets clog easily) and others have been expensive (ColorByte's ImagePrint RIP). Today, superior quality inkjet printing is both affordable and easily achieved.


Insights Members can login to read the full article.
Email:
or Sign up

Try Setting Your Camera to Preview in B&W


Many people find it easier to see composition in black and white. If you’re one of them, try setting our camera’s preview to black and white. When you do this, seeing line, shape, form, and relative light and dark relationships may become easier. Doing this will also help you get a better sense of how an image will look in black and white. Remember though, the saturated hues in your image can be converted to black and white as either light or dark, so the relative tonal distribution of your image is quite fluid – and seeing the hues in the image (whether with your naked eye or on the camera’s LCD) will inform you how fluid you can expect it to be, where it will be fluid and where it won’t.
Setting your camera’s preview to black and white will only affect the JPEGs your camera creates; your Raw files will still be in full color.
Find more digital photography online resources here.
Learn more in my Digital Photography Workshops.