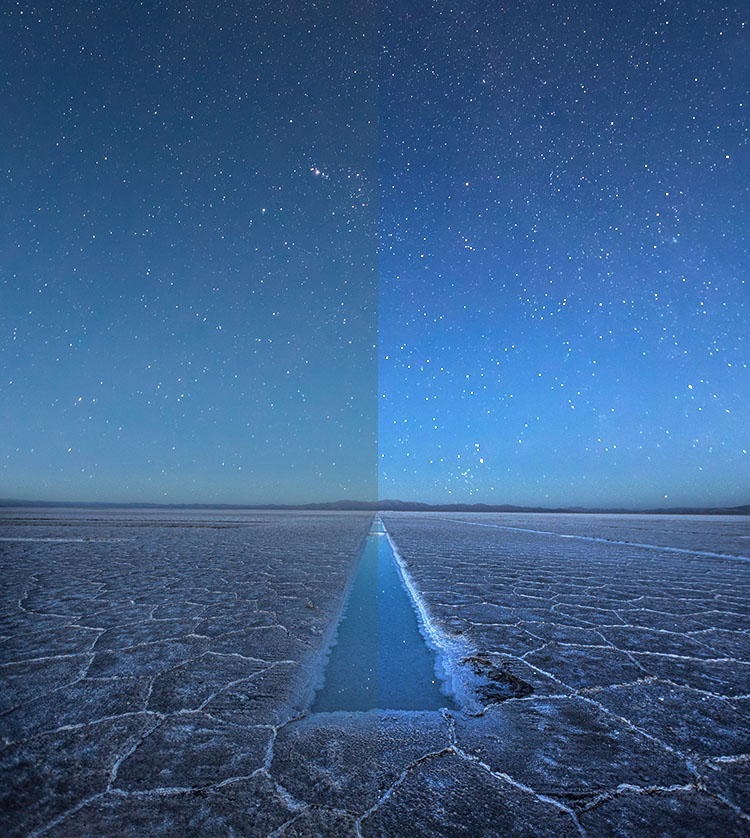
How To Use Simultaneous Contrast To Make Colors Even More Lively

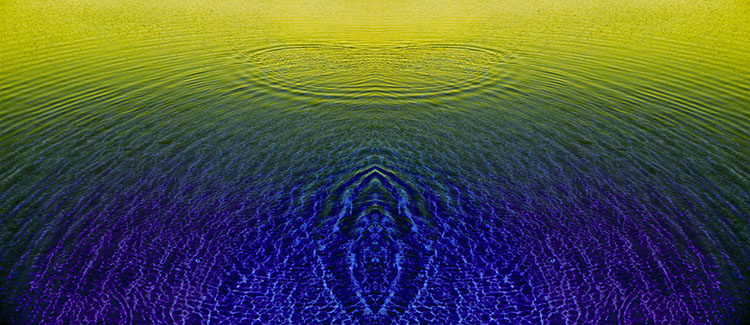
Composed of two complementary color families (yellow and blue); one is light and the other dark, while one is warm and the other is cool. Together, they increase each other's intensity.

Simultaneous Contrast

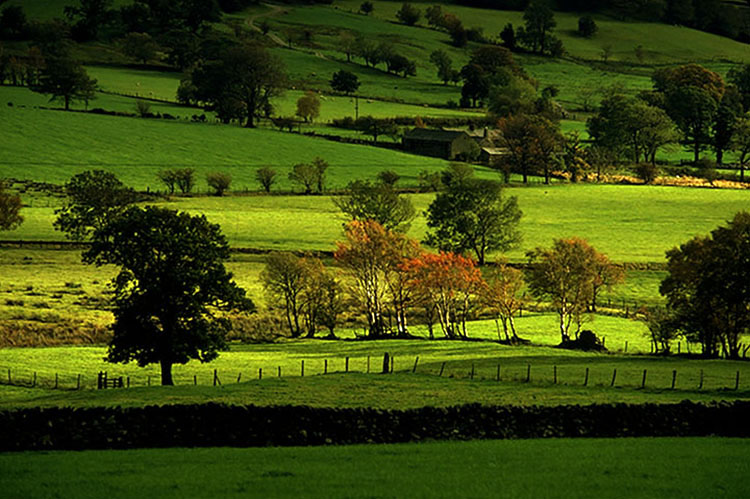
You can make a color appear more lively by changing it or by changing the colors around it. Even though it remains unchanged, we see it differently. Color context can be almost as important as individual color.

These effects are part physics (measurable qualities of light), part biology (what our brains do to enhance information to better perceive the world), and part psychology (our subjective responses). While the phenomena and our responses to them are complex, we can use a few simple dynamics to produce striking effects.

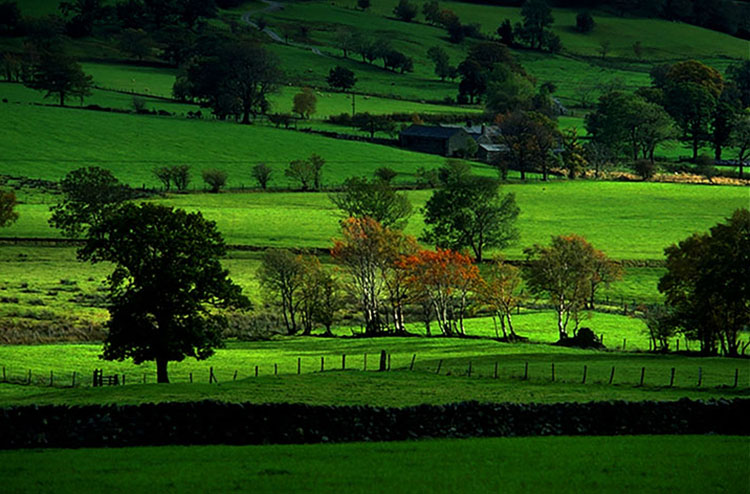
The colors in the center are the same but appear different because of the colors that surround them.

A lighter surround makes a color appear darker - and vice versa.

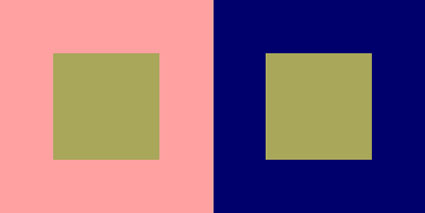
A warmer surround makes a color appear cooler - and vice versa.

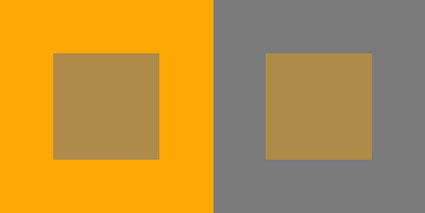
A saturated surround makes a color appear more neutral - and vice versa.

Find more on Simultaneous Contrast and Color Theory here.

3 Types Of Contrast

Luminosity, hue, and saturation, the three elements of color, offer three types of contrast to choose from.

Changes in luminosity make colors feel lighter or heavier.
Use Curves. How To Master Color Adjustment With Curves

Changes in hue bring warm and cool associations with them.
Use Curves. 4 Ways To Enhance Color Temperature In Your Images

Changes in saturation increase or decrease vibrance.
Use Saturation and/or Vibrance. How To Master Saturation In Your Images

All three, either individually or collectively, can make a color appear nearer or farther away.

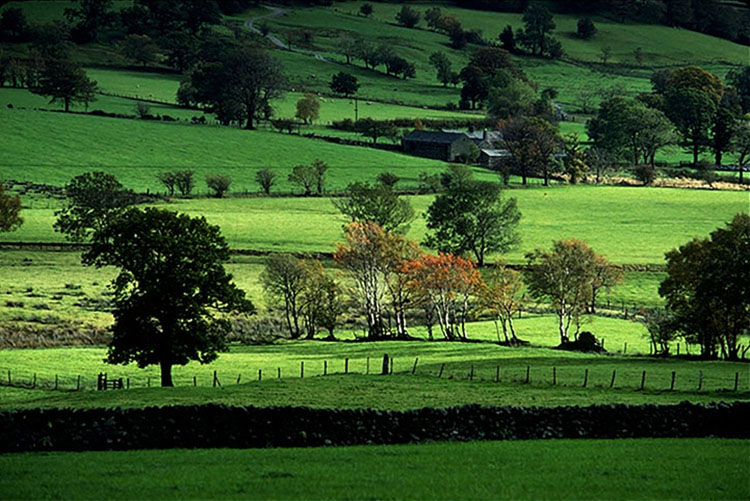
Atmospheric perspective enhances the illusion of depth; lighter, warmer, more saturated colors appear closer.

Sometimes, you want to select the element you change carefully to create a specific effect.

Other times, you just want separation, and any kind of contrast will do. For maximum effect, change all three elements as much as you can while still maintaining a realistic appearance.

Nearby, Adjacent, Surrounding


Insights Members can login to read the full article.
Email:
or Sign up

The Key To Lively Images – Midtone Contrast – And How To Get It

Contrast catches the eye. When looking at images short of an exciting subject and a dynamic composition, nothing does more to grab and hold attention. More contrast, more energy. Contrast is life.

Contrast is not as simple as one slider – thankfully. There’s real control here and so near infinite creative possibilities. Equally beneficial for both black-and-white and color images, there are many ways to enhance contrast, and every tool produces different qualities of life. Master these tools, and you’ll craft visual statements that speak with more confidence and complexity.

Let’s move through our options as we would in a classic workflow, from coarse to fine control.


Insights Members can login to read the full article.
Email:
or Sign up

Explore The Emotional Possibilities Of 3 Different Tonal Keys In Images

Want more mood in your photographs? One way to do this is to limit images to a single tonal range and focus more on the emotional associations it offers.

Luminosity is often divided into three broad ranges; shadows, midtones, and highlights. If the tonalities in images are predominantly from one of these ranges, they are often described as low-key or high-key. (Curiously, the words medium or mid-key are less frequently used, but it is useful to make this distinction.) By constraining an image to one of these three, you can set a specific mood.

High keys are light and airy.

Medium keys are moderate and balanced.

Low-key images are dark and heavy.

Pursue this a little further by listing as many specific emotions that you feel are related to each of these, and you’ll get a sense of how many shades of expression you’ll be able to explore when you identify them. Read More

How To Avoid Making Viewers Squint At Your Images To See Their Highlights

Highlights are crucial to most images, with a few notable exceptions. If highlights are too dull, the whole image feels flat and suppressed. So, many people try to make them as bright as possible without losing detail. (This is a classic practice that’s part of a style, but some photographers prefer even fuller highlights. Edward Weston and Minor White were two such photographers.) In an attempt to make their images glow more, some people go so far as to make images overly bright, washing out midtone contrast, saturation, and clipping highlights, removing detail at the very top of the tonal scale and producing flat white areas. This is a graphic style more than a photographic style – or at best lo-fi rather than hi-fi solution that often requires additional compromises to image quality to feel convincing. Plus, it renders the frame no longer rectangular.


Don't take ETTR to an extreme.


Do make your exposures light without clipping.


Process your files darker.


If you've got clipping in both shadows and highlights, use HDR bracketing.

Exposure

Good highlight detail starts with exposure. Get it. You have to have it to optimize it. This is one of the two reasons to monitor your histograms during exposure; the other is shadow detail. As long as you don’t “hit the wall” on the right-hand side of the histogram, your file will be fine. Remember, the histogram on your camera is based on the JPEG your camera would produce, while the as yet unrendered Raw file has even more data in the highlights. Don’t take ETTR (expose to the right) to an extreme. At some point, data will be clipped, and just before the point data starts to clip, it will start to lose gradation and shift in color.


Basic Panel


Parametric Curve and Point Curve

Processing

You’ll get more contrast by having something to contrast with; in this case, highlights contrast with shadows. Set them first. The darker shadows are, the more contrast you’ll get. (Losing shadow detail is avoided in a classic style but may be done intentionally for more graphic, gothic, or grunge styles.) Similarly, if you weigh midtones lower, highlights will appear brighter. Every range of tones (shadows, midtones, and highlights) can have its own kind of contrast. To produce more separation in highlights, focus on setting the point where they transition into midtones as low as possible without making the image look too dark. What’s too dark? Subjective. Trust your gut and do it your way.


Insights Members can login to read the full article.
Email:
or Sign up

One Simple Way To Make Photoshop’s Go To Filter High Pass Even More Useful

Indispensable, Photoshop’s High Pass filtration offers contrast and detail enhancement effects no other tool does. Some tools get close, but they’re not the same. 

(Read Curves, Clarity, Dehaze, High Pass, Texture and Sharpening Compared.)

High Pass filtration slip streams between detail enhancement or sharpening (at a low setting) and luminosity contrast adjustment (at a high setting). The two are intimately tied to one another and the difference is really just the granularity that the contrast is applied with. At a low setting High Pass filtration accentuates contrast along contours with a thin feathered line, while the flat gray areas surrounding contours on the high pass layer tend not to accentuation texture or noise. At a high setting High Pass filtration creates stronger contrast so broadly feathered that it creates a localized vignetting effect, accentuating the illusion of volume in the process.

(Read more here on How To Apply High Pass Filtration.)

The intensity of either or both of these high pass effects can be accentuated by adding more contrast to the high pass layer with Curves. Unlike raising the High Pass filter slider while you apply it, which increases the width of the lines on it, increasing the contrast of the layer with Curves does not; it simply makes the lines darker and the haloes brighter.

Take these steps ...


Insights Members can login to read the full article.
Email:
or Sign up

6 Ways To Get Better Shadow & Highlight Detail In Your Photographs

You want your photographs to glow - right? So what’s better than one kind of glow? How about three?

You can get there by not succumbing to the classic temptations to clip shadows and/or highlights to produce a more obviously dramatic but a less lively, nuanced, and expressive tonal scale. Instead, hold the full dynamic range with a real black and white and also create gorgeous separation in the values nearest to them.

So many times we give the lion’s share of the contrast to the midtones. Midtone contrast is really important. But that doesn’t mean we have to sacrifice the light in highlights by making them too hot to look at comfortably or in shadows making them so dark they turn to murky mud. You can hold separation in these extreme ends of the tonal scale and produce beautiful qualities of light that complement not just contrast. Here’s how.


Insights Members can login to read the full article.
Email:
or Sign up

Use HDR Techniques To Get The Best Image Detail

Download your free copy now!


Use high dynamic range techniques to capture detail in highlights and shadows even in scenes with extreme contrast.


Why Everybody Needs HDR … Sometimes | Coming Soon

What In The World Is HDR ?

What Is Exposure Value ?

Using Histograms – ETTR

Why Your Camera’s Auto HDR Feature Is Inferior 

How To Set Your Camera To Auto Bracketing 

How Many Exposures Do You Need For HDR Merges ? 

Making HDR Merges Is A Four Step Process

5 Photoshop Tools To Make The Most of Shadows & Highlights Without HDR

3 Ways HDR Software Can Benefit Single Exposures | Coming Soon

Using HDR Software To Sharpen Photographs

HDR With One Exposure

HDR With Two Exposures

HDR with Lightroom | Coming Soon

HDR With Photoshop | Coming Soon

HDR Panoramas | Coming Soon

Refine HDR With Photoshop Layer Blending | Coming Soon

7 HDR Artifacts & How To Avoid Or Cure Them 

8 HDR Myths Debunked 

Quick Answers To The 5 Most Asked HDR Questions 


Enhancing Local Contrast In Black & White Images

AntarcticaLIV_after_425

After

AntarcticaLIV_before_425

Before

Color to black and white conversions are radical transformations of an image. They establish the tonal foundations of a neutral image, creating tonal relationships by determining which areas of an image become light and which are dark. While this process can generate some localized effects (all blues become darker or lighter), this is quite different than selectively lightening and darkening an image to accentuate existing tonal relationships (only select blue areas become darker or lighter). Selectively enhance a tonal structure after conversion, rather than before. Selective enhancement may yield dramatic results.
Here are two ways.


Insights Members can login to read the full article.
Email:
or Sign up

Developing Your Sensitivity to Gradation

reflection_saltlake

The engine that drives color dynamics, contrast, is a measure of the difference between colors. Contrast can be measured by both the amount and kind of difference between colors.

You can discuss contrast in terms of amount. There can be a lot or a little. You can move between two very different colors (i.e. from black to white) or two similar colors (i.e. from dark gray to light gray).

You can discuss contrast in terms of how transitions between colors are made. There can be many (fine) or few (coarse) steps in-between colors. (Having many steps in between contrasting values is an essential criterion for continuous-tone imagery.)

You can discuss contrast in terms of how transitions progress. The steps in between can be made in a regular (even) or irregular (uneven) manner.

If contrast brings variety and energy, ask yourself what kind of energy you seek. Just as each color often elicits a set of associations, so to does each type of contrast.

High contrast images are often thought of as dramatic, while low contrast images are often thought of as quiet. Images, where transitions are made with many steps, are considered smooth, while those with only a few are considered abrupt. When gradations transition evenly they seem calm, graceful, and can be navigated quickly, while when they transition unevenly they seem dynamic, syncopated, and take more time to navigate. There are many subtle distinctions that can be made within these broad generalizations. This is an area that rewards continued exploration.

Sharpen your eye, by developing the ability to identify both the amount and quality of contrast between colors. You’ll find this to be an extremely valuable skill. You’ll increase your sensitivity to color, expand the range of color choices available to you, and add strategies for meeting color challenges. Color will become more intense and pleasurable for you.

intervals_1hue_variL

Luminosity intervals of one hue. Hues achieve maximum saturation at specific luminosities.

intervals_1H_variS

Saturation intervals of one hue – luminosity and hue stable. Achievable only for mid-level luminosities.

intervals_variH_maxS

Hue intervals – maximum saturation, luminosity shifts. Hues achieve maximum saturation at different luminosities.

intervals_variH_1L

Hue intervals – luminosity stable, saturation shifts.

intervals_compsthruS

Hue intervals between two complementary hues passing through the color wheel.

intervals_compsthruH

Hue intervals between two complementary hues passing around the color wheel.

gradation_exercise

Try These Exercises.
1            Create a set of equal luminosity intervals of one hue.
Optionally, repeat for all hues – ROYGBIV.

2            As above, create equal intervals of hue.
Optionally, repeat for all hues – ROYGBIV.
Optionally, repeat for all hues at different luminosity levels.

3            As above, create equal intervals of saturation.
Optionally, repeat for all hues – ROYGBIV.
Optionally, repeat for all hues at different luminosity levels.

4            Match the intervals (luminosity, hue, and saturation) between two color progressions.

Because it’s difficult to separate other forms of image content from color, color exercises are best performed abstractly. While it’s useful to check numerical values for colors and color relationships, because these exercises are perceptual (often incorporating physiological and psychological responses that are not physically measurable), determine your answers visually. Train and trust your eye.

Read more Color Theory.
Learn more in my digital photography and digital printing workshops.