How To Adjust Your Prints For The Light They Will Be Viewed In

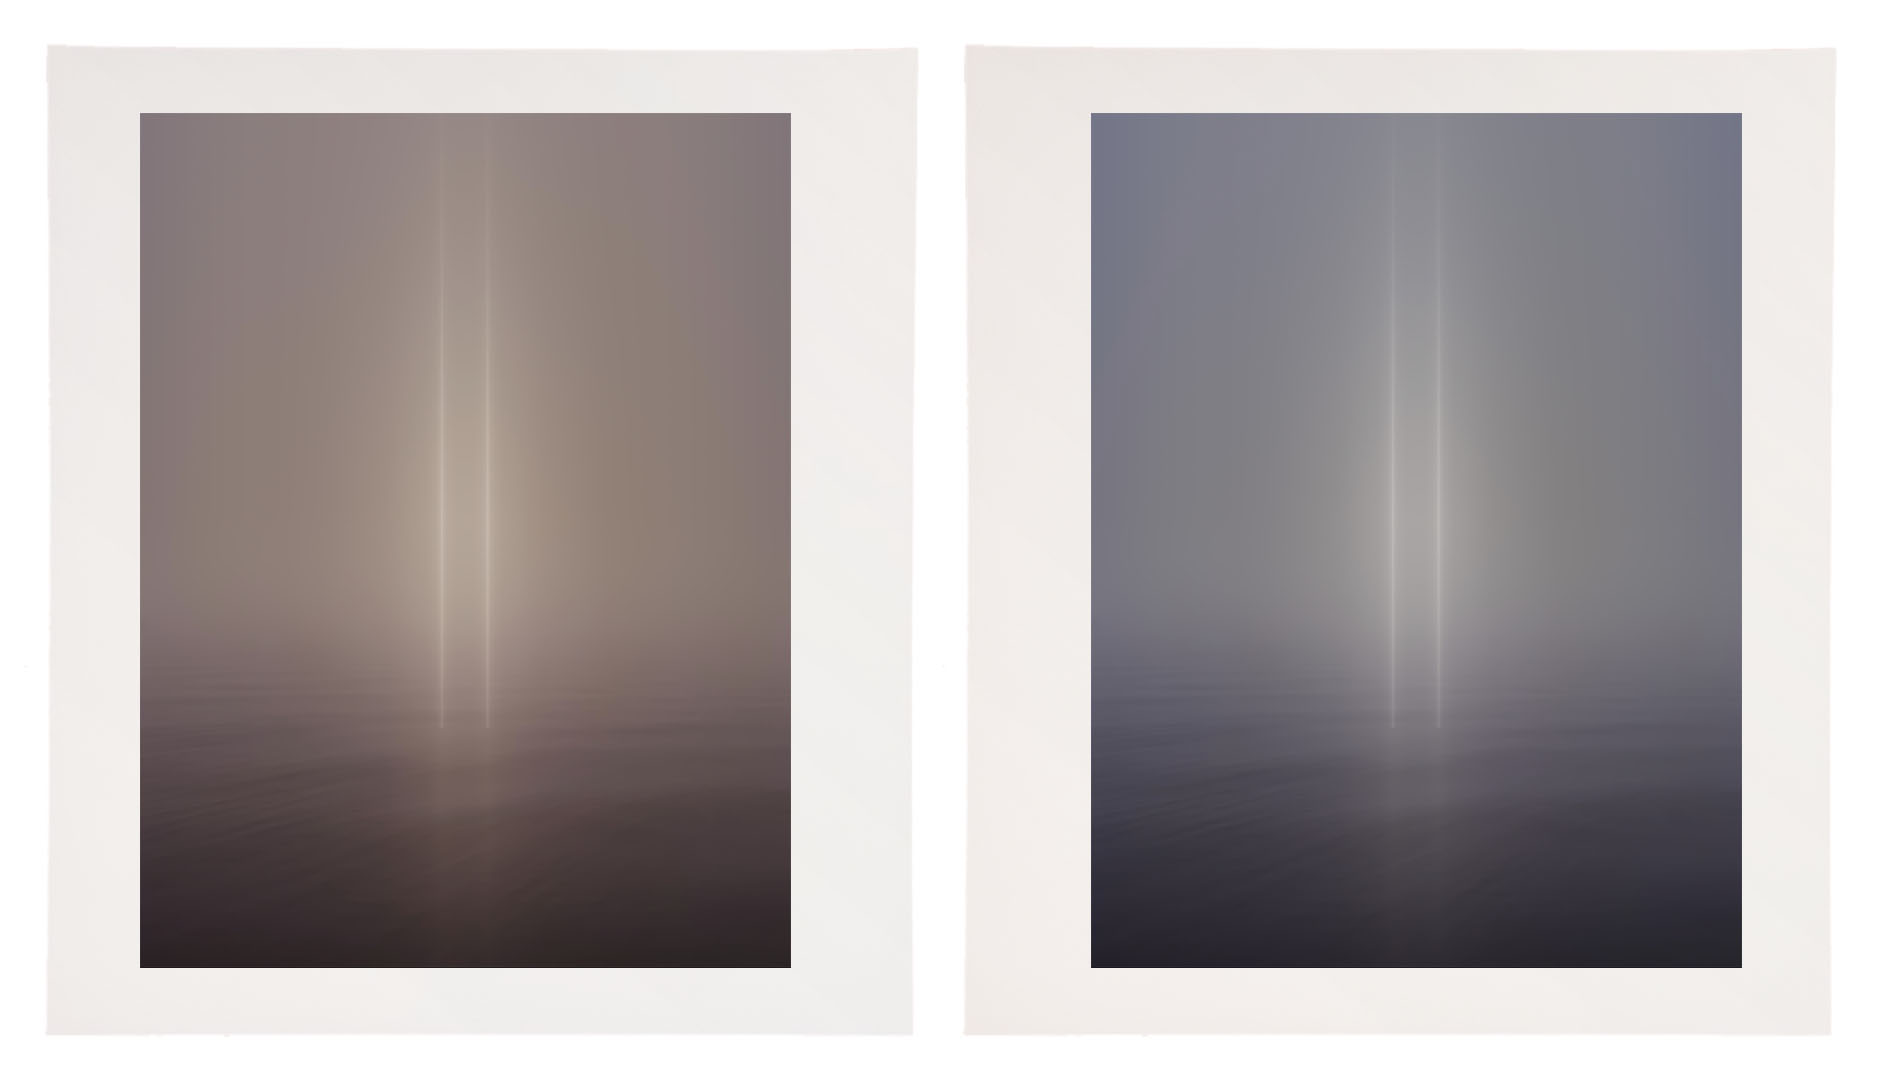
A print printed with a 5000K profile viewed under a warmer light temperature (left)
and a print with a compensating cooling adjustment (right).


The vast majority of printing profiles are optimized for a viewing light temperature of 5000K. Yet, the final viewing light temperature for most prints is rarely 5000K.

What light temperature are most prints viewed under? In galleries and museums, the standard tends to be halogen or LED with a similar temperature (3800K). In most homes, you’ll typically find a mix of tungsten (2900K) and daylight (5000K); the mix depends on placement and the time of day.

If you proof under 5000K light, the color of the final print will shift when viewed under a different light temperature. If you use a printing profile optimized for 5000K and your prints are viewed under a different light, the final viewing light, they will appear to shift color. If you proof under a light temperature similar to a final viewing temperature other than 5000K then the softproof on your monitor will appear less accurate.

What can you do?

You could edit the printing profile you’re using, but this requires special software and the expertise to use it. It’s more practical to use an existing profile optimized for 5000K and compensate during the printing process for the discrepancy in viewing light temperature. This requires some initial proofing. To do this, use an image that contains a variety of colors; include neutrals that make color shifts very apparent. Proof the image. Evaluate the proof under the light temperature that the final print will be viewed in. Next, apply a color adjustment to compensate for the apparent shift in color caused by your chosen viewing light temperature. For instance, if you’re printing for a typical viewing light, between 3500K and 4000K, warmer than 5000K, you’ll most likely be adding a little cyan and a touch of blue (I’ve had more success using Curves than White Balance) to compensate for the warming influence of the lower light temperature. It may take a few proofs to get it right. But once you compensate for this color shift precisely, you can use that correction for all of the other prints you make, regardless of inkset or substrate. Use a preset, an action, or an adjustment layer, as you like.  This adjustment will work every time,  as long as your standard viewing light temperature doesn’t shift,

Then, take the extra step of recommending a viewing light temperature to venues that display your prints and customers who purchase them.


Explore more Printing resources here.

Learn more in my digital photography and digital printing workshops.

Viewing Light – SoLux


Good light makes your prints appear even more beautiful. Get good light. It’s one of the most essential elements in any photographic image, at the point of capture, during processing, and at the point of display.

SoLux (www.solux.net) makes good light. SoLux bulbs’ Color Rendering Indexes (rating used to describe the quality of light) are 99 on a scale of 100. All SoLux bulbs are full smooth spectrum and ultra low UV and IR. SoLux bulbs come in a variety of color temperatures – 3500K, 4100K, 4700K, and 5000K. SoLux bulbs come in a variety of beam angles – 10-36 degrees. Low voltage (12 volt), SoLux bulbs fit in standard MR-16 2 pin socket fixtures and adaptors are available for regular screw in fixtures.

While light has many important qualities, two are particularly significant; temperature and spectral power distribution.

Most prints are viewed under light temperatures warmer than 5000K, typically a mix of tungsten (2800K) and daylight (variable). Galleries and museums favor halogen (2900K). Studies suggest that more people prefer viewing artwork under higher color temperatures (3500K).

A majority of artificial light sources, including fluorescent, metal halide, and LEDs, have an uneven distribution of colors. Graphs of light sources with uneven spectral distributions display spikes in specific regions of the spectrum. Spikes limit the number of available colors in a spectrum to discern an object’s color. Due to missing colors in between spikes, objects may look dull or gray. When a spectrum is uneven, hues that are found in elevated levels appear brighter while hues that are found in low levels appear duller. Spikes create an imbalance in the relationships between hues. When possible, avoid lights that have them.

Incandescent light contains large amounts of yellow, orange, and red light. Though not as extreme, halogen suffers from the same tendencies. Cool white fluorescent light may produce a white that is cooler in appearance, but all fluorescent lights have uneven spectral distributions.

How important is viewing light? Very. To many, at first glance, the differences may seem subtle. To truly appreciate the differences you need a side-by-side comparison of the same or identical objects in spikey and smooth spectrum light sources.

The curators of the Van Gogh Museum (Netherlands) visited their traveling collection while it was on display at the National Gallery of Art (US). “What have you done with our paintings?” they exclaimed. They thought they had been cleaned. “Nothing.” was the reply. The real answer was in the light – SoLux. Under full-spectrum light sources the paintings appeared significantly brighter, clearer, and more saturated. The Van Gogh Museum now uses SoLux bulbs. More and more museums are beginning to use SoLux bulbs as well.

I use SoLux 3500K bulbs for my studio and gallery. I evaluate and display prints under the same light, one that most closely approximates the display conditions prints are most likely to be viewed under. I use four SoLux Gooseneck fixtures for portable light sources; two with 3500K bulbs to evaluate display conditions and two with 5000K bulbs to evaluate color management issues (calibration, softproofing, and profiles).

I recommend to owners of my prints that they strongly consider using 3500K SoLux bulbs for display and viewing.
To see, you need light. So it stands to reason that the light you view your prints in is extremely important. All lights are not created equally. For the best results, choose a high-quality light source.


SoLux bulb

Spectral curves comparing 3500K halogen (yellow) and SoLux (red)

Spectral curves for 5000K fluorescent gti lightbox (blue) and SoLux (red)
Visit www.solux.net to find out more about their products and light (there are excellent resources there on the science of light).
Contact Phil Bradfield – phil@solux.net or 800-254-4487.

Read more on Color Management here.

Read more on digital Printing here.

Learn more in my digital photography and digital printing workshops.