The Key To Lively Images – Midtone Contrast – And How To Get It

Contrast catches the eye. When looking at images short of an exciting subject and a dynamic composition, nothing does more to grab and hold attention. More contrast, more energy. Contrast is life.

Contrast is not as simple as one slider – thankfully. There’s real control here and so near infinite creative possibilities. Equally beneficial for both black-and-white and color images, there are many ways to enhance contrast, and every tool produces different qualities of life. Master these tools, and you’ll craft visual statements that speak with more confidence and complexity.

Let’s move through our options as we would in a classic workflow, from coarse to fine control.


Insights Members can login to read the full article.
Email:
or Sign up

One Simple Way To Make Photoshop’s Go To Filter High Pass Even More Useful

Indispensable, Photoshop’s High Pass filtration offers contrast and detail enhancement effects no other tool does. Some tools get close, but they’re not the same. 

(Read Curves, Clarity, Dehaze, High Pass, Texture and Sharpening Compared.)

High Pass filtration slip streams between detail enhancement or sharpening (at a low setting) and luminosity contrast adjustment (at a high setting). The two are intimately tied to one another and the difference is really just the granularity that the contrast is applied with. At a low setting High Pass filtration accentuates contrast along contours with a thin feathered line, while the flat gray areas surrounding contours on the high pass layer tend not to accentuation texture or noise. At a high setting High Pass filtration creates stronger contrast so broadly feathered that it creates a localized vignetting effect, accentuating the illusion of volume in the process.

(Read more here on How To Apply High Pass Filtration.)

The intensity of either or both of these high pass effects can be accentuated by adding more contrast to the high pass layer with Curves. Unlike raising the High Pass filter slider while you apply it, which increases the width of the lines on it, increasing the contrast of the layer with Curves does not; it simply makes the lines darker and the haloes brighter.

Take these steps ...


Insights Members can login to read the full article.
Email:
or Sign up

6 Ways To Get Better Shadow & Highlight Detail In Your Photographs

You want your photographs to glow - right? So what’s better than one kind of glow? How about three?

You can get there by not succumbing to the classic temptations to clip shadows and/or highlights to produce a more obviously dramatic but a less lively, nuanced, and expressive tonal scale. Instead, hold the full dynamic range with a real black and white and also create gorgeous separation in the values nearest to them.

So many times we give the lion’s share of the contrast to the midtones. Midtone contrast is really important. But that doesn’t mean we have to sacrifice the light in highlights by making them too hot to look at comfortably or in shadows making them so dark they turn to murky mud. You can hold separation in these extreme ends of the tonal scale and produce beautiful qualities of light that complement not just contrast. Here’s how.


Insights Members can login to read the full article.
Email:
or Sign up

How To Make Your Images More Expressive With Adobe’s Color Grading

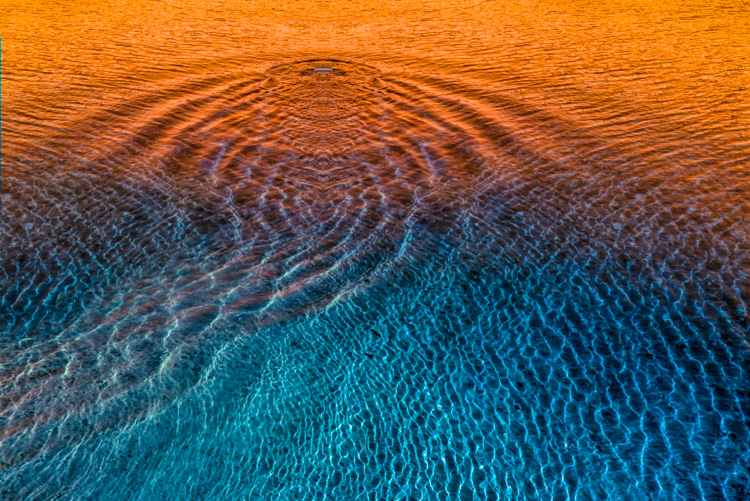
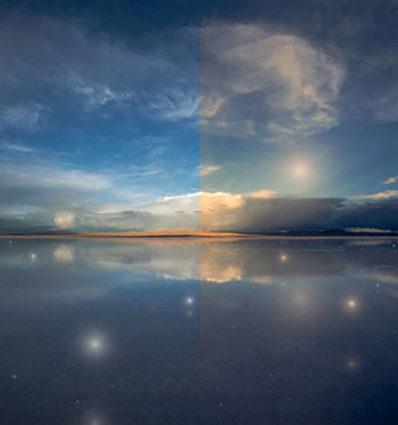
There was a time when color crosses were thought of as poor form, as so many were struggling to remove color casts consistently and accurately while managing the inaccuracies inherent in analog color photographic media. When you saw these kinds of effects, it was hard to ascertain whether the artist was not in control of their craft or insensitive to color or whether they deliberately deviated from the norm. But over time color effects like these have become celebrated both because their differences catch the eye, standing out amid a sea of images, and for their expressive capabilities. What used to require time-consuming chemical processing became quicker and easier digitally. Now there’s a new tool that makes it even easier and allows you to make these kinds of color choices more intuitively - Color Grading.

What Is It

Color Grading is the new Split Toning in Adobe Lightroom’s Develop and Photoshop’s Camera Raw processors. Color Grading offers major improvements including global, control, midtone control, blending sliders, luminance sliders, and the addition of color wheels for a more intuitive interface.

It’s Backwardly Compatible

Don’t panic. All of the Split Toning adjustments you’ve made with previous versions will be compatible with this improved tool if you choose to update files processed with older versions. The sliders will automatically be set new settings that generate the same results. All new controls (midtone, global, luminance) will be set to zero. Blending will be set to 100. You can also make the new tool behave like the old tool by setting Blending to 100 and moving only the hue and saturation of shadows and highlights.

How To Use It

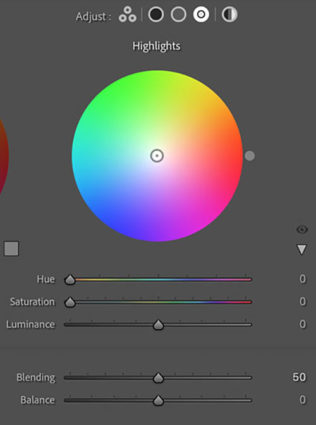
Accessed by clicking the five circles to the right of word Adjust at the top of the panel, you can choose the way you view the Color Grading tool. It’s likely you’ll spend a majority of your time in the first panel (3-Way), which condenses into one panel the next three panels (Shadows, Midtones, Highlights). The larger view of these separate panels offers only one additional feature, the ability to use the Custom Colors swatches to apply preselected colors or sample colors within an image. The fifth and final panel Global adds color to all values equally, for finishing touches rather than the grand effect.
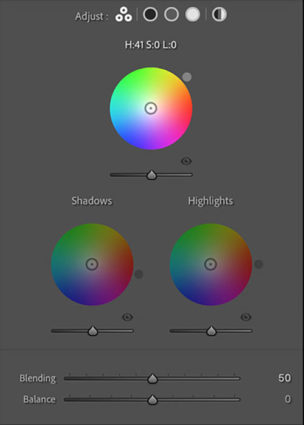
Color Wheels

The most eye-catching part of the new interface may present the biggest learning curve for those who have not used color wheels before but once you try it a few times you’ll find it’s incredibly intuitive.

Move the circle from the center of the color wheel towards the color you want to add, increasing saturation the further away from the center you go, and you’ll see the Hue and Saturation sliders move as you do. Rather than rendering them useless, they become fine control. The second circle on the edge of the wheel moves Hue only and is redundant but perhaps more intuitive to use. The Luminance slider affects brightness for the tonal range you’ve selected, but you’ve got to ask yourself why you wouldn’t use the more precise Tone sliders in the Basic panel. The Luminance slider is fine for some occasions, (It’s great for quickly lifting blacks or lowering whites so they’ll show color effects in ways that pure black and pure whites will not.) but don’t trade convenience for exceptional results.
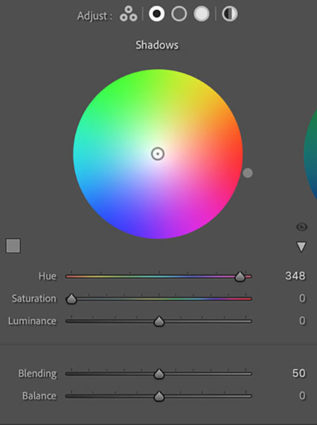
Balance & Blending

The Balance and Blending sliders both control how the color you add fades into surrounding luminance values. What’s the difference? Balance places the middle of the transition while Blending affects how short or long it is. Blending sets whether the transition is short (Set low it affects fewer surrounding values thought the transitions it makes are still smooth.) or long (Set to 100 it’s capable of affecting all values but not equally.) Be careful setting both Balance and Blending high; you can create curious color cross-over effects.

You’ll find that the Blending setting will affect the saturation of your color choice significantly. A higher Blending setting with less saturated color allows more of the image to be affected less intensely. A lower Blending setting with a more saturated color affects less of the image more strongly.
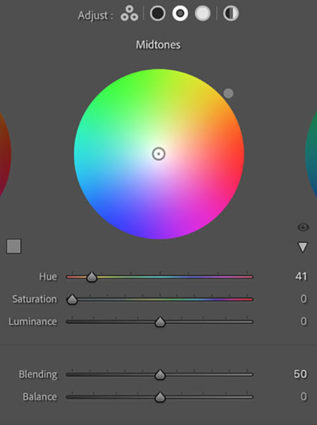
Midtone Control

One of the game-changing features of Color Grading is the ability to add a third color into the midtones, one that is different from the color added into the shadows and different from the color added into the highlights.

Global Control

You might think it strange to add Global Control to a tool designed to affect select levels of luminosity, but once you try it you’ll find it very useful, often as your last stop in this panel. The addition of an overall color effect frequently helps unify the disparate effects added into shadows, midtones, and/or highlights.
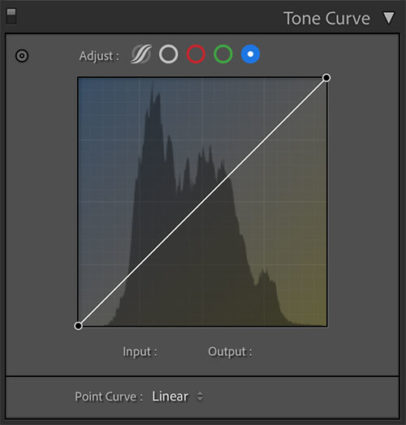
Curves

Color Grading’s interface is much more intuitive and direct than Tone Curve’s. Nevertheless, with a little more work, you can get very similar and even identical effects to Color Grading by using Tone Curve’s Red, Green, and Blue Point Curve feature, which allows you to add color into shadows, midtones, and highlights and control the blend of these effects into one another. I tend to use the Curve for its precision and often further refine Color Grading effects with it; the two are not mutually exclusive. But, you can get even stronger effects with Tone Curve than you can with Color Grading. So if you find yourself using these kinds of Color Grading effects frequently, you owe it to yourself to also see what you can also do with the Tone Curve panel.

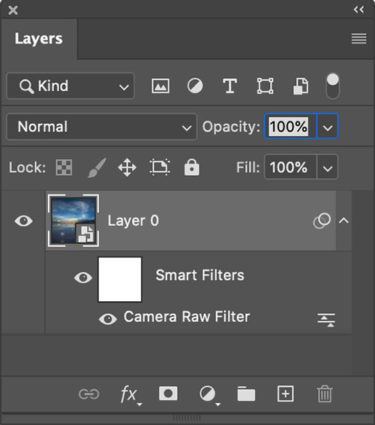
Use Photoshop's smart filters to apply Raw adjustments locally

Apply It Locally

Color Grading is a global effect, that is it will affect all shadows, midtones, and highlights equally – unless you apply it as a Camera Raw smart filter in Photoshop. If you do this, you can mask the Color Grading effect to apply it to any portion of an image in any percentage you choose and away from other portions.

Color Strategies

Before you apply Color Grading make your Basic adjustments first, setting black and white points, brightness, midtone contrast and white balance. How you set these things will change the subsequent settings you use in Color Grading. There are always exceptions but, usually, you’ll want to clear any color casts as a more neutral base will show Color Grading effects with fewer color influences and you can do more with less. Black and white images show Color Grading effects most quickly and even a tiny bit of color can produce significant differences.

Here are five strategies for applying Color Grading.


Insights Members can login to read the full article.
Email:
or Sign up

The Art Of Color Adjustment

Download your free copy now!


The power of color offers you extraordinary creative capabilities and you’ve never had more control than today.


Strategies


Infinite Variations
The possibilities are almost limitless. Explore your options before you commit to a solution.

Use Presets To Find Variations Quickly
Speed your workflow and visualize many possibilities for your images.

Why Achieving Neutrality In Your Images Is So Important
Make your color more believable, saturated, and three-dimensional.

4 Ways To Achieve Neutrality
How you achieve neutrality sets the foundation for future color moves.

How To Key Your Images Expressively – Go High, Medium, Or Low
Set the mood for your images with tonality.

The Key To Lively Images –  Midtone Contrast – And How To Get It

6 Ways To Get Better Shadow & Highlight Detail
Increase separation in the darkest and lightest values.

5 Tools You Can Use To Make The Most Of Shadows & Highlights Without HDR
You can extend the dynamic range of your images without bracketing exposures.

How To Avoid Making Viewers Squint At Your Images To See Their Highlights
Preserving detail and setting brightness are important first steps.

How To Render Lively Shadows

3 Qualities Of Light You Can Use To Make Your Images Glow

How To Use Simultaneous Contrast To Make Colors Even More Lively

9 Ways To Tell If Your Images Are Overcooked
Avoid these common mistakes.

Enhancing Space With Atmospheric Perspective  | Coming Soon

Deciding Where To Make Your Images Glow And How To Do It  | Coming Soon


Raw


What In The World Are Raw Files?
Dive in to the strange and wonderful world of Raw files.

Why You Should Shoot Raw
Get highest quality images from your digital camera.

Why You Should Profile Your Camera
Improve the clarity and saturation of the color your digital camera creates.

How To Get More Than The Maximum A Slider Allows
Get 150%,  200%, 500% or more out of sliders.

5 Reasons You Still Need Photoshop
1  Fine Retouching, 2  Precise Masking, 3   Advanced Color Adjustment, 4  Creative Sharpening, 5  Plug-Ins


Tools


How To Evaluate Color Adjustment Tools
Identify the go-to, exotic, and redundant tools.

Blend Modes
Make all of Photoshop’s color adjustment tools more precise.

Curves
It’s the most precise tool for adjusting luminosity and hue.

High Pass Contrast
Choose between planar contrast or edge sharpening.

Get Even More Out Of High Pass Contrast
Add Curves contrast to High Pass contrast.

Curves, Clarity, Dehaze, High Pass, Texture and Sharpening Compared
How do you choose between so many ways to control luminosity contrast?

Curing Dehaze Color Artifacts
Try this quick fix to eliminate Dehaze color artifacts.

Hue/Saturation & Vibrance & HSL Compared
They’re the most powerful tools for adjusting saturation.

White Balance, Photo Filter, Color Overlays, and Curves Compared
How do you choose between so many ways to control color temperature?

Selective Color
It makes very precise changes like no other tool.

Use LAB Color Mode To Increase Hue Contrast
Use LAB mode for greater hue separation.

Blending Channels
Use the information in one channel to improve another.

Adobe Camera Raw Filter
Using ACR on layers lets you use Photoshop’s precise masking with it.

Color Lookup
Color grading can give many images a similar look or individuals a unique one.

Color Grading
Make the color in your images more expressive with this easy split toning solution.

Gradient Maps
Add new color into specific ranges of luminosity.

Match Color
Transfer color from one image to another.

Synthetic Profiles
Make big changes non-destructively by redefining color values.

Before You Mask Use The Tool’s Selectivity | Coming Soon
The results are faster and sometimes better.

What You Can Do With Raw That You Can’t With Photoshop Unless … | Coming Soon
Adjust Raw files and individual layers with the most robust color adjustment feature.


Sign up for Insights for news of new content!

How To Master Saturation In Your Images

Saturation Is An Essential Key To The Success Of Your Images

One of the most distinctive features of a visual artist’s use of color is their use of saturation. When you think of Ansel Adams’ photographs, you think of neutral images rather than highly saturated ones. When you think of Matisse’s paintings, you think of supersaturated images rather than neutral ones. Think of your use of saturation as an essential element that will help you define your own signature style.
One of three elements of color (luminosity, hue, and saturation), saturation can give your images specific qualities of energy and light. Here are five things you can do with saturation: one, increase energy and impact; two, add complexity by revealing hidden hues; three, restore life to listless hues; four, calm colors that are distracting; or five, produce softer semi-neutral and pastel palettes.

Read more about Saturation here.

Together, Adobe Lightroom and Photoshop offer an impressive, almost overwhelming, array of possibilities for controlling saturation. Do three things before you choose a tool to adjust saturation with. First, understand and develop your eye for saturation. Second, adopt a consistent strategy for exploring the possibilities it offers your images. Third, understand the differences between the tools, both how they function and the effects they produce.

Know What To Look For

Knowing what to look for will help you choose a direction, a tool, and how far to go with it. It will also help you evaluate the results you produce – and quite possibly improve them further.


Insights Members can login to read the full article.
Email:
or Sign up

What Are The Differences Between Lightroom and Photoshop’s Curves, Clarity, Dehaze, High Pass, Texture, and Sharpening ?

20170206_ANT_yalourislands _458
Lightroom and Photoshop offer an impressive array of tools for adjusting an image’s contrast. At some point luminosity contrast adjustment tips over to affecting image detail (contour and texture) more than overall lightness. Deciding exactly how you want to affect lightness, contour, and texture is the key to deciding which tool to use and how to use it.

The following progression moves from the smoothest to edgiest tools – Curves, Clarity, Dehaze, High Pass, and Sharpening. The differences between these tools can be found in the way they handle frequencies of detail; low or smooth, medium or broad lines and moderate texture, and high fine lines and grain.

01_Curves

Curves

Curves creates the smoothest effects. It simply affects light and dark values. With it, you can fine tune the relationships between different values with unparalleled precision. Curves ignores texture and contours. If either is affected it’s simply because those areas are lighter or darker, not because they have been targeted. Along with contrast, Curves also boosts saturation somewhat. (If Curves is applied in Photoshop, this saturation shift can be removed by using a blend mode of Luminosity.)

02_Clarity

Clarity

Clarity offers the second smoothest effects. It pays significant attention to contours. The contrast it adds to contours is smoothed or broadly feathered. Think of it as a local vignetting, not for the frame, but for areas within contours. To make the effect more realistic, it darkens the dark side of contours more than it lightens the light side of contours edges, greatly reducing visible bright halos. Clarity makes images look clearer for two reasons; one, because the overall contrast appears to remove haze; and two, because the edge contrast makes images appear better focused or sharper. Clarity, particularly strong applications of it, will accentuate texture affecting medium frequency detail even more than high-frequency detail. Strong applications of Clarity will boost saturation significantly, which can be removed with the Saturation slider. Clarity does not exist in the Photoshop Image > Adjustments menu but can be applied in Photoshop with the Camera Raw filter.

03_Dehaze

Dehaze

Dehaze offers the third smoothest effects. It creates effects that are similar to Clarity, only stronger. Dehaze darkens shadows and rather than brightening the highlights it simply pulls out more separation by darkening the lower values in these areas. Strong applications of Dehaze may even reveal detail you can’t see with the naked eye. Dehaze affects larger areas of contrast, sometimes losing the ability to distinguish between smaller areas. While Clarity boosts saturation somewhat, Dehaze boosts it more and often creates color non-uniform shifts. (There is a cure for this, which I cover in a separate article.) Dehaze does not exist in the Photoshop Image > Adjustments menu but can be applied in Photoshop with the Camera Raw filter.

04_HighPass_High

High Pass High

05_HighPass_Low

High Pass Low

High Pass filtration drives contrast into edges. It produces significantly different effects at low and high settings. At low settings it affects contours most, only slightly affecting texture and having little or no effect on overall contrast. At high settings it produces localized vignetting similar to Clarity but with less feathering, making it an excellent tool for emphasizing planar contrast. Be careful, it does not have the halo suppression built into Clarity. Only high settings create saturation shifts, which are localized not uniform. Remove this by desaturating the layer you apply the filter to. The High Pass filter is only available in Photoshop and is usually applied on a duplicate layer set to a blend mode of Overlay.

Texture_4235

Texture

The Texture slider produces effects that lie between the Clarity and Sharpness sliders.

When compared to Clarity, the Texture slider does not increase saturation and it produces an effect significantly more targeted to edges. With little or no localized vignetting, it has less effect on overall contrast (Think of it as a micro-contrast.) and will not produce planar or volumetric accentuation. While it does produce more of an overall contrast effect than Sharpness, Texture is much more suited to detail enhancement. Think of it as a broader softer Sharpness rather than a finer edgier Clarity.

When compared to the Sharpness slider, the edge it produces is not as pronounced (It’s more feathered.) nor does it increase artifacts or noise as much. Texture increases or decreases apparent sharpness in mid-frequency detail. Its effects on smooth (low frequency) and fine (high frequency) detail are minimal. Think of it as producing an entirely different mask that removes effects from low and high-frequency detail rather than the one produced by Sharpening’s Masking slider that removes effects first from smooth areas and then gradually converges on edges at higher settings.

06_Detail

Sharpening

The Detail Panel’s Sharpening sliders aggressively target edges. It offers four sliders – Amount, Radius, Detail, and Masking. Amount determines the increase in contrast. Radius accentuates contours in thinner (lower setting) or thicker (high setting) areas. Detail targets the effects of the previous two sliders into lower (less texture) or higher (more texture) frequencies of detail. Masking creates a mask that removes the effects of the other sliders from smooth areas at low settings and from all areas but contours at its highest settings. These sliders produce no overall contrast effects and little to no saturation shifts. (These detail sliders don’t exist in the Photoshop Image > Adjustments menu. Photoshop’s filter Unsharp Mask offers identical Amount and Radius sliders but it lacks the Detail and Masking sliders. Instead, it offers a Threshold slider that allows you to remove the effect from adjacent areas that have less contrast than the Threshold you set.) These tools are the ultimate tools for accentuating texture and contour.

Experiment. Develop your eye for all of the possibilities these tools open up for you. You’ll be amazed by what they can do. And when you master them, your viewers will be amazed at how good your images look.

Read more on Color Adjustment here.

Learn more in my digital printing and digital photography workshops.

View test files with maximum applications of these tools below.
Read More

A Quick Cure For Dehaze Color Shifts With Photoshop

Dehaze_Color_Off

Without Dehaze

Dehaze_Color_Artifacts

Dehaze may create color artifacts

Dehaze_Color_Final

Color artifacts removed

Color without Dehaze blended with luminosity with Dehaze

Dehaze_Color_Layers

The top layer is set to a blend mode of Color

When you’re using Lightroom or Camera Raw, you’ll quickly find the Dehaze slider can produce marvelous contrast effects. Dehaze can dramatically exceed the contrast that can be produced with either Curves or Clarity. Sometimes it will reveal detail you couldn’t see with your eyes!

.
Often, there’s a price to pay for these great effects – color shifts. Neutral areas may turn magenta. Shadows may pick up strong blue or green casts. To make matters worse, these unwanted artifacts are rarely uniform, which makes them harder to fix.

.
If you’re lucky you can compensate by reducing Saturation after using Dehaze. When you do this, it’s likely that you’ll end up choosing the least objectionable version or making a compromise you’d prefer not to. Frequently, to avoid these side effects, you’ll be tempted to not to push Dehaze as far as you’d like to.
There is a cure that will help you go as far as you’d like, without producing color shifts. Render your image twice. First, render it with as much Dehaze as you’d like. Second, render it without Dehaze.

.
Then place the version without Dehaze in a layer on top of the version with Dehaze. Change the Blend Mode of the top layer to Color. This will give you a combination of the color of the top layer (without Dehaze’s color artifacts) and the luminosity of the bottom layer (with Dehaze’s contrast).

.
How do you make two layers from one Raw file?

.
If you’re using Lightroom, make a virtual copy and then double click on the Dehaze slider. Highlight the original file and the virtual copy and select Photo > Edit In > Open as Layers in Photoshop. Now in Photoshop, make sure to change the top layer’s blend mode from Normal to Color.

.
If you’re using Camera Raw, open your Raw file as a smart object, then select New Smart Object via Copy in the Layer menu, and finally double click on the top layer to return the Dehaze slider to 0. Remember, change the top layer’s blend mode from Normal to Color.

.
The technique of using the color of one layer to overlay another layer can be used for many applications. Here, it makes Dehaze even more useful.

.

Read more color adjustment resources here.

Learn more in my digital photography and digital printing workshops.

Resurrecting Detail In Challenging Images With Photoshop

WakeXII_2005_unblended

Before channel blending

WakeXII_2005_blended

After channel blending

Big problems call for big solutions. Blending channels is a powerful color adjustment strategy that can handle even the biggest challenges.
Color adjustment occurs by modifying the tonal structure of individual grayscale channels. Typically, the information within them is adjusted. Less typically, the information within them is replaced.
Blending channels is one way of replacing them. Blending channels takes information from one channel and combines it with information from another. Rather than simply enhancing existing tonal values, blending channels reshapes one channel’s tonal structure with another’s. Consequently, in a most cases, blending channels calls for a substitution of information by percentage not a wholesale replacement of the deficient channel. You usually blend channels from different versions of the same image because blending channels from different compositions produces a highly altered effect.
Blending channels is complex. It often produces additional unintended color affects that may require further correction, such as shifts in hue that aren’t uniform across the tonal scale. Blending channels is neither the simplest nor the most direct path to color adjustment, but in certain situations (files that are exceptionally problematic) it may be the best path. The resulting benefits can be dramatic.
When is blending channels appropriate? In extreme cases. Blending channels is designed to correct major color deficiencies. It’s recommended if a channel is severely deficient, either globally or in select areas. For example, by being extremely light or dark or having very low contrast, a channel may be lacking desired detail. That detail can be found in another channel. Fine-tuning color is best left to more traditional methods of color adjustment.
Many Methods
There are several ways to blend channels; Channel Mixer, Apply Image, Calculations, and using channels as layers. Let’s review the options in detail.
1_ChannelMixer_1
The Channel Mixer (Layer: New Adjustment Layer: Channel Mixer) blends percentages of channels within a single document. It can be applied as an adjustment layer and so corrections made this way can be changed or masked indefinitely. It cannot be used to blend channels from two documents. The Channel Mixer is an excellent choice for making global (the same percentage of channels for the whole image) color to black-and-white conversions. If you want to control black-and-white conversions locally (different percentages of channels for different image areas), use channels as layers instead.
2_ApplyImage
3_Calculations
The commands Calculations (Image: Calculations) and Apply Image (Image: Apply Image) can also be used to blend channels. With these two commands you can combine any two channels, from different documents, from any layer, at any opacity, with most blend modes. With Apply Image you target the channel you wish to change. With Calculations you blend to create a new document, a new channel, or a new selection. Neither Calculations nor Apply Image can be used as adjustment layers or layers, consequently corrections you make with either of these features are made permanently to an image. With Apply Image and Calculations you can take advantage of two less frequently used blending modes not found with other tools (Add and Subtract) but you cannot take advantage of four frequently used blending modes (Hue, Saturation, Color, and Luminosity) – even if you use the Fade command.
For the greatest control and flexibility use channels as layers. How do you do this? Copy any channel and paste it into any destination as a layer. (Target a channel (click on it); copy it (Select: All; Edit: Copy); then target the master channel (RGB) and paste (Edit: Paste).) You can activate, deactivate, mask, change, or replace this new layer indefinitely. Use Layer Styles (double click on the layer icon in the Layers palette) to determine Blend Mode, Opacity, Advanced Blending (to select which channel is affected) and Blend If options (to determine how This Layer affects the Underlying Layer or which values of the overlying layer affect the values of the underlying layer). What’s more, you get a dynamic preview of any changes you make while you make them. The adjustments you make are flexible, so you can remove them or fine-tune any of the settings future editing sessions. You can even blend two or more channels first, as layers, and then use the resulting new layer to blend with the Background layer. By turning channels into layers, you can achieve everything that the other methods achieve and more.
One File, Many Channels
You may be surprised to find that every file has at least ten channels to choose from. How do you get so many? Consider the file in different color spaces – RGB, CMYK, and LAB. Convert a duplicate file into another color space and you can use any and all of the resulting channels. In fact, you can choose between many, many more channels when you consider that when converting to CMYK there are five different options for generating a Black Plate (None, Light, Medium, Heavy, and Maximum) with two styles for each with two Separation Types (UCR and GCR). But, for the vast majority of situations, I recommend you try to keep things as simple as possible and stick with the standard three.
Be cautious with older files and lower end scanners when blending with the blue channel as it often contains significant amounts of noise. In fact, in some instances, blending channels can be used to replace some or all of the blue channel and thereby remove unwanted noise. Unlike blurring or despeckling, this method of removing noise will not compromise sharpness, but it may produce unwanted color shifts that will require subsequent correction.
A Good Preview
The possibilities are staggering. Is there anything that can help with the decision making process? Yes. A good preview. You’ll want to have multiple documents of the same image in different color modes (RGB, CMYK, LAB) visible at one time to simultaneously see the blended and the blendee. You may even want to make a side-by-side comparison of the component channels of a single document. To do this, use the Split Channels option in the Channels palette submenu. This command will break a single multi-channel document into multiple single-channel documents. (If a file has layers it must be flattened first to use Split Channels.) While doing this with several documents will quickly fill a screen, having the channels separated makes evaluating their relative merits infinitely easier.
Classic Strategies
With so many possibilities, how do you choose one channel as the best candidate to blend with another and how do you use it?
First, identify the channel causing the problem. Then, find the channel with the best contrast in the areas you wish to enhance (at a low opacity) or replace (at 100% opacity). (Stronger adjustments require higher opacities.) Finally, deal with any unintended side effects.
There are several tried and true strategies for dealing with classic problems. First, create detail where there was none before. Second, create contrast that wasn’t there before. Third, add more contrast to existing tonal relationships, if the values can’t be adequately enhanced using Curves.
Look to the Luminosity channel in LAB. Look to the black plate in CMYK. Look to complementary colors. Complementary colors often contain the best possibilities for increasing contrast (Red and Cyan, Green and Magenta, Yellow and Blue), in highly saturated values.
What are you looking for? Better detail in shadows or highlights, better contrast, and a similar tonal distribution. If you change the relative distribution of tones in a channel, you’ll create a non-uniform color shift where some colors will shift more dramatically than others.
13 before-colorcast

Sometimes channel blending produces unintended side effects.

  15 after-colorcast

In most cases, these side effects can be cured.

Blending channels can produce unintended side effects. There are times when it’s better to achieve the necessary effect with this technique and accept its side effects, if the side effects are easier to cure than the initial problem. Typically, all that’s required is a little dose of additional tonal enhancement, either to the master channel (tone and contrast) or a single channel (color). If you find this is not the case, take this as a sign that this is not the right technique for the problem you face.
BlendModes

Layers offer many Blend Modes 

Control The Mix With Blend Modes
As well as controlling the amount channels are blended you can control the way they are blended, by using blending modes. Blend modes determine how new values are mixed with old values. There are dozens of blend modes to choose from.
As color adjustment is achieved by altering the luminance (light and dark) values of select channels (Channels create but don’t contain color or saturation.), when it comes to blending channels, you can limit the number of blend modes you use to those that affect tone; five are particularly useful – Lighten, Screen, Darken, Multiply, and Luminosity.
Lighten displays the lightest values of both This Layer and the Underlying Layer; its neutral color is black (you can’t lighten with black).
Screen multiplies the inverse values of the pixels lightness or darkness. It’s like registering same image in the same location from two projectors. Think of it as industrial strength lightening. Its neutral color is black (you can’t lighten with black). Screen can do wonders for opening up deep shadows. It has a tendency to blow out highlights. Use a contrast mask to remove the effect from highlights.
Darken displays the darkest values of both This Layer and the Underlying Layer; its neutral color is white (you can’t darken with white).
Multiply multiplies the values of the pixels on both layers and then divides by 255. It’s like registering two identical transparencies on a light table. Think of it as industrial strength darkening. Its neutral color is white (you can’t darken with white). Multiply can do wonders for reclaiming subtle highlight detail. It has a tendency to block up shadows. Use a contrast mask to remove the effect from shadows.
Luminosity combines the luminance values of This Layer with the hue and saturation of the Underlying Layer; it has no neutral color.
5_LayerStyle
Enhance The Blend
You can enhance a channel before (or if you use channels as layers after) blending it with another. Use any adjustment method that makes the data better to blend with. As you’re blending with black-and-white images, Curves is usually all you need for it offers the most precise control of tone. For instance, you might increase the contrast of an image before using it to blend with. If you’re using the channels as layers method, all you have to do is group a Curves adjustment layer to the new layer being used to blend with. The contrast of overlying layer can then be fine-tuned as the blend with the underlying layer is occurring. This way you don’t have to guess how much contrast needs to be added before blending, instead you see how much contrast to add while the blend is occurring.
Constraining The Effect
While blending channels may solve problems that other adjustment methods can’t, they may also produce new problems.
In a great many cases, if the tonal distribution of a single channel is substantially altered using another channel, color may shift in an unintended manner. If this happens simply make an additional adjustment to eliminate any side effects. There are times when the color shifts you encounter will be non-uniform (more in some areas than others), which may lead you to making more complex corrections than you had anticipated.
If the problem solved with channel blending and the resulting side effects lie in different areas of the image, consider masking away the side effects rather than correcting them. There are several ways of masking the side effects of channel blending from selected areas. One, simply brush them away by painting with a black brush on a layer mask. Two, use a contrast mask to hold back the effect from highlights or shadows. Three, use the Blend If function in Layer Styles; by sliding the black arrow to the right or the white arrow to the left you drop out the effects from values below or above them – by holding the Option key (Command on PC) you can split the sliders to fade the effect more smoothly.
If you think you’re not used to blending channels, think again. Every time you turn a color image into a black-and-white image you blend channels. In a grayscale conversion three channels are blended to create a single channel while when using either Hue/Saturation or Channel Mixer three channels are blended to equal RGB values. But, when it comes to color adjustment, blending channels is used infrequently, perhaps because it’s so little known. Blending channels is a sophisticated adjustment method. In a majority of cases you don’t need a method that’s this complex. Blending channels is best used in exceptional situations for enhancing originals with substantial problems. If you find that you use this technique frequently, you’re probably not addressing the real problem, the quality of your originals. Nevertheless, when you run into files with severe problems, blending channels will often save the day.
Read more on Color Adjustment here.
Learn more in my digital printing and digital photography workshops.

Using Color Management For Color Adjustment – Synthetic Profiles

    SyntheticProfiles_425


Synthetic Profiles – Big Change Small Price

How can you change the appearance of a digital image without changing the numbers that assign the colors in it? Change what those numbers mean, by changing image’s ICC profile. Using abstract or synthetic profiles, you can make massive changes to an image with little to no cost, changes that would ordinarily cause big problems using standard methods, such a posterization and noise. It’s a practice known to color geeks and few others. When you’ve got a big job to do, it can get you out of a pinch in a hurry.

In most cases we think of using color management to accurately match colors when moving between different color spaces; ICC profiles are used to describe different color spaces and to make precise transformations to values moved from one to another to maintain consistent appearances. In very rare cases, when profiles are assigned to image files without a color conversion, the appearance of the image changes; values stay the same, but their meaning changes so the image looks different. So when you use this unorthodox method of color adjustment, you get a change in appearance without changing the values in the file and this is particularly useful when you want to pay a very small price for making very big changes.

This is worth restating. What exactly is the difference between assigning an ICC profile and using an ICC profile to perform a color conversion? Using an ICC profile to convert color changes values to maintain the appearance of an image. Assigning an ICC profile changes the recipe for colors without changing the values in an image, so its appearance changes.

Real / Abstract / Synthetic Profiles

You could say there are “real” and “abstract” profiles. Real profiles describe the color capacity of real-world devices, like monitors and printers. Abstract profiles describe theoretical color spaces that don’t refer to specific devices, like the standard editing spaces we all use in everyday digital imaging – sRGB, Adobe RGB (1998), ProPhoto RGB, etc. Both real and abstract profiles are designed to maintain a consistent color appearance. So what’s a synthetic profile? It’s an ICC profile that is designed to change color appearance or to solve a color problem.

ColorSettings1

Color Settings

ColorSettings2

Color Settings Custom RGB option


Creating Synthetic Profiles
You can create synthetic ICC profiles with Photoshop. Go to Edit > Color Settings and making sure More Options is checked go to Working Spaces > RGB > Custom RGB. In the final window that appears, you’ll use three variables to create a synthetic profile; Gamma, White Point, and Primaries.

Gamma affects brightness and contrast. Gamma is the midtone adjustment applied to compensate for nonlinear characteristics of capture and display systems. It’s the slope of the input-output curve. A slope of 1 is linear or with no change between input and output. Values larger than 1 make shadows darker; values less than 1 make shadows lighter. ColorMatch RGB and ProPhoto have gammas of 1.8. sRGB and Adobe RGB (1998) have gammas of 2.2. You can set a value as low as .75 and as high as 3.0.

Gamma is the most useful setting of the three; it’s excellent for making industrial strength adjustments to exposure. It has one variable.

White Point is the color temperature of white produced by combining red, green, and blue primaries at maximum strength. It’s measured in Kelvin degrees Fahrenheit. 5000K is the temperature of daylight (at high noon) and the industry standard viewing light. A higher value is cooler (bluer); a lower value is warmer (yellower).

White Point is useful for gross color adjustment; the results are best fine-tuned with other tools in Photoshop. It has two variables.

Primaries are the chromaticities (hue and saturation) of the red, green, and blue components that define a color space. Each primary is specified by an x and y coordinate. There are nine defaults to choose from including Adobe RGB (1998). If you’d like to start with values from other color spaces (including the other standard editing spaces like sRGB, ColorMatch RGB, Apple RGB, and ProPhoto RGB), using the RGB drop down menu specify a color space first, this sets the starting point, and then pull up to Custom RGB, where you can modify those values.

Primaries is the most complex and difficult to use of the three; it requires a lot of experimentation; it’s capable of making exotic color adjustments that can’t be duplicated with other tools in Photoshop but it’s much harder to predict and control. It has six variables.
To make it easier to preview the results of your explorations with synthetic profiles, discard the profile of the image you are viewing. Go to Edit > Assign Profile > Don’t Color Manage This Document. Photoshop uses the current Color Spaces Working Spaces settings to display files without ICC profiles. If you don’t do this, you’ll have to save a synthetic profile and then take the extra step of applying the profile to see the results, which will slow you down considerably.

When you’re ready to save your synthetic profiles, use Color Settings’ RGB drop down menu and pull up to Save RGB. (Don’t use the Save button on the right side of the Color Settings dialog; instead of saving an ICC profile, this saves all of the Color Settings as a .csf file, useful for syncing multiple Adobe applications.) When you finish creating a synthetic profile click Cancel in the Color Settings dialog; you don’t want synthetic settings to become your default RGB editing space as they are used when creating new files.

If you want to archive or share synthetic profiles, you can copy the profiles out of the folder they’re saved in. (On a Mac, profiles are saved with this path – Library > Color Sync > Profiles.)

To apply a synthetic profile go to Edit > Assign Profile command. You can see before and after appearances by checking the Preview box on and off.

Exploring Your Options

Because using synthetic profiles is so abstract, it’s useful to explore your options by comparing the results of multiple profiles side-by-side. While you’re exploring your options, at any one time, have a minimum of two identical files open in Photoshop so that you can carefully assess the results of different profiles.

Make a number of synthetic profiles based on your standard editing space (My standard editing space is ProPhoto RGB.) with different gamma settings varying in .1 or .2 increments. When you save your synthetic profiles, use a standard naming convention to tell the differences between them, such as SYN ProPhoto G2.2, SYN ProPhoto G2.4, etc.

Once you’ve applied a synthetic profile, should you then convert the file to a standard editing space? You don’t need to. Your synthetic profile uses the standard ICC language and should be accurately read by any software that is ICC compliant. One advantage to keeping it in the synthetic color space is that your file will accurately inform you about its creation. But if it makes you feel better, you won’t pay much of a price if you convert to a standard editing space; the few minor quantization errors associated with such color conversions are almost always invisible to the naked eye.

Fine-Tuning Your Results

While you’ll be able to perform the lion’s share of color adjustment using a synthetic profile, most images will benefit from additional fine-tuning through standard image editing practices in Photoshop.

With just a little experimentation, you’ll find you too can make big changes to your images and pay a small price using synthetic profiles. Using synthetic profiles is color adjustment without editing values; they change no values, but they do change the meaning of those values – and thus their appearance. Don’t believe it? Check your Histogram when you assign a profile. You won’t even see it move! It is kind of unbelievable. Try it. See it with your own eyes. You’ll quickly become a believer too.

Read more on Color Adjustment here.
Learn more in my digital printing and digital photography workshops.