Using Color Management For Color Adjustment – Synthetic Profiles
Synthetic Profiles – Big Change Small Price
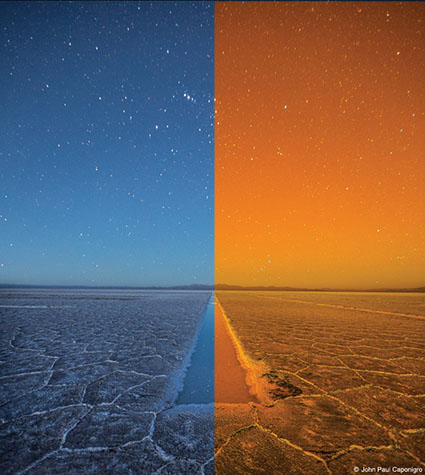
How can you change the appearance of a digital image without changing the numbers that assign the colors in it? Change what those numbers mean, by changing image’s ICC profile. Using abstract or synthetic profiles, you can make massive changes to an image with little to no cost, changes that would ordinarily cause big problems using standard methods, such a posterization and noise. It’s a practice known to color geeks and few others. When you’ve got a big job to do, it can get you out of a pinch in a hurry.
In most cases we think of using color management to accurately match colors when moving between different color spaces; ICC profiles are used to describe different color spaces and to make precise transformations to values moved from one to another to maintain consistent appearances. In very rare cases, when profiles are assigned to image files without a color conversion, the appearance of the image changes; values stay the same, but their meaning changes so the image looks different. So when you use this unorthodox method of color adjustment, you get a change in appearance without changing the values in the file and this is particularly useful when you want to pay a very small price for making very big changes.
This is worth restating. What exactly is the difference between assigning an ICC profile and using an ICC profile to perform a color conversion? Using an ICC profile to convert color changes values to maintain the appearance of an image. Assigning an ICC profile changes the recipe for colors without changing the values in an image, so its appearance changes.
Real / Abstract / Synthetic Profiles
You could say there are “real” and “abstract” profiles. Real profiles describe the color capacity of real-world devices, like monitors and printers. Abstract profiles describe theoretical color spaces that don’t refer to specific devices, like the standard editing spaces we all use in everyday digital imaging – sRGB, Adobe RGB (1998), ProPhoto RGB, etc. Both real and abstract profiles are designed to maintain a consistent color appearance. So what’s a synthetic profile? It’s an ICC profile that is designed to change color appearance or to solve a color problem.
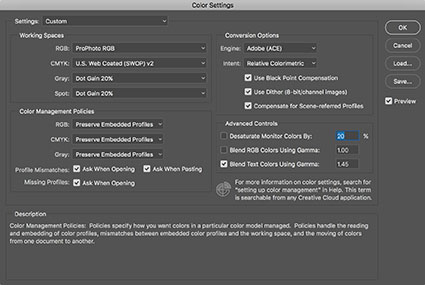
Color Settings
Color Settings Custom RGB option
Creating Synthetic Profiles
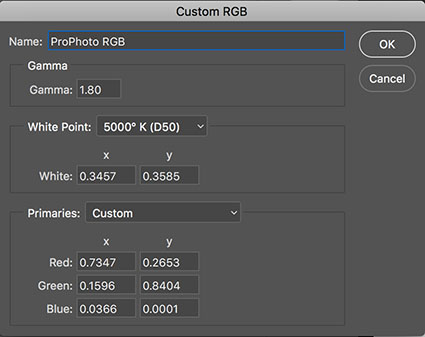
You can create synthetic ICC profiles with Photoshop. Go to Edit > Color Settings and making sure More Options is checked go to Working Spaces > RGB > Custom RGB. In the final window that appears, you’ll use three variables to create a synthetic profile; Gamma, White Point, and Primaries.
Gamma affects brightness and contrast. Gamma is the midtone adjustment applied to compensate for nonlinear characteristics of capture and display systems. It’s the slope of the input-output curve. A slope of 1 is linear or with no change between input and output. Values larger than 1 make shadows darker; values less than 1 make shadows lighter. ColorMatch RGB and ProPhoto have gammas of 1.8. sRGB and Adobe RGB (1998) have gammas of 2.2. You can set a value as low as .75 and as high as 3.0.
Gamma is the most useful setting of the three; it’s excellent for making industrial strength adjustments to exposure. It has one variable.
White Point is the color temperature of white produced by combining red, green, and blue primaries at maximum strength. It’s measured in Kelvin degrees Fahrenheit. 5000K is the temperature of daylight (at high noon) and the industry standard viewing light. A higher value is cooler (bluer); a lower value is warmer (yellower).
White Point is useful for gross color adjustment; the results are best fine-tuned with other tools in Photoshop. It has two variables.
Primaries are the chromaticities (hue and saturation) of the red, green, and blue components that define a color space. Each primary is specified by an x and y coordinate. There are nine defaults to choose from including Adobe RGB (1998). If you’d like to start with values from other color spaces (including the other standard editing spaces like sRGB, ColorMatch RGB, Apple RGB, and ProPhoto RGB), using the RGB drop down menu specify a color space first, this sets the starting point, and then pull up to Custom RGB, where you can modify those values.
Primaries is the most complex and difficult to use of the three; it requires a lot of experimentation; it’s capable of making exotic color adjustments that can’t be duplicated with other tools in Photoshop but it’s much harder to predict and control. It has six variables.
To make it easier to preview the results of your explorations with synthetic profiles, discard the profile of the image you are viewing. Go to Edit > Assign Profile > Don’t Color Manage This Document. Photoshop uses the current Color Spaces Working Spaces settings to display files without ICC profiles. If you don’t do this, you’ll have to save a synthetic profile and then take the extra step of applying the profile to see the results, which will slow you down considerably.
When you’re ready to save your synthetic profiles, use Color Settings’ RGB drop down menu and pull up to Save RGB. (Don’t use the Save button on the right side of the Color Settings dialog; instead of saving an ICC profile, this saves all of the Color Settings as a .csf file, useful for syncing multiple Adobe applications.) When you finish creating a synthetic profile click Cancel in the Color Settings dialog; you don’t want synthetic settings to become your default RGB editing space as they are used when creating new files.
If you want to archive or share synthetic profiles, you can copy the profiles out of the folder they’re saved in. (On a Mac, profiles are saved with this path – Library > Color Sync > Profiles.)
To apply a synthetic profile go to Edit > Assign Profile command. You can see before and after appearances by checking the Preview box on and off.
Exploring Your Options
Because using synthetic profiles is so abstract, it’s useful to explore your options by comparing the results of multiple profiles side-by-side. While you’re exploring your options, at any one time, have a minimum of two identical files open in Photoshop so that you can carefully assess the results of different profiles.
Make a number of synthetic profiles based on your standard editing space (My standard editing space is ProPhoto RGB.) with different gamma settings varying in .1 or .2 increments. When you save your synthetic profiles, use a standard naming convention to tell the differences between them, such as SYN ProPhoto G2.2, SYN ProPhoto G2.4, etc.
Once you’ve applied a synthetic profile, should you then convert the file to a standard editing space? You don’t need to. Your synthetic profile uses the standard ICC language and should be accurately read by any software that is ICC compliant. One advantage to keeping it in the synthetic color space is that your file will accurately inform you about its creation. But if it makes you feel better, you won’t pay much of a price if you convert to a standard editing space; the few minor quantization errors associated with such color conversions are almost always invisible to the naked eye.
Fine-Tuning Your Results
While you’ll be able to perform the lion’s share of color adjustment using a synthetic profile, most images will benefit from additional fine-tuning through standard image editing practices in Photoshop.
With just a little experimentation, you’ll find you too can make big changes to your images and pay a small price using synthetic profiles. Using synthetic profiles is color adjustment without editing values; they change no values, but they do change the meaning of those values – and thus their appearance. Don’t believe it? Check your Histogram when you assign a profile. You won’t even see it move! It is kind of unbelievable. Try it. See it with your own eyes. You’ll quickly become a believer too.
Read more on Color Adjustment here.
Learn more in my digital printing and digital photography workshops.
No Comments