Photoshop’s Quick Mask Combines All Selection And Brush Tools

Edit In Standard Mode (Press Q) shows selected areas inside an active selection outline.

Edit In Quick Mask Mode (Press Q) shows masked areas with a red overlay.
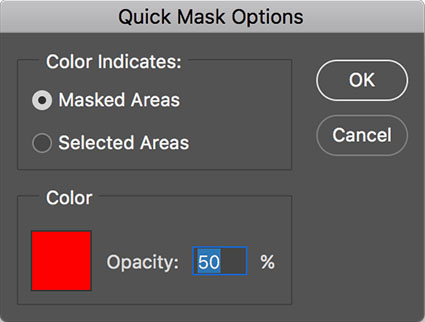
Quick Mask Options can be activated by double-clicking it.
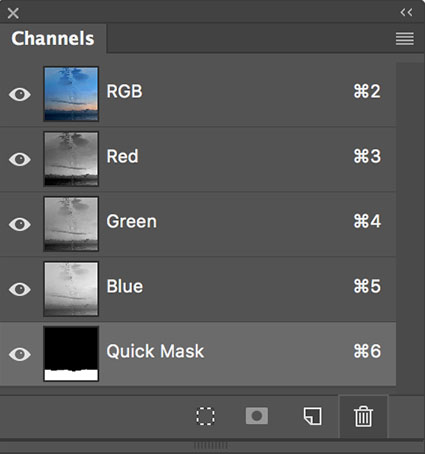
Quick Masks appear temporarily in the Channels palette.
Consider Photoshop’s Quick Mask feature as an easy-to-access nexus point that allows you to make and modify selections by efficiently moving between all selection and brush tools.
In addition to being fast and flexible, Quick Mask makes it easy to see both the image and the mask at the same time – and this view can make it easier for you to make more precise selections and masks. When you’re in mask mode, you’ll see the mask as a transparent red overlaying the image. You can change the color of the overlay and its opacity with the window activated by double-clicking on the Quick Mask icon. This is particularly useful when masking images with red colors.
When you use Quick Mask you can start with either a selection or a mask.
To start with a brush tool, click on the Quick Mask icon and you’ll see a temporary (Its title will be in italics.) alpha-channel appear in the Channels palette. Use a black brush and you’ll see the masked areas appear over the image in a transparent color. When you’re finished brushing, click once again on the Quick Mask icon and the mask will become a selection; the temporary alpha-channel will disappear, so if you want to save your work click the Save selection as channel icon or use the menu item Select > Save Selection; you can tell the resulting alpha-channel is permanent because its title is not italicized.
Or, you can start with a selection before clicking on the Quick Mask icon and using a brush to make modifications. When you’re done click on the icon again to return to selection mode and save the results.
You can move back and forth as many times as you like between selection tools and brush tools to create any result you desire. That’s the beauty of Quick Mask feature. When you hit the limits of one tool you can move to another.
Just remember, after you finish refining a selection, if you want to use it later, save it. And if you save many results along the way to a final solution, delete the ones you don’t plan on using again, so that you don’t get confused with too many choices.
Read more about Selections & Masks.
Learn more in my digital photography and digital printing workshops.