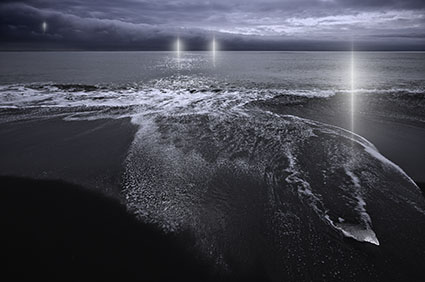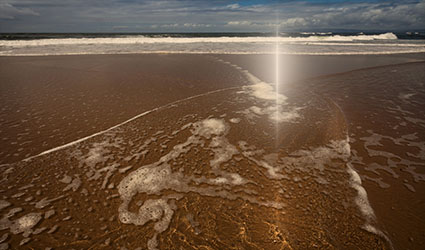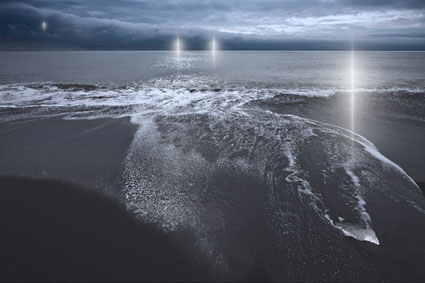
high noise / low noise

column and row noise / severe under-exposure

hot pixel noise / very long exposure or very hot conditions

Bayer pattern noise / substantial under-exposure

random noise / high ISO
While it’s best to eliminate noise in images at the point of capture (by choosing optimum tools and making exposures), taking the steps to do this may be impractical and/or lead to unacceptable trade-offs, so you may need to make a compromise settling for reducing it (first during exposure and second during post-processing). But which compromises should you make? Knowing the types of noise that are produced in digital images and how they are produced will help guide you to solutions that will eliminate, reduce, or remove it.
There are three types of noise; random noise, fixed pattern noise, and banding noise.
Random Noise
Random noise appears as both luminance (light and dark) and chrominance (hue/saturation) variations not native to an image but produced by the electrical operation of a capture device. The electrical signal produced in response to photons is comingled with electrical variations in the operation of the capture device. Random noise patterns always change, even if exposure conditions are identical. Random noise is most sensitive to ISO setting. Again, digital cameras have one native ISO setting; higher ISO settings artificially boost the signal produced by the sensor and the noise accompanying it. The results? You get a brighter picture from less light and exaggerated noise. Since the pattern is random it is challenging to separate the noise from the image, especially texture, and even the best software used to reduce it through blurring may compromise image sharpness; how much depends on the level of reduction.
Fixed Pattern Noise
Fixed pattern noise (“hot pixels”) is a consistent pattern specific to an individual sensor. Fixed pattern noise becomes more pronounced with longer exposures. Higher temperatures also intensify it. Since the pattern is consistent, it can be easily mapped and reduced or eliminated.
Column & Row Noise
Banded noise is introduced with the camera reads the data produced by the sensor. It’s camera-dependent. Banding noise is most visible at high ISOs, in shadows, and when an image has been dramatically brightened. This type of noise quickly becomes obvious and objectionable; the regular row and column patterns from the sensor quickly call attention to the capture device; it is challenging to reduce without severely compromising image sharpness.
Noise can be broken down into two kinds; chromatic (hue/saturation variances) and luminance (brightness variances).

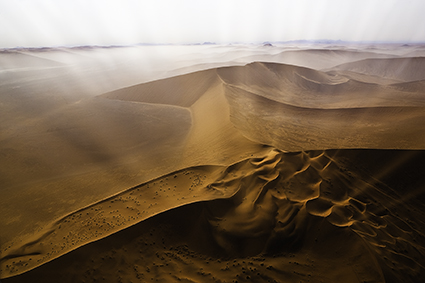
chrominance / color noise
Chromatic Noise
Chromatic noise produces a more ‘unnatural’ appearance, it is easier to reduce without compromising image sharpness than luminance noise. Chromatic blurring is less noticeable than luminance blurring, as human perception tends to see color contained within contours, even when it is not precisely true. It’s a convenient optical illusion. Larger chromatic variances may result from bayer pattern demosaicing. (Digital sensors typically capture photons with an array of two green, one red, and one blue photosites that register separate luminance values for each site. This data is then processed, ‘averaged’ if you will, to generate a final color, such as brown or lavender, or even a specific green, red, or blue. If done under suboptimal conditions, such as underexposure, larger areas of color variances may occur and will require additional post-processing. Extreme amounts of chromatic noise reduction may results in reduced saturation, especially along contours separating strongly contrasting colors.

luminance / light & dark noise
Luminance Noise
The presence of luminance noise is more readily accepted than chrominance noise. Luminance noise is harder to reduce than chrominance noise. Luminance information encodes contour, volume, and texture, key elements in representational images. Aggressive amounts of luminance noise reduction subdue image texture, creating a synthetic or overly smooth appearance, and blurs contours, lessening the appearance of focus. Camera noise reduction tends to be crude. Raw conversion software produces significantly improved results. For more extreme noise reduction, third-party software (such as Define, NoiseNinja, and NoiseWare) offer superior functionality and results.
Noise also varies in both magnitude and spatial frequency. Noise occurring over short distances has a high frequency (it’s ‘fine-grained’), while noise occurring over long distances has a low frequency. Noise magnitude, often described by the statistical measure of ‘standard deviation’, quantifies the variance a pixel will have from its ‘true’ value. Higher magnitude noise overpowers fine texture and becomes exceptionally difficult to remove.
The noise floor dominates other forms of noise. It is created by the type of read circuits in the sensor, the transistor characteristics, and support circuits such as the analog to digital converter. As light levels increase the noise associated with light (‘photon shot noise’) exceeds the noise floor. If the signal is increased by a factor of two (one f-stop), then the noise increases by a factor of one and the signal to noise ration increases by one. A higher signal to noise ratio makes noise less visible. When the signal exceeds the maximum value the sensor is capable of capturing (dynamic range is a measure of the largest ratio of the capture signal to the noise floor), the noise drops because the signal is pinned at the saturation value.
With a thorough understanding of what produces noise, how it is produced, what kinds and types of noise to be on the lookout for, you can take steps to reduce it at the point of capture. You want to start with as little noise as possible. If you want noise, you can always add it later, which gives you the possibility of customizing it with almost infinite precision. If you begin with noise in your originals, you’re locked in, and it can be challenging to reduce it without compromising image quality – sharpness, texture, saturation, and hue variety. Given that noise isn’t the only concern you balance, for some uses this may be an acceptable trade-off.
.