Crop or Retouch ?


As visual communicators, we’re responsible for everything that’s in the frame; we’re also responsible for everything that’s not in the frame. Deciding what’s in the frame and what’s out is a critical decision that can make or break an image. Here are two essential framing strategies.
1.?Use the frame to eliminate distracting information around a subject.
Take extra care with image information that touches the frame, as it will draw extra attention. Do this with significant compositional elements.
2.?Eliminate space around a subject to focus a viewer’s attention.
A lot of space between the subject and the frame can be used to call on psychological associations with space, such as freedom or isolation. Some space between the subject and the frame can give the appearance of the subject resting gracefully within the frame. Touching the subject with the frame strongly focuses the attention of the viewer and may seem claustrophobic. Cropping the subject with the frame can focus the attention of the viewer on specific aspects of the subject and/or give an image a tense quality, evoking evasion and incompleteness—this often seems accidental if less than half the subject is revealed.
There’s more than one way to apply these strategies. While cropping techniques are simple to practice, the reasons for their application and the choices made about how to apply them, as well as the final effects, may be exceptionally complex. You have two choices ..
1. Reposition the frame before exposure.
2. Contract the position of the borders of an image after exposure
If you plan to retouch, you’ll frame and crop differently …
Read more at Digital Photo Pro.
Find more digital photography techniques here.
Learn more in my digital photography worskhops.

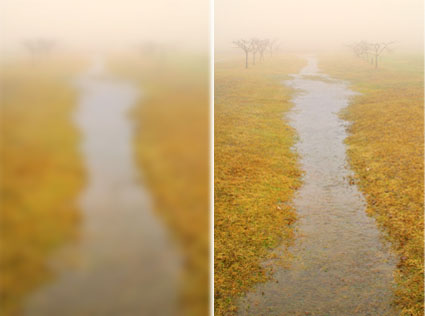
Defocus


It’s easy to lose sight of the forest for the trees.
We’re capable of seeing a lot of detail. Sometimes detail is distracting. Eliminating it can help us see fundamentals more clearly.
Here’s a quick way to make sure the foundations of your compositions are strong.
1    Frame an image.
2    Defocus the camera. Defocus enough to lose sight
of the details (line and texture) but not the broader com- position (light and dark, color, shape).
3    Refine the composition. Move the camera or zoom.
4 Refocus.
5 Expose.
Images that contain well-rendered detail without a solid compositional structure often appear cluttered and confusing. Develop the habit of slowing down and taking the time to make sure your compositions are as strong as they can be.
Find more online resources here.
Learn more in my digital photography workshops.

Framing

framed
You’ve been framed. It sounds terrible right? But, when it comes to your prints, it’s great. It’s a sign that after all that work you’ve arrived.
Think of how many photographs you make; a lot. Now think of how many of those actually get selected and processed; a few. Now think of how many of those actually get printed; fewer. Now think of how many of those actually get prepared for formal presentation, mounted and matted, perhaps for a portfolio; fewer still. Finally, think of how many of those actually get framed; even fewer still. The images you frame are a very small percentage of the total umber of images you create. They’re the rare few.
Framed images represent your very best work. Framed images are the ones that go on your walls or someone else’s walls. You spend the most time with them and live with them the longest. They represent your work publicly. They’re the ones used for exhibitions. They establish your reputation, and once made, reinforce or elevate it. If you’re a fine artist, framed images are the images that generate a significant amount of your income.
You’ve got choices. And the choices you make speak volumes to your viewers. There are so many framing choices available to you it’s easy to get lost in endless details. Identifying a few broad categories or types of frames can help you focus on specific areas, where details become important rather than superfluous.
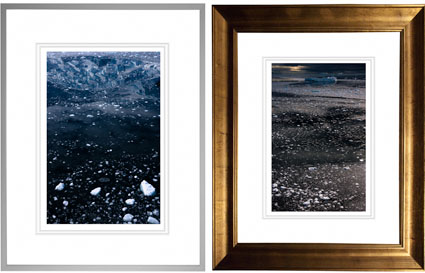
Frames can be simple or complex.
Frames come in many sizes, from thin to thick.
Two framing materials are used more than any others – wood or metal.
Consider framing fashion for your images. Dress your images appropriately. The right fit will make your images look like a million bucks. Presentation enriches a viewing experience. The wrong fit may seem cheap, be distracting, or even send conflicting signals to viewers and put them off. Your viewers may not think twice about or have a second look at your images. Since there are so many types of images, no one size or style fits all.
Would you go out in public naked? Don’t let your artwork go out into the world poorly presented and unprotected.
This is an excerpt from the current issue of Photoshop User magazine.
Read more in PhotoshopUser magazine.
Find out more with my free Lessons.
View more on my DVD Fine Art Digital Printing.
Learn more in my Workshops.

Printing – Glass / No Glass


It can be helpful to see what presentation behind glass / plexiglass will do to print quality. The appearance of prints can shift slightly; darker and/or towards blue or green.
You can preview this before framing by keeping a sheet of glass/plexi-glass in your printing area and looking at final proofs and finished prints under glass / plexiglass to see the impact it will have on print quality. On occasion you may want to make small adjustments to a final print based on what you see. But remember, glass is often replaced. If you compensate for glass and the glass is replaced, make sure the new glass matches the old glass.
What kind of glass do you use for presentation? Do you use it? Comment here!
Check out my Printing downloads here.
Check out my DVD The Art of Proofing here.

Find out about my The Fine Digital Print Workshop Series here.