Managing Camera Profiles


If you make camera profiles customized for your camera, sooner or later you’re going to want to rename or delete a few. Where do you find camera profiles? On the Mac, follow this trial User : Application Support : Adobe : Camera Raw : Camera Profiles.
X-Rite offers a free easy to use software for managing camera profiles – DNG Profile Manager. With it, you can activate, deactivate, delete, move, export or rename camera profiles.

Download X-Rite’s DNG Profile Manager here.

Read more on Color Management here.

Learn more in my digital photography and digital printing workshops.


Rendering Intents Compared

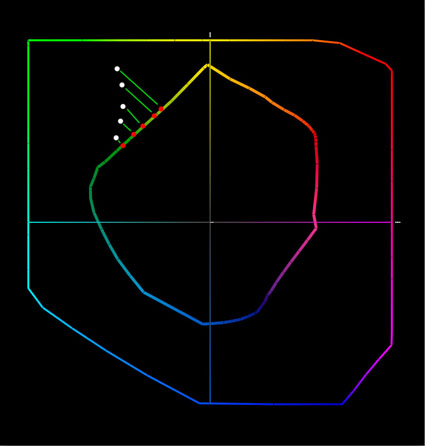
gamut clipping

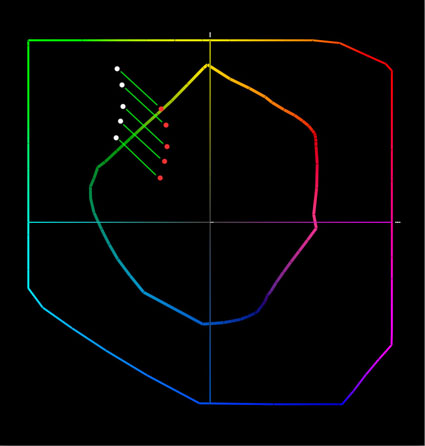
gamut compression


Your choice of rendering intent tells a color management system how to handle color conversions between different color spaces. This is particularly important when converting colors from a wider-gamut color space (such as an editing space like ProPhoto) to a smaller-gamut color space (like a printer color space). You’ll get different results, even when using the same ICC profile, depending on the rendering intent you choose for a color conversion. You have four choices; perceptual, relative colorimetric, absolute colorimetric, and saturation.

What’s the difference between these four rendering intents?

Perceptual
Use a perceptual rendering intent for printing images with highly saturated colors. Watch it carefully. To deliver very saturated colors, it may lighten an image or shift the hue of specific colors. Both side-effects can be compensated for with output-specific adjustments.

Relative Colorimetric
Use a relative colorimetric rendering intent for printing images where the luminosity structure is most important. You may get slightly less saturated colors but brightness values will be most stable with this rendering intent. This makes it the ideal choice for near-neutral and black and white images.

Absolute Colorimetric
Use an absolute colorimetric rendering intent for making a proof of one device on another, like making a proof of an offset press on an inkjet printer. It’s not useful for making the best inkjet print; it will limit the results the printer delivers. Note, you can’t simulate a printer with a greater gamut than the device you’re printing on, only one with a smaller gamut.

Saturation
Use a saturation rendering intent for eye-catching graphics where color impact is more important than color accuracy , like pie charts. It will so much saturation it will distort continuous tone images in an adverse way.
Here’s the color geek explanation.

Read More

Using X-Rite’s Color Checker Passport – Target Or Profiles


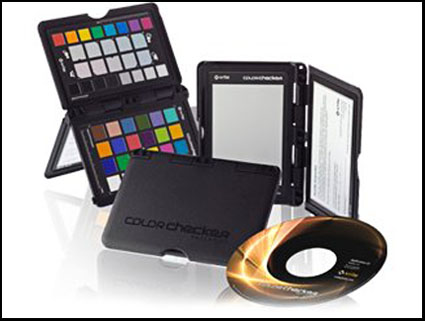
X-Rites’ Color Checker Passport can be used to quickly deliver more accurate color in a variety of ways.

Set White Balance, White Point, and Black Point
The X-Rite Color Checker Passport is the industry standard target that can be used in several ways to render color in your digital images more accurately – setting white balance, creative enhancement, and visual confirmation.

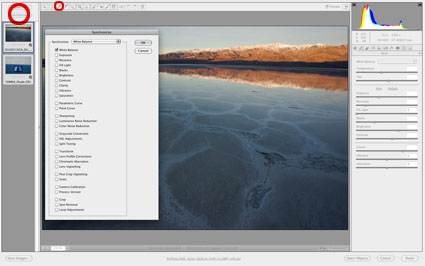
It’s easy to use. Shoot the Color Checker once at the beginning of each shooting session and you can use that exposure as a target for all exposures made under the same light. The exposure of the target doesn’t have to be perfect. Just, roughly fill the frame with the target; it doesn’t even have to be focussed. To use the exposure of the target, use your choice of Raw conversion software to open it along with other exposures you’d like to apply the same measurements to; click on the appropriate color patches (black for black point, white for white point, gray for gray point); and sync all of the files. It’s that simple.

Create A Camera Profile
The X-Rite Color Checker Passport can also be used to make custom profiles for your individual camera. You can create a camera profile with the same exposure of the target that you use to set white balance. While camera profiles are generated with the same target, the resulting exposures are not used to set white balance, instead, they are used to deliver significantly improved color rendition and saturation, providing the best starting point for any color adjustment strategy you choose. Camera profiles are created with the X-Rite software supplied with the Color Checker Passport, stored, and later applied with your choice of Raw conversion software, typically Adobe Camera Raw or Adobe Lightroom.

For optimum results, exposures used to generate camera profiles need to be made under the light (color temperature and spectral distribution) that subsequent exposures are made in. Using two exposures of the target made under different light temperatures, you can create a dual illuminant camera profile that can be used for all exposures made under a wide range of color temperatures. Single illuminant profiles are recommended for exposures made under very warm or very cool light temperatures – below 3600K (golden hours) and above 6800K (twilight).

How do you make a camera profile? First, convert one or more exposures of the Color Checker Passport from the manufacturer’s proprietary Raw format to Adobe’s open standard Raw format – DNG. (Use either the free Adobe DNG Converter, Adobe Bridge, or Adobe Lightroom.) Open X-Rite’s Color Checker Passport software. Click DNG or Dual Illuminant DNG. Drag one or two DNG files into the open window. Once the software has identified the specific color patches it needs to build the profile, click Create Profile. The profile will automatically be stored for you in Camera Profiles and will be available for your use the next time you convert a Raw file in either Adobe Camera Raw or Adobe Lightroom. You’ll find it under the Camera Calibration tab/panel under Camera Profile. Save New Camera Raw Defaults and your new camera profile will be automatically loaded when you open Raw files and previews in Adobe Bridge will be rendered with it.

Using a Color Checker Passport target or a camera profile generated with it doesn’t mean that you are locked into the results they generate, they simply give you the best starting point possible for adjusting your images.

Read More

What To Do With Photoshop’s Color Management Dialogs

Knowing what to do with the color management dialog boxes you encounter while you’re editing your digital images in Photoshop is the key to making sure that the rich, saturated, wide-gamut color you choose to master your files in stays wide-gamut and doesn’t change – unless you want it to.

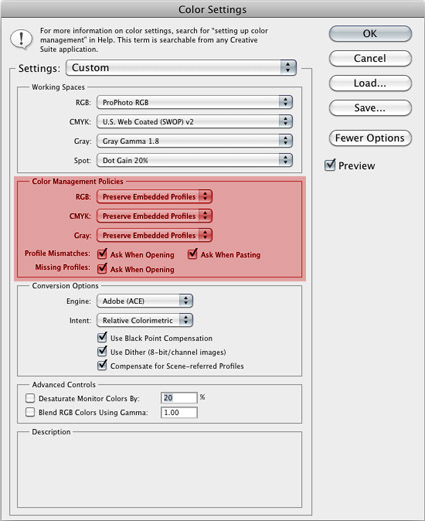
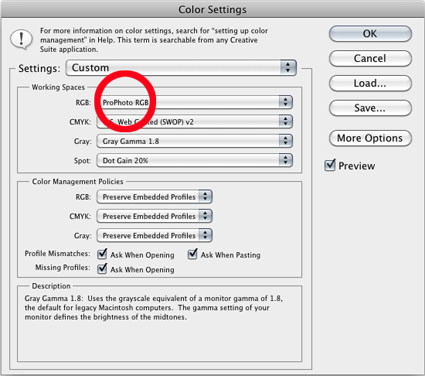
When you set Color Settings in Photoshop (Edit : Color Settings), you not only choose Working Spaces (RGB, CMYK, Gray, and Spot) to create new files in (Choose ProPhoto RGB for the widest-gamut color space.), you also set Color Management Policies that determine what happens when you’re dealing with files that are not created or edited in the same color spaces.


For RGB, CMYK and Grayscale files you can choose to turn Color Management Off, to Preserve the Embedded Profiles, or to Convert to Working color spaces. You rarely, if ever, want to turn color management off; you only do this when you want to ensure that no color space conversions take place, for example when opening target files for creating printer profiles. Similarly, you typically don’t want files automatically converted to a default working color space without your knowing that it’s happening, as they are when you set the policy to Convert to Working; you’d only want this to happen when you’re batch converting a number of files to quickly bypass color management dialog boxes. In the vast majority of cases, you’re better off served leaving the default settings at Preserve Embedded Profiles. This way, any time a color management operation is about to take place, you’ll get one of three dialog boxes that not only alert you but also give you control over how the operation is handled.

So what do you do when you encounter these three dialog boxes – Missing Profile, Profile Mismatch, and Paste Profile Mismatch?

Read More

Photoshop Color Settings

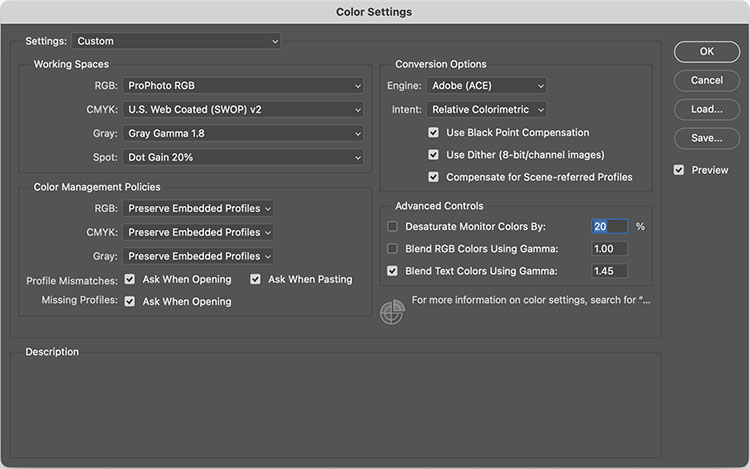
Excellent Photoshop Color Settings can be set up in a few seconds.

1  Go to Photoshop’s Edit Menu select Color Settings.

2  Start with Settings of North American Prepress 2 and then change RGB to ProPhoto RGB. (Optionally change Gray to Gray Gamma 1.8.)

3  Click OK.

Here’s a little more about the underlying assumptions of this recommendation.

1. Choose a device-neutral wide gamut editing space to create your images in. Wide gamut editing spaces can contain all the data your camera or scanner delivers. Smaller gamut editing spaces may not. Preserve your high-quality information. ProPhoto is today’s preferred wide gamut RGB editing space. It’s the only default that can contain all the colors your camera can capture.

2. Minimize the number of color conversions applied to your files. Set Photoshop to Preserve Embedded Profiles. Always keep your master file in the color space it was created in. Convert only derivative files.

3. Make sure you know about all the color conversions your file goes through. Set Photoshop to alert you whenever a color conversion may take place. Check Ask When Opening / Pasting with Profile Mismatches and Missing Profiles.

Standardize your workflow, using these settings for all your work (with few exceptions).


Read more on Color Management here.

Learn more in my digital photography and digital printing workshops.

Choose A Wide Gamut Editing Space

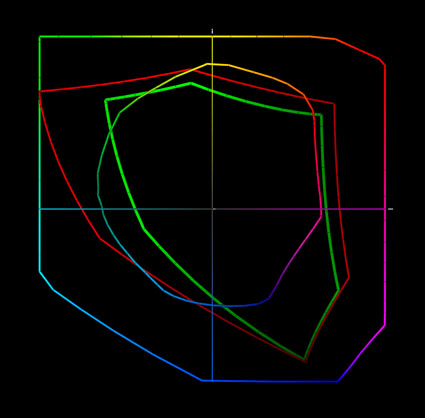
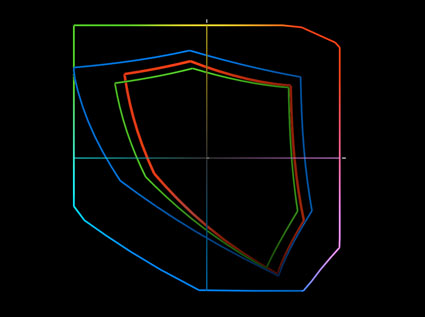
Today’s inksets can exceed the gamut of even the best monitors in yellows, oranges, and blues. Epson UltraChrome HDR ink on Epson Exhibition Fiber is plotted against sRGB, Adobe RGB (1998) and ProPhoto.

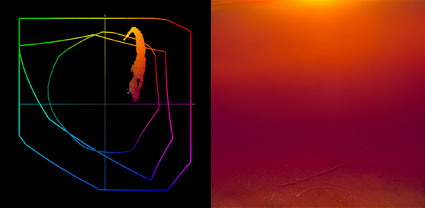
The gamut of this image and the print made from it exceeds the gamut of Adobe RGB (1998) and the monitor. You have to make a print to see the most saturated color possible.


Choose a wide gamut editing space to make the best prints possible. If a file’s color space is smaller than the printer’s color space, you won’t be able to realize the full saturation your printer is capable of.

Today’s inksets exceed the gamut of all but one of the standard editing spaces (sRGB, Colormatch, and Adobe RGB (1998)), making ProPhoto the best choice for creating files in. Since ProPhoto exceeds the gamut of human vision, it’s unlikely that you’ll ever need a wider gamut editing space than ProPhoto. If you create your files in ProPhoto you’ll be well-positioned to take advantage of future advances in printer and media technology. So, choose ProPhoto.

How do you do this?

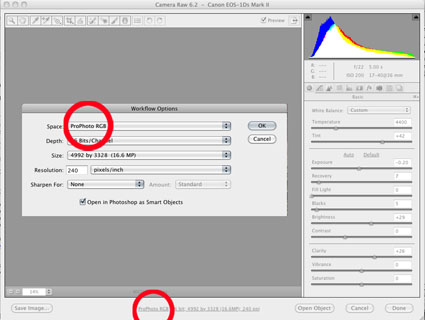
1         If you’re converting a Raw file, choose ProPhoto in the Raw converter’s interface.

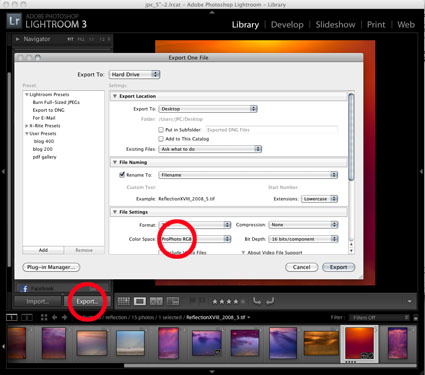
2         If you’re exporting a file from Lightroom, choose ProPhoto.

3         If you’re creating a new file in Photoshop, set ProPhoto as your default color space.

4         If you’re scanning an image, choose ProPhoto in the scanner’s interface.

Read More

Editing Spaces Compared

Four standard device-neutral RGB editing spaces compared
sRGB – red; Colormatch – green; Adobe RGB – blue; ProPhoto – full color


From small to large, standard RGB editing spaces include sRGB, Colormatch, Adobe RGB (1998), and ProPhoto. Only ProPhoto RGB can contain as much or more color as your camera can capture. This is why I recommend ProPhoto RGB as my first choice of these editing spaces. ProPhoto RGB has the widest gamut.

The term gamut is used to describe the total capacity of a color space. Wider gamut color spaces are capable of containing more saturated color than smaller gamut color spaces. ICC profiles are used to describe color spaces. ICC profiles can be graphed as XY chromaticity diagrams, which can be used to compare the gamuts of color spaces. On the center, axis are neutral colors. As you move away from the center color becomes more saturated. A larger area indicates a greater ability to hold more saturated data. The contour defining that area marks the gamut boundary, the limit of saturation that color space is capable of holding.

Capture your images in wide-gamut color (Raw) and edit them in wide-gamut color (ProPhoto RGB). Convert only copies of your master files into smaller gamut spaces for output-specific uses. Converting images from wider gamut spaces to smaller gamut spaces reduces saturation. Converting images in smaller gamut spaces to wider gamut spaces doesn’t increase saturation.

Why? Think of a bucket full of water. If the water is color, then the bucket that holds it is the editing space. If you pour water from a big bucket into a small bucket, some of the water will be lost. Pouring the smaller volume of water back into the larger bucket won’t make the total volume of water larger; it will be the same amount of water sitting in a larger bucket. Start wide and stay wide.


Read more on Color Management here.

Read more on digital Printing here.

Learn more in my digital photography and digital printing workshops.