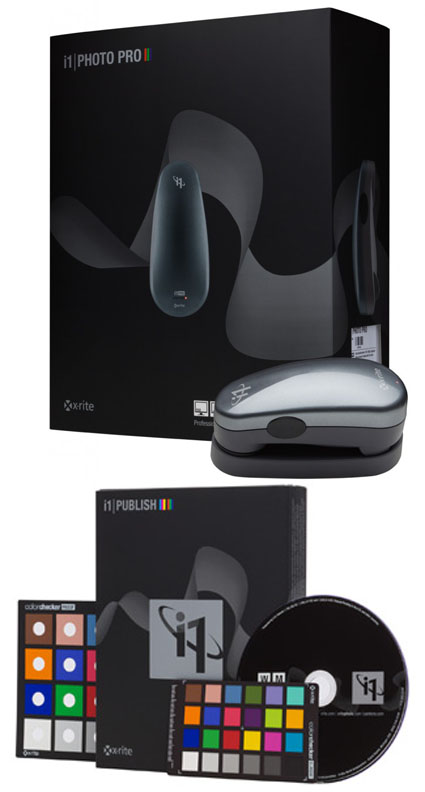
X-Rite i1Photo Pro


“The long awaited day is here!  X-Rite i1 Professional solutions, which includes the new i1Photo Pro, are now available. Each solution features the all-new i1Profiler software application designed to delivers superior color results!  i1Profiler is driven by a new color engine, sports a dual mode interface (basic and advanced) and new quality assurance features, plus so much more. The new i1Photo Pro was designed specifically for discerning photographers to attain the highest quality color results and color control throughout your complex digital photo workflow, at a very attractive price.
The new portfolio is comprised of three software/hardware/target bundles ­– i1Basic Pro, i1Photo Pro, i1Publish Pro – and i1Publish, a software/target solution. All four feature groundbreaking new i1Profiler software technology designed to accommodate all levels of proficiency and expertise, and provide the power and control needed to create the highest quality color profiles. The new PANTONE Color Manager color swatch bridging software,  ColorChecker Proof, a new ColorChecker target for direct viewing analysis against a printed target and ColorChecker camera calibration system are also featured.
Upgrade packages are available for those who have i1Pro devices as well as MonacoPROFILER 4 and ProfileMaker 5 users. Read more about the upgrade opportunities and review the features of i1Profiler software at www.xritephoto.com.”
The advances in software make every function more precise.
Printer profiling takes a major leap forward with easy to make light temperature and image specific profiles.
If you haven’t invested in X-Rite technology do it now.
If you have, upgrade now.
This is a major upgrade that all users should seriously consider.
Find out more about i1Photo Pro here.
View more in my DVD 6 Simple Steps to Good Color Management.
Learn more in my digital printing and digital photography workshops here.

Save Up To 20% On Chromix’s ColorThink Software


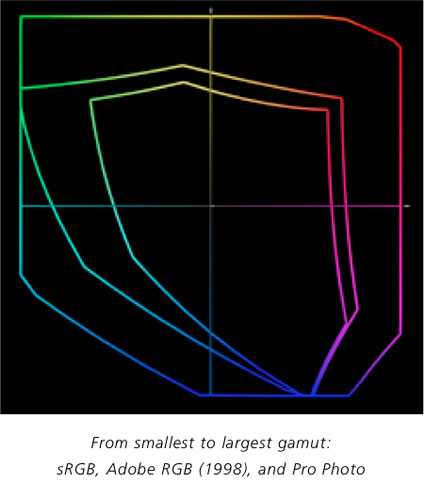
They say “A picture is worth a thousand words.” In some cases, it’s worth far more. That’s certainly true of the images generated by CHROMiX’s ColorThink. The folks at CHROMiX say, “You can’t manage your color if you don’t understand it. Nothing gets the idea across faster than the graph of a printer gamut.” They’re right.

CHROMiX ColorThink is the award-winning color management toolset that helps you understand your color more than ever before, primarily (but not exclusively) by graphing it. The ColorThink toolset is an application for managing, repairing, evaluating and graphing ICC profiles, composed of nine modules that are proven to “keep your brain on color”.

Profile Manager
Organize your profiles individually or in sets

Profile Inspector
Open all types of ICC Profiles and inspect their color data and other details. Change default settings to fit your workflow. Display neutral rendering curves.

2D Graphing
2D graphing gives you both general and specific views, allowing the overlay of multiple profiles and data sets.

3D Graphing
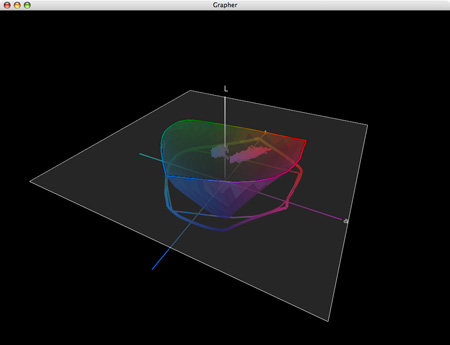
3D graphing gives you the whole picture. Analyze your devices and workflow. See the cause of proofing and printing problems. Graph measurement files and image colors to compare with device gamuts.

Image Inspector
Open images and see the embedded profile. Export, change(mac only) or delete(mac only) it at will. Learn to handle the files your customers are sending.

Profile Renamer
Profiles have two names; internal and external. Confused by what appears in menus? Change the internal and external names with this tool.

Profile Linker
Some RIPs allow linked profiles to be loaded for proofing purposes. Profile Linker will build those profiles for you, quickly and easily.

Profile Medic
Multi-point integrity checks can be performed on one or all the profiles in your system. If Profile Medic finds fixable problems with a single click it will get you back to work.

Color Lists
Open measurement files from most profiling applications. View them in list form with rendered colors. Apply profiles to the lists for testing and graphing.

ColorThink is a very robust color management software. Only a few advanced users will use its full toolset. But almost everyone can benefit from using a few of its most essential features.

For me, graphing color is the core utility of this tool. Graphs are useful abstractions. When you’re dealing with a lot of information, graphs can condense and focus information from specific perspectives revealing useful information. This is certainly true of color. Because color has three dimensions (luminosity, hue, and saturation), graphs of color in 2D always leave something out, while graphs of color in 3D give you a more complete picture and more useful perspectives.

ColorThink gives you powerful tools for graphing color in both 2D and 3D. You can graph ICC profiles (input, display, output), color, color lists, or images. You can graph multiple profiles simultaneously for comparison. You can graph profiles and images simultaneously for comparison. You can view graphs in multiple formats such as shaded objects, wireframes, points, and vectors. You can change color and transparency to make comparison easier. And you can rotate, pan, and zoom your viewpoint dynamically.
Every time I lecture on color, I use ColorThink. Every time I evaluate a new inkset or substrate or printing profile, I use ColorThink. While I don’t graph every image before I print it, I do graph particularly challenging images to print and ColorThink always reveals useful information. I recommend it highly.

This utility not only expanded my understanding of color and color management but it has also helped me refine an advanced perspective on color theory (the conceptual tools artist’s often use to help structure color palettes and make color choices). It’s my hope that in the 21st-century 2D color wheels (such as Leonardo’s, Goethe’s, and Itten’s) will be replaced with 3D color volumes.


1    An image.
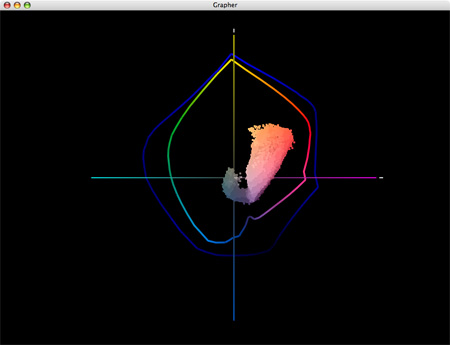
 

2    A 2D graph (two profiles and an image) tells only part of the story. The gamut of semi-gloss papers seem moderately extended when compared to matte papers; the image appears in gamut for both.
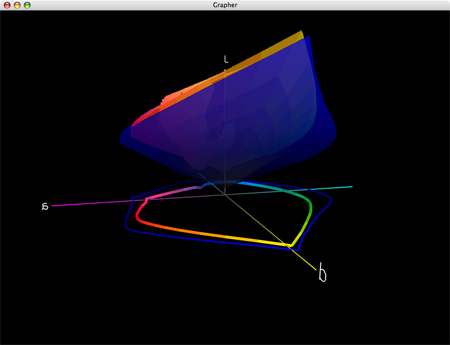
 

3    A 3D graph of two profiles tells you more. Semi-gloss papers have greatly extended dmax and gamut in dark values but reduced gamut in lighter hues; warm highlights are out of gamut for both (better highlight saturation is found in matte) and cool shadows are out of gamut for matte.
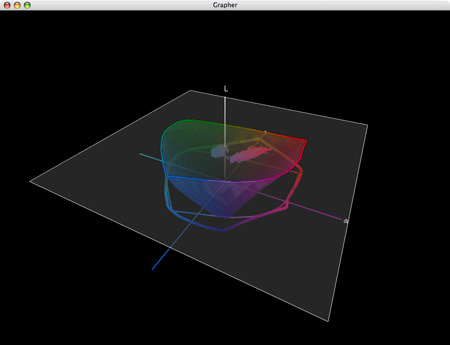
 

4    Gamut can be sliced at specific luminosity values.
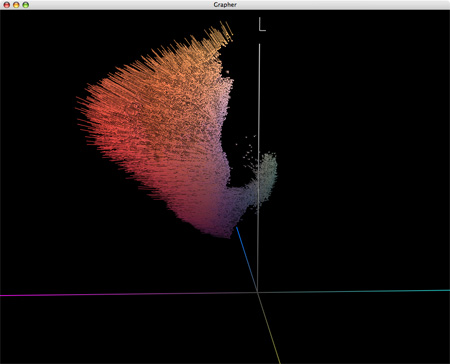
 

5    Display the effects of profiles on colors in images with vectors.


Visit the ColorThink product pages at www.chromix.com to learn more.


Read more on Color Management here.

Learn more in my digital photography and digital printing workshops.

Epson Advanced B&W Photo

Black and white printing presents several significant challenges; the ability to produce a neutral color, the ability to maintain that neutral appearance under different light sources (reduced metamerism), the ability to attain graybalance (consistent color throughout the entire tonal scale); the ability to achieve a very dark black (high Dmax) without sacrificing shadow detail (low dot gain), and longevity. All of these things are now easily attainable.

Black and white inkjet printing has come of age. In past years, there have been many compelling solutions for making black and white prints with inkjet technology; some have been fraught with problems (third party quadtone ink sets clog easily) and others have been expensive (ColorByte's ImagePrint RIP). Today, superior quality inkjet printing is both affordable and easily achieved.


Insights Members can login to read the full article.
Email:
or Sign up

Navigating The Epson Printer Driver With Photoshop


Successfully managing color for digital printing requires that the color in an image file be converted from its device-neutral color space to a device-specific color space. (Typically this occurs by converting from Adobe RGB 1998 or Pro Photo RGB  to a device-specific color space defined by an ICC profile characterizing a specific combination of printer, ink, paper, and driver.)

Using Photoshop, you can either convert color in an image before you send it to a printer driver or after you send it to a printer driver.

Choose one method of color management – not two. Easily made, a classic mistake is using both. Double color management typically results in a print that is too light and magenta.

The Epson printer driver provides many ways to manage color conversions and get reasonably good color. Two methods offer the best results; the Photoshop route and the Epson route.
How do you choose either of these methods?

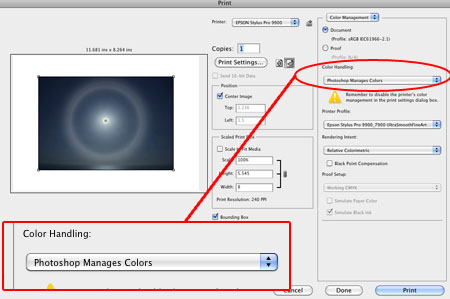
Let Photoshop’s Print window (under Color Handling) guide you – Let Photoshop Determine Colors and Let Printer Determine Colors. (While the principle is the same for most printers, interfaces will vary. Here’s information for the most current Epson interface.)

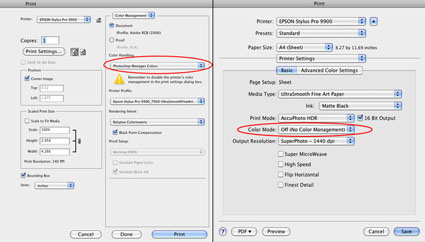
If you choose Let Photoshop Determine Colors under Color Handling, select a profile for Photoshop to make the conversion with (a paper/ink/driver specific profile not the interface default of Working RGB) under Printer Profile, choose a Rendering Intent of either Relative Colorimetric or Perceptual, and then click Print Settings. In the Print window choose the correct Printer and then change Copies and Pages to Print Settings. Select the correct Media Type, uncheck High Speed, and choose the highest printer resolution available. Finally, change Print Settings to Color Management and select Off (No Color Adjustment). The Photoshop route turns Photoshop’s color conversion on and turns the printer’s color conversion off.

The Photoshop route tends to hold slightly more saturation but it’s rendition of neutral colors and gray balance is usually not as good as the Epson route. The Photoshop route is the route to take when you want to use a custom profile. Use it if you are printing with either third-party inks or papers which require the use a custom profile to accurately describe the behavior of the alternate media.

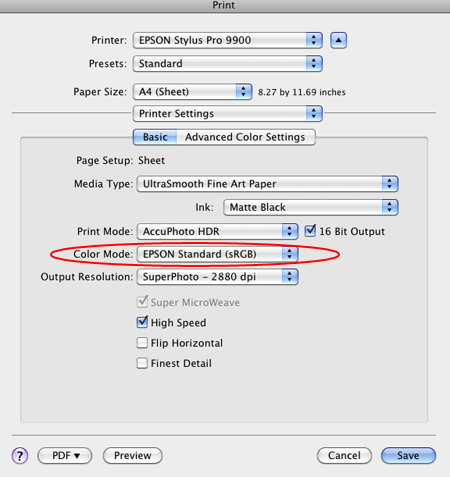
If you choose Let Printer Determine Colors under Color Handling, choose a Rendering Intent of either Relative Colorimetric or Perceptual, and then click Print Settings. In the Print window choose the correct Printer. Change Copies and Pages to Print Settings to select the correct Media Type, uncheck High Speed, and choose the highest printer resolution available. Finally, change Print Settings to Color Management, choose EPSON Standard (sRGB) under Mode, and select Color Controls. The Epson route turns Photoshop’s color conversion off and turns the printer’s color conversion on.

The Epson route tends to deliver a significantly improved rendition of neutral colors and gray balance with slightly less saturation. Try it when printing neutral colors. Use the Epson driver’s Advanced B&W Photo feature for black and white images.

Each route works well. Each route yields slightly different results. Test them to see the differences. (Note that you cannot see the differences between printing routes when softproofing; you have to make physical proofs to see these differences. They can significant.)
Read More

How To Avoid Double Color Management – Epson Printers


Get This – Correct Color Management
Avoid This Double Color Managed
Is your print too light and magenta? Double color management. It’s a classic mistake. I sometimes make it myself when I’m working too fast. So that you know what to look for, I recommend that you make the mistake deliberately, once, and only once, if possible.
Don’t do this …

And this …

What’s the right solution?
Check your software (Photoshop or Lightroom) and printer software (Epson driver) settings, reset them, and print again. Choose one method of color management – not two.
Read more in my online resources.
Learn more in my digital printing workshops.

Setting Digital Camera Color Space


Here are five commonly asked questions that, once answered, will demystify camera color spaces.

“Why do my digital camera files have an sRGB profile?”sRGB is the default color space for most digital cameras today. Most camera interfaces will allow you to change this default. Interfaces and options will vary. The widest gamut default color space most digital cameras support is Adobe RGB (1998). The profile for the camera’s default color space is attached to JPEG files but not to Raw files.

“Is Adobe RGB (1998) the widest gamut I can get with my camera?”
No. The camera sensor is capable of quite a lot more. To access color spaces with a wider gamut than Adobe RGB (1998) you typically need to shoot in a Raw file format. This also allows you to acquire a high bit file – 16-bit instead of 8-bit.

“Where do Raw files get their profiles?”

Raw files don’t have profiles until they are converted into a standard editing space, either with the manufacturer’s software or another Raw file converter like Adobe Camera Raw or Lightroom. Most Raw converters offer a choice of editing spaces including sRGB, ColorMatch, Adobe RGB (1998), or ProPhoto RGB.

“Which color space do you recommend using?”
Use ProPhoto RGB for digital output. It’s the only editing space that can encompass the full gamut of both your camera and your inkjet printer. Use ProPhoto RGB for master files. Make all output specific derivatives from them.
Use sRGB for the web. If a browser isn’t color management compliant, colors won’t be distorted as much as wider gamut color spaces. Use sRGB for derivative files.

“How do I set color space on a digital camera?”
Camera interfaces and terminology vary widely. On the Canon 1Ds Mark II, you can toggle between sRGB and Adobe RGB (1998) by pressing the Menu button and going to the Recording menu (the first icon, a camera), then dialing down to Color matrix and continuing within that to Set up.

Read more Printing Tips.
Learn more in my Fine Art Digital Printing Workshops.

Where to Put ICC Profiles

colorsyncutility
ICC profiles need to be filed in the correct location on your computer for them to be available to applications.
Where do you put them? It depends on the system and version you’re using.

Mac OS X
–    Library / ColorSync / Profiles – storing profiles here allows all Users to use them.
–    Users(Username) / Library / ColorSync / Profiles – storing profiles here makes them available to the current user only .

Windows 7, Vista and XP
–    Windows \ System32 \ Spool \ Drivers \ Color
–    Right click on the profile and select “Install Profile” to copy the profile to the directory.
– Profiles need to be copied manually to the directory to replace profiles.

Mac OS 9.x
–    System / ColorSync / Profiles

Windows 2000 and NT
–    Winnt \ System32 \ Spool \ Drivers \ Color
–    Right click on the profile and select “Install Profile” to copy the profile to the directory.
–    Profiles need to be copied manually to the directory to replace profiles.

Windows ME and 98
–    Windows \ System \ Color
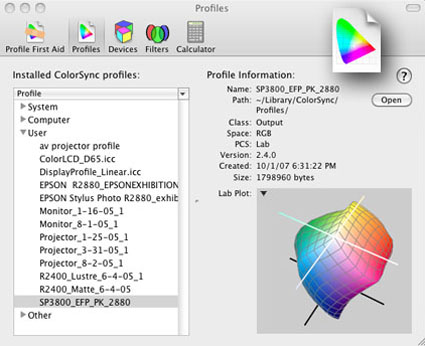
Apple’s ColorSync Utility displays details of individual profiles, shows gamut plots, can rename profiles, validates profile structure, etc.
Microsoft’s has a Control Panel Applet installs and removes profiles, edits internal and external names, creates 3-D gamut plots, compares profiles, etc.


Read more on Color Management here.

Learn more in my digital photography and digital printing workshops.

Get Great Color in Blurb Books!

BlurbColorVideo
X-Rite and Joe Brady offer this free 52 minute webinar on how to get great color in Blurb books.
video Step-by-Step Guide to Creating Your Book (37 Minutes)
Learn how to: create your book; work with photos, text, and layouts; upload your book; and more.
video Blurb BookSmart® Design Tips and Techniques (26 minutes)
For those who already know the basics of BookSmart, this intermediate session explores several design ideas you can use in your books.
video Using InDesign® to Make a Blurb Book (3:33)
A short three-minute introduction to using Adobe InDesign® to create compliant PDF files by using the Blurb PDF/X-3 Export Preset and the Blurb Templates.
Learn more with my Bookmaking Lessons.
Learn more in my Fine Art Digital Printing Workshops.