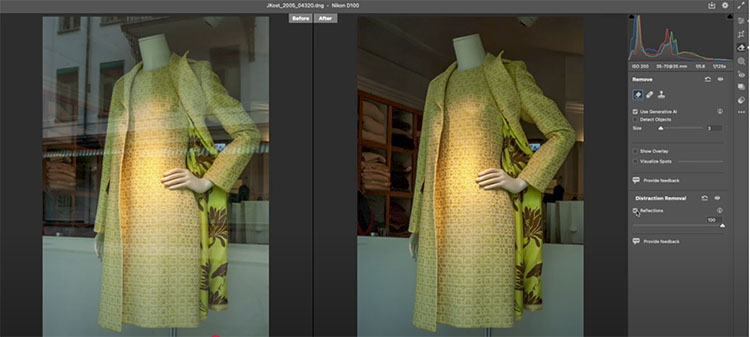
Advanced Image Editing Techniques With Photoshop CS6
February 4, 2013 | 1 Comment
“Learn how to start with a everyday good image and then make it look like a prize winning photo. This will all be done with some tips and techniques found in Adobe Photoshop CS6. This project combines Adobe Camera Raw, Smart Objects, Adaptive Wide Angle, and finally Puppet Warp to enhance the image.”
View more Photoshop videos here.
Learn more in my digital photography and digital printing workshops.
Adobe Photoshop CS6 For Photographers – Julianne Kost
January 29, 2013 | Leave a Comment
Julieanne Kost showcases the most exciting new features from Photoshop CS6 and Camera Raw.
Find more B&H Event Space videos here.
View more Photoshop videos here.
Learn more in my digital photography and digital printing workshops.
The Graduated Filter and Adjustment Brush In Lightroom 4 – Julianne Kost
October 22, 2012 | Leave a Comment
Julianne Kost demonstrates the power of making selective adjustments like dodging and burning, color corrections and noise removal using the Graduated Filter and Adjustment Brush in Lightroom 4. Note: although this video was recorded in Lightroom, the same techniques are available in Adobe Camera Raw in Photoshop CS6.
View more Lightroom videos here.
Learn more from Julianne Kost on her blog.
Learn more in my digital photography and digital printing workshops.
3 Sneak Peeks At Adobe Photoshop CS6
February 9, 2012 | Leave a Comment
Adobe has been releasing a series of Photoshop CS6 Sneak Peeks.
Above are the first 3.
Find Adobe’s Julianne Kost’s 8 part video series on Lightroom here.
Camera Raw 6.6 / Lightroom 3.6 Updates Now Available
December 16, 2011 | Leave a Comment
Adobe has released updates for Camera Raw (6.6) and Lightroom (3.6).
New cameras are supported.
New lens profiles have been added.
Bugs are fixed.
See the Lightroom Journal for a full list of details.
X-Rites’ Color Checker Passport can be used to quickly deliver more accurate color in a variety of ways.
Set White Balance, White Point, and Black Point
The X-Rite Color Checker Passport is the industry standard target that can be used in several ways to render color in your digital images more accurately – setting white balance, creative enhancement, and visual confirmation.
It’s easy to use. Shoot the Color Checker once at the beginning of each shooting session and you can use that exposure as a target for all exposures made under the same light. The exposure of the target doesn’t have to be perfect. Just, roughly fill the frame with the target; it doesn’t even have to be focussed. To use the exposure of the target, use your choice of Raw conversion software to open it along with other exposures you’d like to apply the same measurements to; click on the appropriate color patches (black for black point, white for white point, gray for gray point); and sync all of the files. It’s that simple.
Create A Camera Profile
The X-Rite Color Checker Passport can also be used to make custom profiles for your individual camera. You can create a camera profile with the same exposure of the target that you use to set white balance. While camera profiles are generated with the same target, the resulting exposures are not used to set white balance, instead they are used to deliver significantly improved color rendition and saturation, providing the best starting point for any color adjustment strategy you choose. Camera profiles are created with the X-Rite software supplied with the Color Checker Passport, stored, and later applied with your choice of Raw conversion software, typically Adobe Camera Raw or Adobe Lightroom.
For optimum results, exposures used to generate camera profiles need to be made under the light (color temperature and spectral distribution) that subsequent exposures are made in. Using two exposures of the target made under different light temperatures, you can create a dual illuminant camera profile that can be used for all exposures made under a wide range of color temperatures. Single illuminant profiles are recommended for exposures made under very warm or very cool light temperatures – below 3600K (golden hours) and above 6800K (twilight).
How do you make a camera profile? First convert one or more exposures of the Color Checker Passport from the manufacturer’s proprietary Raw format to Adobe’s open standard Raw format – DNG. (Use either the free Adobe DNG Converter, Adobe Bridge, or Adobe Lightroom.) Open X-Rite’s Color Checker Passport software. Click DNG or Dual Illuminant DNG. Drag one or two DNG files into the open window. Once the software has identified the specific color patches it needs to build the profile, click Create Profile. The profile will automatically be stored for you in Camera Profiles and will be available for your use the next time you convert a Raw file in either Adobe Camera Raw or Adobe Lightroom. You’ll find it under the Camera Calibration tab/panel under Camera Profile. Save New Camera Raw Defaults and your new camera profile will be automatically loaded when you open Raw files and previews in Adobe Bridge will be rendered with it.
Using a Color Checker Passport target or a camera profile generated with it doesn’t mean that you are locked into the results they generate, they simply give you the best starting point possible for adjusting your images. Read more
Adobe Releases New Free Updates
August 31, 2010 | Leave a Comment
Adobe released multiple free updates today.
Camera Raw 6.2
Lightroom 3.2
Dreamweaver CS5 11.0.3
Bridge CS5 4.0.3
Russell Brown – Photoretouching in Camera Raw
June 14, 2010 | Leave a Comment
Learn more about Photoshop and Lightroom in my DVDs and Workshops.
Julianne Kost – New Camera Raw Feature in CS5
June 11, 2010 | Leave a Comment
Learn more about Photoshop and Lightroom in my DVDs and Workshops.
Using Star Ratings
June 12, 2009 | 5 Comments

It’s important to think about how you use star Ratings (in Adobe Camera Raw and Lightroom). Not everyone uses them the same way. However you decide to use them, you should use them consistently. Otherwise, when you browse multiple folders, you’ll have to interpret the same symbols differently in different contexts. That gets confusing fast!
I like the 5 star rating system. It helps make useful distinctions with only a touch more granularity than 3 levels of distinction – typically high, medium and low. It doesn’t get as granular at 10 levels of distinction, so you can cut to the chase fast. It’s used in other venues like restaurants and hotels so it’s familiar. Still, I don’t find using 1 and 2 star ratings useful for ranking the quality of images; I have no use for images that are below average. The images use are either good – 3, better – 4, or excellent – 5. So, I use 1 and 2 stars for something else. I use 1 star to identify a good idea in a substandard exposure or composition; I’ll try and use the idea later with better material. I use 2 stars to identify images that are good for composites; the exposures are fine but the composition is unfinished.
How do you use star ratings?
Comment here.
We discuss this and many other subjects in my field workshops.
Learn more about composition in my field workshops.
Upcoming dates include …
8/9-15 – Iceland … 10% discount ends June 20.
10/16-19 – Fall Foliage … 15% discount ends August 15.
Subscribe
Get the RSS Feed-
- Adventures
- Alumni
- Antarctica
- Antarctica 2009
- Apps
- Audio
- Books
- Business
- Calendar
- Canon Cameras
- Causes
- Cell Phone
- climate change
- Collected
- Color
- Composition
- Contests
- Conversations
- Creativity
- Destination
- Disclosure
- Discount
- Drawing
- DVDs
- eBooks
- Editing
- Environment
- Epson Print Academy
- Equipment
- Event
- Exercises
- Exhibit
- Experiment
- Exposure
- Green Actions
- Greenland
- Guest Blog
- Huffington Post
- iceland
- Images
- Influences
- Inspiration
- Interviewed
- iPad
- iPhone
- Lecture
- Lighting
- Lightroom
- Magazine
- Map
- Masterworks In My Collection
- Media
- Meditation
- Multimedia
- Namibia
- News
- Optical Illusions
- Packing
- People
- Photographer's Favorite Quotes
- Photographers
- Photographers – Q&A
- Photographers On Photography
- Photographers Video Conversation
- photography
- Photoshop
- Postcards
- Printing
- Published
- Q&A
- Quotes
- R/Evolution
- Radio
- Reading
- Requests
- Review
- Reviewing
- Science
- Screensaver
- Sculpture
- Seminar
- Sharpening
- Slideshow
- Social Causes
- Social Networks
- Software
- Special Guest
- Special Offer
- Statements
- Storytelling
- Technique
- Technology
- The Making Of The Print
- The Stories Behind The Images
- Travel
- Uncategorized
- Video
- Video – Artists
- Video – Creativity
- Video – Lightroom
- Video – Photographers
- Video – Photography
- Video – Photoshop
- Video – Quick Tips
- Website
- Winners Of The Day
- Workshop Giveaways
- Workshops
- Writing
- X-Rite i1Photo Pro
Archives
-
- May 2013
- April 2013
- March 2013
- February 2013
- January 2013
- December 2012
- November 2012
- October 2012
- September 2012
- August 2012
- July 2012
- June 2012
- May 2012
- April 2012
- March 2012
- February 2012
- January 2012
- December 2011
- November 2011
- October 2011
- September 2011
- August 2011
- July 2011
- June 2011
- May 2011
- April 2011
- March 2011
- February 2011
- January 2011
- December 2010
- November 2010
- October 2010
- September 2010
- August 2010
- July 2010
- June 2010
- May 2010
- April 2010
- March 2010
- February 2010
- January 2010
- December 2009
- November 2009
- October 2009
- September 2009
- August 2009
- July 2009
- June 2009
- May 2009
- April 2009
- March 2009
- February 2009
- January 2009
- December 2008
- November 2008
- October 2008
- September 2008
- August 2008
- July 2008
- June 2008
- May 2008
- April 2008
- March 2008
- February 2008
- December 2007
- September 2007
- April 2007
- March 2007
- February 2007
- December 2006
- November 2006
- October 2006
- August 2006
Categories
Blogroll
Topics & Friends
WP Cumulus Flash tag cloud by Roy Tanck requires Flash Player 9 or better.


