How To Reduce Image Noise With Photoshop’s Filters
Photoshop offers several filters designed to reduce noise – Despeckle, Dust and Scratches, Median, and Reduce Noise. They’re all useful for modest amounts of noise. They may be all you need for an extra pass of noise reduction after Raw conversion.
Build yourself a safety net when using these filters. Don’t apply them to the Background layer. Apply them to a duplicate of the Background layer. Then you’ll be able to redo noise reduction at any time in the future. Noise reduction tools will surely improve as time passes. You’ll also be able to mask the effect to affect only selected portions of an image, use Layer Styles Blend If sliders to restrict an effect to shadows, midtones, or highlights, and use Blend Modes to target luminosity, hue, or saturation.
A deeper look at these four filters will benefit every Photoshop user.
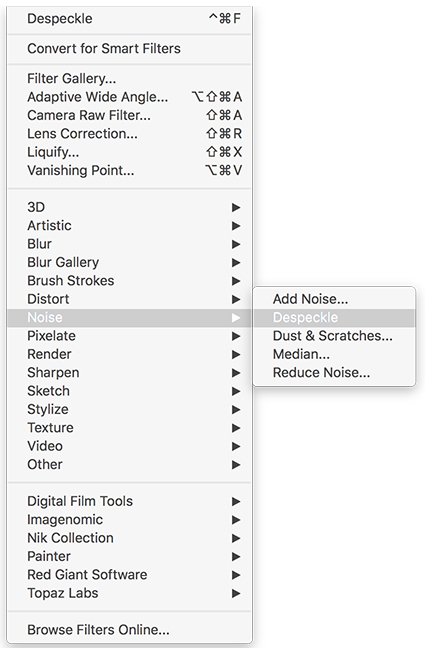
Despeckle. It’s a bare bones simple filter. There’s one strength and setting. There’s no dialog box. You can apply it multiple times for stronger applications. You can apply it to individual channels (i.e. if the blue channel has more noise than the others) or selectively (to low frequency smooth areas) to make it more targeted. That’s it. It’s that simple. How well does it work? Well enough to become familiar with it. It does a reasonable job for modest amounts of noise. It never performs miracles. But it can be a final touch worth applying to many images. It’s also useful for reducing noise in masks and effects layers.
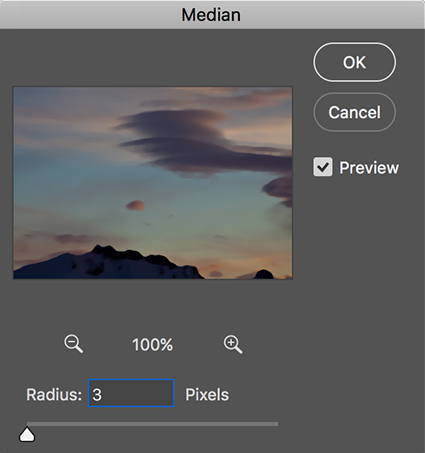
Median. It’s simple. There’s only one slider Radius. Radius controls the amount of blurring. The blurring is Median provides is substantially more aggressive than Despeckle. Only very low settings are useful for photorealistic images. Be very careful with this filter. With even modest applications it can subdue important textural detail. With moderate applications, it can even smooth and reshape contours. Apply it aggressively to see just how far it can go. You’ll see it quickly goes too far.
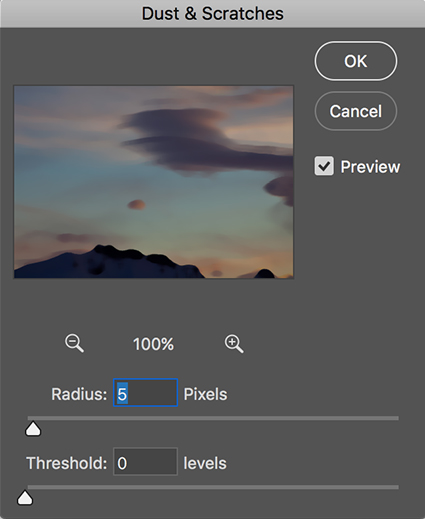
Dust and Scratches. It’s classically used to reduce the amount of retouching needed by images as it removes small artifacts, like dust and scratches, but it can also be useful for modest amounts of noise reduction. There are two sliders. Radius controls the amount of blurring; with higher Radius settings subdue more noise and may compromise detail. Threshold restricts the number of tone levels the filter is applied to, making the filter selective with respect to luminosity values; very high Threshold settings may introduce sharp transitions in texture between blurred and unblurred areas. Used aggressively, this filter will subdue small textural detail and compromise image sharpness. Used carefully, this filter can effectively reduce modest amounts of noise.
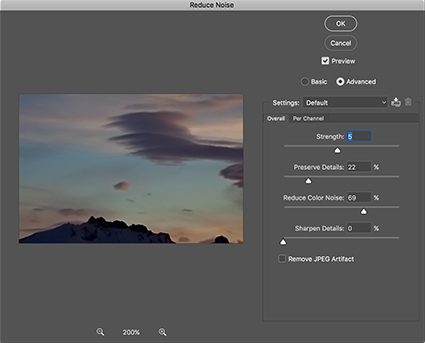
Reduce Noise. It offers the most control of the Photoshop filters. It can deal with moderate amounts of noise relatively well. Strength controls the intensity of the filter. It’s the blurring effect. Preserve Details reduces the effect of the filter initially targeting contours and later by targeting higher and higher detail frequencies or image texture. The settings you use are entirely dependent on Strength settings and image content. Higher frequency detail merits higher settings. It’s not a panacea. High Strength and Preserve Detail settings can make some areas of an image look synthetically smooth and yet still fail to remove small artifacts, especially near contours. Reduce Color Noise blurs color without affecting luminosity. You can be relatively aggressive with this slider, but if you use it this way, guard against reduced saturation especially along dramatic contours. Sharpen Details attempts to restore image sharpness after blurring. Use it conservatively. More sophisticated sharpening can be performed with other filters in Photoshop. Remove JPEG Artifact is somewhat effective for reducing JPEG compression artifacts, such as blocky color and jagged edges. Use this check box only on JPEGs that contain artifacts. (Don’t use it on TIFFs from Raw files.) If you can’t remove all of the JPEG artifacting in a file without compromising image quality, turn to third-party plugins. While it’s the most advanced Photoshop filter for noise reduction, like all the others, when used for major noise reduction, it may compromise image sharpness.
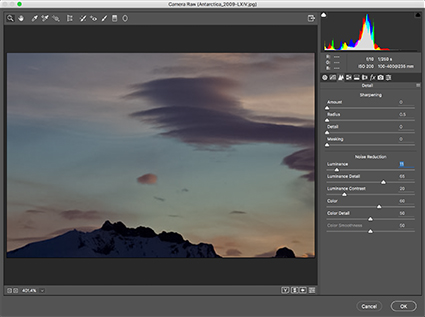
The best tool in Photoshop’s arsenal for noise reduction is Adobe Camera Raw. While the best place to use this tool is during Raw conversion, you can also apply it after Raw conversion as a filter. Try it first; consider these other tools as offering different blurring methods that are useful in specific situations, like Dust & Scratches. I cover this Adobe Camera Raw’s Noise reduction features in great detail in a separate article.
None of these tools are up to the task of industrial-strength noise reduction. Applied too frequently or too aggressively they will compromise image sharpness unnecessarily. For aggressive noise reduction, turn to third-party software, like Imagenomic’s Noiseware. (I cover this plug-in in a separate article here.)
Let me offer you a final word of caution. Whenever you blur an image to reduce noise, don’t overdo it. Blur enough to reduce noise but no more. If you go too far with blurring effects you’ll spend a lot more time trying to restore image sharpness and may never achieve optimum results. Just as there are limits to how much apparent sharpness you can restore to a poorly focused image, there are limits to how much more apparent sharpness you can reintroduce after blurring. Use a light touch. Sometimes the noise is more desirable than reduced sharpness. Sometimes the presence of noise is even desirable; it can keep images from seeming synthetic and even make some images appear slightly sharper. (I cover this in a separate article here.)
No Comments