How To Choose An Optimal Setting For Photoshop’s High Pass Filter

Photoshop’s filter High Pass is one every user should know. It can be either an edge sharpener or a unique luminosity contrast enhancer that produces a three-dimensional effect, unlike any other tool.

With only one slider, Radius, the differences between low and high settings can be found in the way they handle frequencies of detail: low (smooth spaces and planes), medium (broad lines and moderate texture), and high (fine lines and texture).

When you use low Radius settings, the High Pass filter adds contrast to the edges of lines. As the setting rises it brings out first coarse and then medium texture, accentuating fine texture, often confused with noise, much less.

When you use high Radius settings, the High Pass filter moves beyond sharpening and becomes tonal enhancement. The halos (light lines) and lines (dark lines) it produces become so broad and feathered that rather than only contour contrast (Think edges and thin lines.) they instead accentuate broader image contrast (Think planes chiseled by a sculptor.).  In short, images filtered with high High Pass settings look contrastier and more three-dimensional, as if all the planes in an image are dodged and burned.

Low or high, how do you choose?


Insights Members can login to read the full article.
Email:
or Sign up

One Filter To Quickly Remove Most Halos In Photoshop

.
“Learn how to easily fix and remove halos easily and fast using a hidden Photoshop slider.”
.

Create Amazing Distortion With Photoshop’s Liquify Filter

1
Awareness of the distortions produced by angle of view and lens choice is the beginning of using them creatively. Curiously, permission is the beginning of using distortion in post-processing creatively. Many people have been told that it’s inappropriate to do so. Why? Why accept an unintended mechanical by-product, but not a consciously intended effect? Why take such a powerful tool for expression off the table? Even the subtlest applications of distortion can produce powerful results. Once you understand what kinds of distortions are possible during post-processing, you may even find yourself changing your angle of view during exposure.

There are many reasons why you might want to distort an image. Here are four:

1. Correct Optical Distortion
It can be produced by many things, including lens choice, angle of view, motion, panoramic stitches, etc. You can choose to make the selection of a wide-angle lens less about distortion and more about including more.

2. Modify Proportion
Adjust the height and/or width of objects and/or areas. Just for starters, take off the 10 pounds that the camera adds on.

3. Change Proximity
Reduce or increase the spaces between objects. Make things feel more or less related.

4. Enhance Or Change Gesture
Make a leaning object more tilted or straighten it out. Think of this as adding the words “very” or “less” into a sentence.

When exploring the many distortion tools in Photoshop, you’ll find that the Liquify filter is one of the most powerful. The Liquify filter is so powerful that, when in use, it offers its own toolbar and menus, somewhat like Camera Raw. To get the most of the Liquify filter, it’s worth taking the full tour …

Read all the details on Digital Photo Pro.

Photoshop’s sophisticated distortion capabilities are relatively new to photography, and so is the mindset of using them to photographers. Both are worth acquiring. Everyone can find a use for them at one time or another, if not on every image. As every photographer uses distortion to one degree or another, ultimately, what separates photographers is not whether they use distortion but when, how, and why they use it. The same tools can be used to achieve entirely different effects. There’s a world of difference between using distortion to remove process artifacts for more accurate representations, using distortion to aesthetically refine the formal qualities of images, and using distortion to interpret subjects expressively. Intent is everything. Practice is a reflection of intent. Simply asking yourself how far you are and aren’t willing to go and, finally, why will help clarify yours. Consider these questions seriously, and you’ll find your vision will grow stronger and clearer.

Learn more in my digital photography and digital printing workshops.
Review – Singh Ray Vari-ND Filter


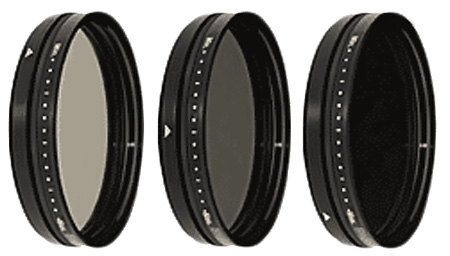
This one filter performs the function of many.  Reduce the amount of light coming through your lens by 2 to 8 stops. Simply rotate the filter to increase or decrease the effect.
Frame and focus with the filter on at minimum density. Rotate the filter to intensify the effect. It can get so dark you can hardly see through it.
Because the Vari-ND is so easy to use, it encourages experimentation with a wide range of exposures and effects.
Make long exposures.
Make selective focus easier.
Enhance close-up flash control.
Exaggerate the effects of panning during exposure.
As you test your Vari-ND Filter, you’ll find the effects will vary with focal length, direction and speed of motion (your subject’s or your own or both), and of course duration of exposure.
Use the preview on your DSLR to confirm your results instantly. Monitor your histogram after exposure to confirm proper exposure.
The Vari-ND comes in 77 and 82 mm sizes. Adaptors for other sizes are available.
The Vari-ND can be used with most other Sing-Ray filters, except Polarizers. You can amplify the effect of the Vari-ND by stacking it with the Mor-Slo 5 Stop Solid ND Filter.
Singh-Ray filters are legendary for their optical quality.
The VariND filter is one of the few filters I use.
For more information visit www.singh-ray.com.
Find out more about the tools I use here.
Learn more in my digital photography workshops.