Use Adobe Lens Profiles To Improve Your Image Quality

LensProfiles_Profile_425
Do you wish you could improve the quality of the images your lenses deliver after exposure? You can, using software. Adobe’s Lens Corrections feature uses a digital image file’s EXIF metadata about camera and lens to automate cures for standard lens distortions, including geometric distortion, chromatic aberration, and vignetting.


Insights Members can login to read the full article.
Email:
or Sign up

Try New Things – The Story Behind The Image

IlluminationII_425

Illumination II, Sossusvlei, Namibia 2012

 In 2010, during my third trip to one of the oldest desert’s in the world, Namibia’s Sossusvlei dune field, I enjoyed one of the most sublime hours of my life, from a helicopter. Moments of grace like this fill you with reverence for the miracle world we live in and a deep abiding gratitude to be a part of it all. I was prepared for it, but nonetheless surprised.
Before arriving, to plan where to go and how to maximize my time this magnificent dune field, I had done a considerable amount of virtual aerial research with Google Earth, zooming and panning images made from the combination of thousands of satellite images at various magnifications, to familiarize myself with where it started and stopped, how it changed in character, and the relative location of landmarks such as the dunes Big Mama and Big Daddy and the famous clay playa Deadvlei. This was a new way of scouting a location for me and it paid dividends making the limited time I had there more efficient and productive.
None of that could have prepared me for the changing angle of light or weather. On site, I had to assess the impact of current conditions. We were on the second flight of the day, an hour after sunrise. All week long, the air was filled with dust from far off sandstorms that scattered the rays of the sun, permeating the sky with a white gold light. Was this a liability or an asset? How could I make it one and not another?
Even at an altitude of 3,000 feet, twice the height of the largest dunes, I found I couldn’t fit the vast dune field into my viewfinder. So I improvised and started making multi-shot exposures for panoramic stitches while moving. It seemed like a bold move, if the two or three shots did not merge successfully then both would be lost. Then, one of my companions, made an even bolder move, requesting we do a 360-degree stationary rotation so that he could make a panoramic image of the entire dune field. Would it work? To my delight both methods worked.
Neither experiment would have been successful were it not for new image processing software that provided better image stitching capabilities. (Not long ago, it wouldn’t even have been possible to convincingly combine two separate exposures.) More new image processing features aided the final realization of this image. I used new lens profile corrections, designed to remove optical distortions, to expressively distort the image. Quite different than a change in angle of view, which reveals and obscures information, these distortions offered complementary but distinctly different visual effects, changing relative proportions and spatial relationships within the image. This furthered my ongoing experiments to compare and contrast the two and so learn to fully utilize them in tandem with one another intuitively.
Ever since that day, I don’t see things in the same ways. Now I also see in new ways. It’s important to try new things. Trying new things stimulates new growth.
Questions
How do new developments change your experience?
How do new developments change your thinking?
How do new developments change your actions?
How can you use new developments to innovate?
Which new developments are likely to impact your creations most?
Find out more about this image here.
View more related images here.
Read more The Stories Behind The Images here.

Discovery Can Happen At Any Point In A Creative Process

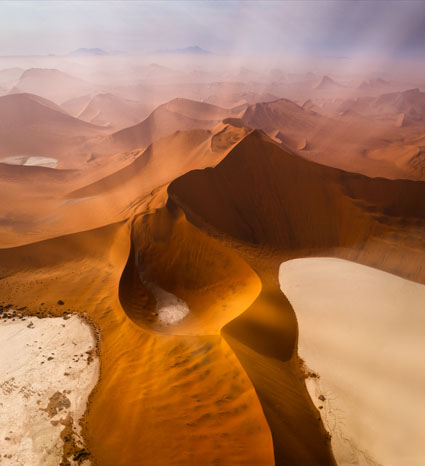
Illumination II, Sossusvlei, Namibia 2012.

In 2010, during my third trip to one of the oldest desert’s in the world, Namibia’s Sossusvlei dune field, I enjoyed one of the most sublime hours of my life, from a helicopter. Moments of grace like this fill you with reverence for the miracle world we live in and a deep abiding gratitude to be a part of it all. I was prepared for it, but nonetheless surprised.
Before arriving, to plan where to go and how to maximize my time this magnificent dune field, I had done a considerable amount of virtual aerial research with Google Earth, zooming and panning images made from the combination of thousands of satellite images at various magnifications, to familiarize myself with where it started and stopped, how it changed in character, and the relative location of landmarks such as the dunes Big Mama and Big Daddy and the famous clay playa Deadvlei.
None of that could have prepared me for the changing angle of light, we were on the second flight of the day, an hour after sunrise, and the atmospheric conditions, all week long, the air was filled with dust from far off sandstorms that scattered the rays of the sun, permeating the sky with a white gold light. On site, I had to assess the impact of current conditions.
Even at an altitude about 3,000 feet, twice the height of the largest dunes, I found I couldn’t fit the vast dune field into my viewfinder. So I improvised and started making multi-shot exposures for panoramic stitches. It seemed like a bold move, if the two or three shots did not merge successfully then both would be lost, until one of my companions, Paul Tornaquindici, made an even bolder move and requested we do a 360 stationary rotation so that he could make a panoramic image of the entire dune field. To my delight, this method worked.
The images lay simmering in my unconscious for more than a year before I found my final solution, to render an effect of light as if it were originating from within the land to complement the light that showered down outside it. Often, a period of gestation is necessary to distill the essence of rich experiences to their essentials and connect them to others.
New image processing features informed the final realization of this image. The body metaphors, latent in these images, were intensified with creative perspective adjustments, using lens profile corrections, designed to remove mechanical optical distortions, now used expressively. Quite different than a change of angle of view, which reveals and obscures information, these distortions offered complementary but distinctly different visual effects, changing relative proportions and spatial relationships within the image. This solidified my previous experiments to compare and contrast the two and so learn to fully utilize them in tandem with one another intuitively.
Unexpectedly, the dynamic explorations made during the creation of this image suggested an entirely new alternate solution – one not fit for print. Animations of progressive distortions made the images appear to pulse and breathe, an effect that is perfectly in sync with my view of land as a living thing with a spirit of its own.
Making this image required pre-planning and then allowing that plan to evolve while responding to new input at each step in the creative process.
How can planning help strengthen your creative efforts?
At what stages and in how many ways can you encourage the evolution of those plans?
When is it better to abandon an old plan for a new one?
What are the positive and negative effects of having no plan at all?
View more related images here.
Read more The Stories Behind The Images here.

Adobe’s Lens Profile Corrections


Adobe’s lens profile corrections are simply amazing. Lens Corrections automate correction of standard lens distortions, including geometric distortion, chromatic aberration, and vignette. In addition to correcting lens distortions, this feature can also be used to adjust perspective and rotation.
 
Adobe provides support for a growing list of camera manufacturers, camera models, and lenses: Canon, Nikon, Pentax, Samsung, Schneider, Sigma, Sony, Tamron, and Zeiss.
Adobe Lens Profile Creator
If Adobe doesn’t supply a lens profile for your particular lens you have three choices.
First, you may be able to access a lens profile created by another user on the Adobe Lens Profile Creator forum. Find and share lens profiles at Adobe labs. Of course, these lens profiles will only be as good as the creators were diligent about creating them.
Second, you can visually adjust the parameters of an existing lens profile and save the new settings under a new name for future use. There’s plenty of room for user error with this method but it’s more efficient than creating manual corrections from scratch. Expect to check the results frequently when you apply these settings to different types of images.
Third, you can create your own custom lens profile with the free Adobe Lens Profile Creator utility. Download the Adobe Lens Profile Creator at Adobe Labs.Adobe Lens Profile Creator is a utility designed for photographers who want to create custom lens profiles for their own lenses. The process of creating a custom lens profile for your lens involves capturing a series of images of a printed checkerboard pattern with your specific camera and lens, converting that set of raw images into Digital Negative (DNG) file format (using the Camera Raw plug-in, Lightroom, or the free Adobe DNG Converter), and importing the raw DNG images (or JPEG/TIFF images when creating lens profiles for a non-raw workflow) into the Adobe Lens Profile Creator to generate a custom lens profile. If you create new lens profiles, you can share them with the rest of the user community on the Adobe Lens Profile Creator forums, publishing them directly from inside the Lens Profile Creator. These profiles will then be available via new versions of the Adobe Lens Profile Downloader. This is an extended and complex process few photographers will want to go through, but for those using unsupported cameras and lenses worth the time and effort in the long run.
Using Adobe’s Lens Profile Corrections
You can access Adobe’s Lens Corrections in three locations; Adobe Camera Raw, Lightroom 3, or Photoshop CS5’s Lens Correction filter. (Lens profile corrections were first introduced in Lightroom 3. To get Lens Profile Corrections in Adobe Camera Raw CS5, you need to download a version that has been updated after the release of Lightroom 3. You can download the latest free update at adobe.com.
It’s far less destructive to make these types of adjustments to Raw files during conversion rather than after conversion. It’s also more flexible. (Use a smart object and reaccess the controls any time by simply by double clicking the smart object.) However, if you want to apply Lens Corrections within Photoshop, after a file has been rasterized, you can use CS5’s updated Lens Correction filter.
In ACR and Lightroom, you’ll find two tabs under Lens Corrections; Profile and Manual.
Under Profile, click Enable Lens Profile Corrections to activate this feature. Using the EXIF data in your Raw file, the software will automatically select the Make (of your camera), Model (of your lens), and the Profile (for that lens). You can use the supplied lens profiles, download a custom profile made by another user, or create your own (manually or with Adobe’s Lens Profile Creator).
Checking Enable Lens Profile Corrections will also allow you to access three sliders –  Distortion, Chromatic Aberration, and Vignetting – for manually fine tuning the results. If you like the results of one correction but not another, you can decrease or increase the effects in one or more of the three fields.
Under Manual, you’ll find controls for visually creating your own lens profile corrections …
Read more on Digital Photo Pro.
Read more in my online lessons.
Learn more in my digital photography and digital printing workshops.