Use Multiple Exposures To Reduce Image Noise

BeforeAfter_425

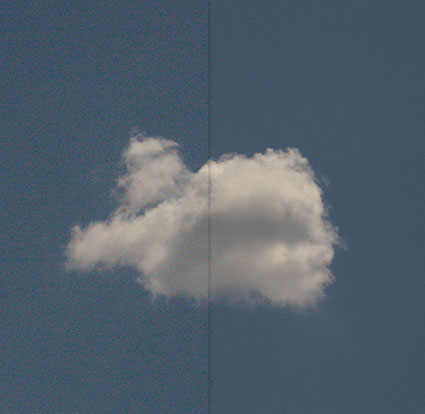
Single Exposure / Multiple Exposures

Need to make an exposure at a setting that’s sure to produce noise? Make a bunch of them. Then watch the noise disappear.
You can reduce noise in an image by combining multiple exposures of the same composition in Photoshop. Photoshop can search for the differences between the separate exposures and then blend them, keeping what stays the same and eliminating what changes. Random noise between separate exposures of the same composition will be substantially reduced, even dramatically, or disappear altogether. (This technique won’t eliminate fixed noise; hot pixels or column and row noise. There are other techniques for that, like using dark slides.)
You’ll find having this option will greatly reduce the reluctance you have towards using high ISOs. This means two things. You’ll be able to make images in lighting situations you thought you couldn’t and you’ll be able to make hand-held exposures in conditions you ordinarily wouldn’t be able to without severely compromising quality.

So how do you do this? Take these steps.
MultipleExposures_425
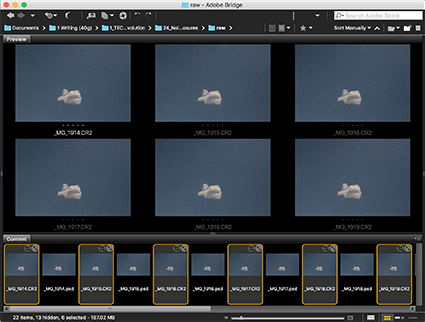
1      Shoot multiple exposures.

(Try to minimize camera motion as much as possible. It’s not necessary to use a tripod, but it can be helpful.)
ScriptLoadFilesIntoStack_425
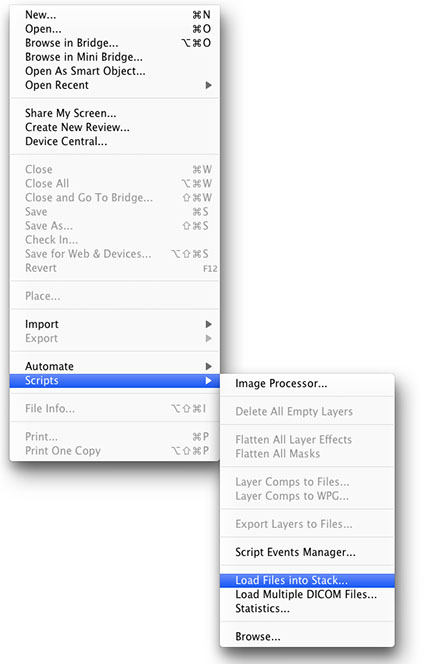
2     In Photoshop go to File >  Scripts > Load Files into Stack
LoadLayers_425
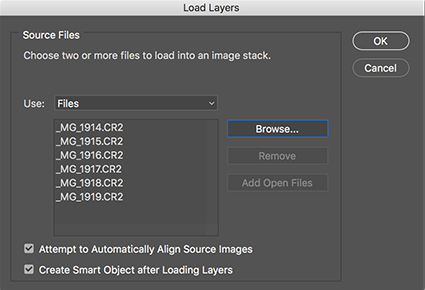
3     Click Browse and select the exposures to be used in the Stack and check Attempt to Automatically Align Source Images and Create Smart Object after Loading Layers.

(The resulting Smart Object will contain all exposures in a single layer.)
StackMode_425
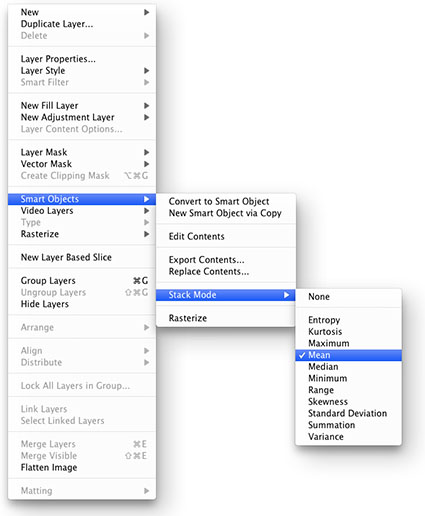
4     Go to Layer > Smart Objects > Image Stack Mode > Median to blend the separate exposures.

(You’ll see the noise substantially reduced.)

5     Optionally, compare the Image Stack Mode > Mean.

(This works best for exposures containing no movement.)

So what is Photoshop doing? Photoshop first aligns a series of images as separate layers, converts them into a Smart Object, and blends them, reducing or amplifying the differences between the layers with a variety of rendering modes. You can choose one of eleven rendering modes; Entropy, Kurtosis, Maximum, Mean, Median, Minimum, Range, Skewness, Standard Deviation, Summation, and Variance. Few people will ever use all of them; most won’t use any of them; but I recommend you try two – Median and Mean. (Stacks were designed for analytical tasks in various scientific fields, like astrophotography or forensics and they’ve since been put to many other uses.)

Median and Mean select values in between the highest and lowest values, smoothing out the differences between aligned layers in a stack. Median works best for images with some motion, either subject or camera, to remove moving objects or noise. Mean works best for processing exposures without motion. (Astrophotographers typically make many exposures, sometimes dozens or more, of the same subject and use Mean to reduce noise.)

The more exposures you make and combine the better the noise reduction. Only practical limits apply. How many exposures can you make? How many exposures can Photoshop process on your computer? You can stack and process as few as two images. Three is my recommended minimum. Six is better. After that, you get diminishing returns. (Try using your camera in burst mode more frequently.) The most challenging part of this technique is identifying situations where it’s helpful and remembering to make multiple exposures. If you have the exposures you can take advantage of this great feature; if you don’t have the exposures you can’t.

Combine the recent advances in digital cameras that offer exceptionally low noise at high ISOs, with new exposure techniques, with new post-processing techniques by the latest software, and you’ve got a profound paradigm shift in photography.

Learn these techniques and you’ll find your photographic options will expand dramatically. The most challenging thing isn’t learning the techniques; the most challenging thing is redefining what’s possible and practical. You’ve got to experience it to truly understand it.

How To Reduce Image Noise With Photoshop’s Filters

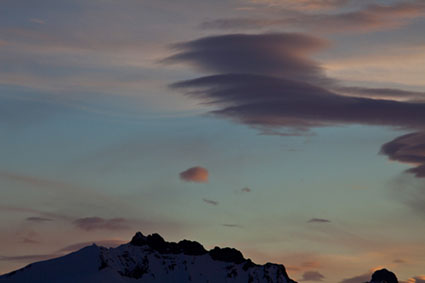
Antarctica LXIV
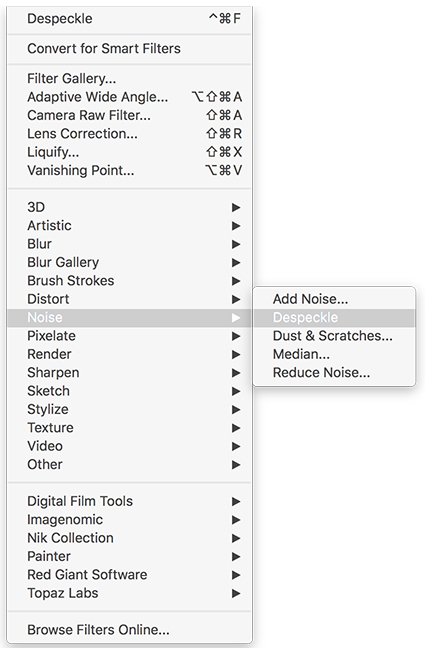
Photoshop offers several filters designed to reduce noise – Despeckle, Dust and Scratches, Median, and Reduce Noise. They’re all useful for modest amounts of noise. They may be all you need for an extra pass of noise reduction after Raw conversion.

Build yourself a safety net when using these filters. Don’t apply them to the Background layer. Apply them to a duplicate of the Background layer. Then you’ll be able to redo noise reduction at any time in the future. Noise reduction tools will surely improve as time passes. You’ll also be able to mask the effect to affect only selected portions of an image, use Layer Styles Blend If sliders to restrict an effect to shadows, midtones, or highlights, and use Blend Modes to target luminosity, hue, or saturation.

A deeper look at these four filters will benefit every Photoshop user.


PS_Despeckle_425
Despeckle. It’s a bare bones simple filter. There’s one strength and setting. There’s no dialog box. You can apply it multiple times for stronger applications. You can apply it to individual channels (i.e. if the blue channel has more noise than the others) or selectively (to low frequency smooth areas) to make it more targeted. That’s it. It’s that simple. How well does it work? Well enough to become familiar with it. It does a reasonable job for modest amounts of noise. It never performs miracles. But it can be a final touch worth applying to many images. It’s also useful for reducing noise in masks and effects layers.


PS_Median_425
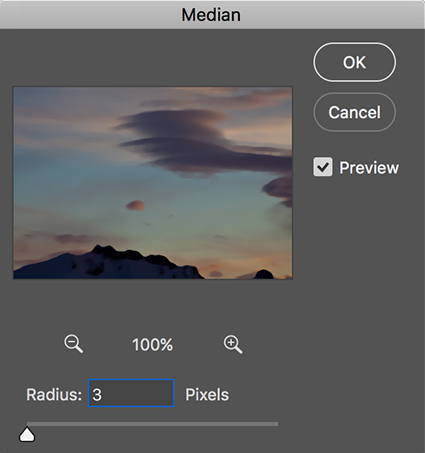
Median. It’s simple. There’s only one slider Radius. Radius controls the amount of blurring. The blurring is Median provides is substantially more aggressive than Despeckle. Only very low settings are useful for photorealistic images. Be very careful with this filter. With even modest applications it can subdue important textural detail. With moderate applications, it can even smooth and reshape contours. Apply it aggressively to see just how far it can go. You’ll see it quickly goes too far.


PS_DustScratches_425
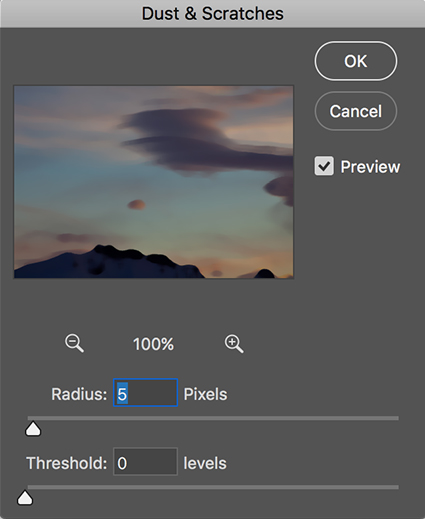
Dust and Scratches. It’s classically used to reduce the amount of retouching needed by images as it removes small artifacts, like dust and scratches, but it can also be useful for modest amounts of noise reduction. There are two sliders. Radius controls the amount of blurring; with higher Radius settings subdue more noise and may compromise detail. Threshold restricts the number of tone levels the filter is applied to, making the filter selective with respect to luminosity values; very high Threshold settings may introduce sharp transitions in texture between blurred and unblurred areas. Used aggressively, this filter will subdue small textural detail and compromise image sharpness. Used carefully, this filter can effectively reduce modest amounts of noise.


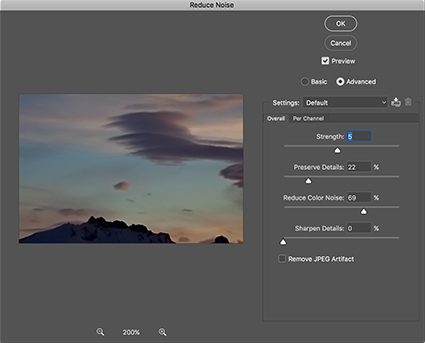
PS_ReduceNoise_425
Reduce Noise. It offers the most control of the Photoshop filters. It can deal with moderate amounts of noise relatively well. Strength controls the intensity of the filter. It’s the blurring effect. Preserve Details reduces the effect of the filter initially targeting contours and later by targeting higher and higher detail frequencies or image texture. The settings you use are entirely dependent on Strength settings and image content. Higher frequency detail merits higher settings. It’s not a panacea. High Strength and Preserve Detail settings can make some areas of an image look synthetically smooth and yet still fail to remove small artifacts, especially near contours. Reduce Color Noise blurs color without affecting luminosity. You can be relatively aggressive with this slider, but if you use it this way, guard against reduced saturation especially along dramatic contours. Sharpen Details attempts to restore image sharpness after blurring. Use it conservatively. More sophisticated sharpening can be performed with other filters in Photoshop. Remove JPEG Artifact is somewhat effective for reducing JPEG compression artifacts, such as blocky color and jagged edges. Use this check box only on JPEGs that contain artifacts. (Don’t use it on TIFFs from Raw files.) If you can’t remove all of the JPEG artifacting in a file without compromising image quality, turn to third-party plugins. While it’s the most advanced Photoshop filter for noise reduction, like all the others, when used for major noise reduction, it may compromise image sharpness.


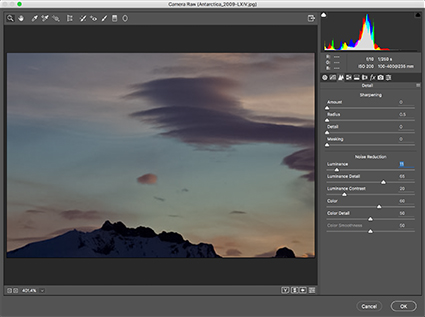
PS_ACR_Noise_425
The best tool in Photoshop’s arsenal for noise reduction is Adobe Camera Raw. While the best place to use this tool is during Raw conversion, you can also apply it after Raw conversion as a filter. Try it first; consider these other tools as offering different blurring methods that are useful in specific situations, like Dust & Scratches. I cover this Adobe Camera Raw’s Noise reduction features in great detail in a separate article.

None of these tools are up to the task of industrial-strength noise reduction. Applied too frequently or too aggressively they will compromise image sharpness unnecessarily. For aggressive noise reduction, turn to third-party software, like Imagenomic’s Noiseware. (I cover this plug-in in a separate article here.)

Let me offer you a final word of caution. Whenever you blur an image to reduce noise, don’t overdo it. Blur enough to reduce noise but no more. If you go too far with blurring effects you’ll spend a lot more time trying to restore image sharpness and may never achieve optimum results. Just as there are limits to how much apparent sharpness you can restore to a poorly focused image, there are limits to how much more apparent sharpness you can reintroduce after blurring. Use a light touch. Sometimes the noise is more desirable than reduced sharpness. Sometimes the presence of noise is even desirable; it can keep images from seeming synthetic and even make some images appear slightly sharper. (I cover this in a separate article here.)

41 Great Quotes On Finished

Quotes_Finished
Enjoy this collection of quotes on the state of being Finished.
“There must be a beginning of any great matter, but the continuing unto the end until it be thoroughly finished yields the true glory.” – Francis Drake
“Begin – to begin is half the work, let half still remain; again begin this, and thou wilt have finished.” – Marcus Aurelius
“Art is never finished, only abandoned.” – Leonardo da Vinci
“Painting, sculpture and architecture are finished, but the art habit continues.” – Robert Smithson
“A man is not finished when he’s defeated. He’s finished when he quits.” – Richard M. Nixon
“It is inevitable that some defeat will enter even the most victorious life. The human spirit is never finished when it is defeated… it is finished when it surrenders.” – Ben Stein
“When you’re finished changing, you’re finished.” – Benjamin Franklin
“A finished person is a boring person.” – Anna Quindlen
“I long for my garden to be complete. Working in it is one of my joys, but it will never be finished because it’s forever changing with the seasons.” – Mary Quant
“In many ways, theatre is more rewarding for a writer. I used to think it was like painting a wall – that when the play is finished, it’s done – but now I realize it’s more like gardening; you plant the thing, then you have to constantly tend it. You’re part of a thing that’s living.” – Lee Hall
“I know that one of the great arts that the writer develops is the art of saying, ‘No. No, I’m finished. Bye.’ And leaving it alone. I will not write it into the ground. I will not write the life out of it. I won’t do that.” – Maya Angelou
Read More