Photoshop CS5 Sneak Peek – Improved Brush Engine
Russell Brown demos CS5’s new improved brush engine.
Wow!
Tune in tomorrow April 12 at 8am PDT for Adobe’s CS5 online announcement. Register now.
Russell Brown demos CS5’s new improved brush engine.
Wow!
Tune in tomorrow April 12 at 8am PDT for Adobe’s CS5 online announcement. Register now.
Bryan O’Neil Hughes demos CS5’s new improved edge detection and masking.
This will give you better results and save you hours.
Tune in tomorrow April 12 at 8am PDT for Adobe’s CS5 online announcement. Register now.
Bryan O’Neil Hughes demos CS5’s new Content Aware Fill feature.
One of the game-changing new features in CS5 is Content Aware Fill. It works like the Patch tool, only it’s easier to use. You simply select an area, click Delete, and choose Content Aware Fill. It’s fantastic for removing unwanted elements in images, even in challenging image areas like smooth gradients in skies. This feature will save you hours and hours. It might even change the way you think about making photographs.
Tune in tomorrow April 12 at 8am PDT for Adobe’s CS5 online announcement. Register now.

Chris Alvanas’ image (above) is an excellent example of heavy HDR.
Last week I taught my most advanced Fine Art Digital Printing Advanced workshop ever. We talked not only about how to use HDR tools but also the visual effects they produce. HDR processing creates several identifiable artifacts. Going to extremes will help you identify the possibilities and the artifacts more clearly. After that, you can better decide just how far you want to go. Clearly identifying these artifacts can help you control them and craft your own HDR style.
1 Full detail in shadows and highlights
This is the reason special software was invented.
Pushed far blacks and whites can get gray.
2 Accentuation of contour
Images look sharper and clearer. It’s Clarity on steroids.
Pushed far this leads localized vignetting.
3 Accentuation of texture
Talk about detail.
Pushed far it gives objects a stained (“grunge”) appearance and boosts noise.
4 Distortion of relative saturation relationships
Sometimes it’s beautiful, sometimes it’s unnatural, sometimes it’s beautifully unnatural.
A little post-production work will help you get the balance that’s best for you.
Learn more in my free Lessons.
Learn more in my HDR DVD.
Learn more in my Workshops.
Next FADP Advanced workshop 2/1-5


Last week I taught my most advanced Fine Art Digital Printing Advanced workshop ever. A number of the participants work with HDR. So we explored a variety of HDR styles.
Chris Alvanas likes heavy HDR processing to give his contemporary portraits a grittier look.
Jim Hooper likes to blend normally processed Raw files with HDR processed files for a blend of classic and contemporary.
HDR techniques can be used to generate many different effects. They’re useful techniques every photographer should know about.
Learn more in my free Lessons.
Learn more in my HDR DVD.
Learn more in my Workshops.
Next FADP Advanced workshop 2/1-5

Photoshop on iPhones? Cool!
I’m enjoying this tiny app. Lighten and darken. Saturate and desaturate. Crop. Flip. Soft focus and a few other special effects.
I’m also want an upgrade – fast. Hue control. Rotation during cropping. Sharpening. Free Transform. Liquify. A brush for localized adjustments.
Find out more and get the free app here.
Check out photoshop.com here.
Here’s an excerpt from my column in the current issue of Digital Photo Pro.
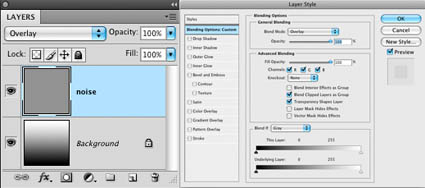
“When adding noise to digital files, keep noise separate from the image so you can control both independently of one another. This way you’ve got extraordinary control and flexibility. When noise is placed on its own layer you can eliminate or change it at any time in the future, reduce its opacity, localize it, desaturate it, target it into specific channels, move it, scale it, blur it and much more …”
Read more in the current issue of Digital Photo Pro.
Learn out more in my digital printing workshops.
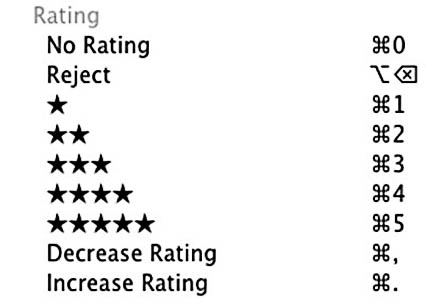
It’s important to think about how you use star Ratings (in Adobe Camera Raw and Lightroom). Not everyone uses them the same way. However you decide to use them, you should use them consistently. Otherwise, when you browse multiple folders, you’ll have to interpret the same symbols differently in different contexts. That gets confusing fast!
I like the 5 star rating system. It helps make useful distinctions with only a touch more granularity than 3 levels of distinction – typically high, medium and low. It doesn’t get as granular at 10 levels of distinction, so you can cut to the chase fast. It’s used in other venues like restaurants and hotels so it’s familiar. Still, I don’t find using 1 and 2 star ratings useful for ranking the quality of images; I have no use for images that are below average. The images use are either good – 3, better – 4, or excellent – 5. So, I use 1 and 2 stars for something else. I use 1 star to identify a good idea in a substandard exposure or composition; I’ll try and use the idea later with better material. I use 2 stars to identify images that are good for composites; the exposures are fine but the composition is unfinished.
How do you use star ratings?
Comment here.
We discuss this and many other subjects in my field workshops.
Learn more about composition in my field workshops.
Upcoming dates include …
8/9-15 – Iceland … 10% discount ends June 20.
10/16-19 – Fall Foliage … 15% discount ends August 15.
Photographers learn how to make the most of weather.
Atmospheric FX will teach you how to make weather.
Find streamed content at Kelby Training here.
Find enhanced content on the Acme Educational DVD here.
Find ebooks here.
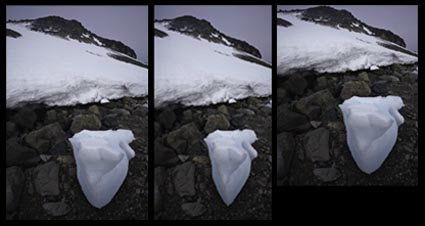
I’ve been out in the field for two long days during my workshop at the Palm Springs Photo Festival. One of the techniques we practiced is exploring how using Photoshop’s Transform and Content-Aware Scale can change the way you make exposures – opening up possibilities for both strengthening classic compositions and also for making new compositions you might otherwise pass by – or not see.
The classic Photoshop Transform tools have been long overlooked and underutilized. Now, in Photoshop CS4, we’ve got a new way to Transform our images – Content-Aware Scale. This will scale specific areas of an image more than others. Many photographers scale an image to resize it. Sometimes portrait photographers squeeze images 10% horizontally to make people look thinner. But how many photographers use these tools to create more compelling proportions in their images? How many use them as a tool to strengthen or weaken relationships in their images by making areas of an image closer to or further away from one another. Few. These are new tools. They’re not hard to master technically. Activate the tool of your choice and then push or pull. Simple. (Favor squeezing instead of expanding to avoid upsampling artifacts.) This may be challenging for some to feel comfortable with as an accepted practice. We accept the distortions of lenses. Why is this type of post-processing any less acceptable? This is challenging to master perceptually. Incorporating these new tools into your ways of seeing takes practice. Once you do master them, you’ll find you’ll make new types of exposures with these possibilities in mind. You’ll learn one more way of seeing your subjects. New possibilities bring new ways of seeing. To master them you’ve got to use them – a lot. It takes practice. Try it. And keep using it. This technique can make an amazing difference in many images.
Learn these and other techniques in my upcoming Workshops.
Find out more in my downloads.