Free Desktop Calendar – July

My monthly desktop calendar is free.
Get it here.

My monthly desktop calendar is free.
Get it here.
You can learn Photoshop CS5’s new features from top pros in free videos.
Here’s a list of links to many of the top Photoshop CS5 videos.
New Features – Richard Harrington
Common Sense Enhancements – Deke McClelland
New Blend Modes – Divide & Subtract – Calvin Hollywood
Improved Selection & Masking – 4 Top Pros
Masking Basics & Masking Magic – Russell Brown
Mask Panel & Refine Edge – Lee Varis
HDR – 4 Top Pros
Photoshop CS5 HDR Special Effects – Jan Kabili
Improved Brush Engine – Russell Brown
Painting – Julianne Kost
Brush Tips – Colin Smith
Repousse 3D – Colin Smith / Russell Brown
Puppet Warp – Colin Smith / Deke McClelland
Puppet Warp – Russell Brown
PatchMatch – Dan Goldman
Spot Healing and Fill Tool – Dan Goldman
Content Aware Scaling – Michael Ninness
Content Aware Fill – Russell Brown
Content-Aware Fill – Bryan O’Neil Hughts
Selective Content Aware Scale and Content Aware Fill – Terry White
?Content Aware Fill / Scale / Heal? – Julianne Kost
Photoshop CS5 Bridge and Mini Bridge – Julianne Kost
New Camera Raw Feature – Julianne Kost
Photoretouching in Camera Raw – Russell Brown
Editing Smart Objects With Adobe Camera Raw – Russell Brown
Using Photoshop Stacks To Remove People – Deke McClelland
Making A Movie In Photoshop – Julianne Kost
Advantages of the DNG File Format – Julianne Kost
Helpful Hints For Creating Action in Photoshop – Julianne Kost
View more in my Photoshop DVDs.
Read more in my Photoshop ebooks.
Learn more in my digital photography and digital printing workshops.

If you make camera profiles customized for your camera, sooner or later you’re going to want to rename or delete a few. Where do you find camera profiles? On the Mac, follow this trial User : Application Support : Adobe : Camera Raw : Camera Profiles.
X-Rite offers a free easy to use software for managing camera profiles – DNG Profile Manager. With it, you can activate, deactivate, delete, move, export or rename camera profiles.
Download X-Rite’s DNG Profile Manager here.
Read more on Color Management here.
Learn more in my digital photography and digital printing workshops.
Julianne Kost provides invaluable insights for automation in Photoshop.
View more Lightroom 3 and CS5 Videos here.
Learn more in my digital photography and digital printing workshops.
Musicophila – The Power of Rhythm
Musicophila – Brainworms
What Hallicination Reveals About Our Minds
Inside Oliver Sack’s Brain – NOVA
Oliver Sacks talks about how music affects the brain.
Watch more great insights from Oliver Sacks on PBS.
View more creativity videos here.
Read more in my creativity ebooks here.

Bobby McFerrin talks about the importance of improvisation.
Watch more great insights and performances from Bobby McFerrin on PBS.
View more creativity videos here.
Read more in my creativity ebooks here.
Charlotte Young’s YouTube video is brilliantly tongue-in-cheek.
For more fun try these three artist’s statements generators.
1 The Tangential
2 10 Gallon
3 Market-O-Matic
Find my ebook Artist’s Statements here.
Find my conversations with photographers here.
gamut clipping
gamut compression
Your choice of rendering intent tells a color management system how to handle color conversions between different color spaces. This is particularly important when converting colors from a wider-gamut color space (such as an editing space like ProPhoto) to a smaller-gamut color space (like a printer color space). You’ll get different results, even when using the same ICC profile, depending on the rendering intent you choose for a color conversion. You have four choices; perceptual, relative colorimetric, absolute colorimetric, and saturation.
What’s the difference between these four rendering intents?
Perceptual
Use a perceptual rendering intent for printing images with highly saturated colors. Watch it carefully. To deliver very saturated colors, it may lighten an image or shift the hue of specific colors. Both side-effects can be compensated for with output-specific adjustments.
Relative Colorimetric
Use a relative colorimetric rendering intent for printing images where the luminosity structure is most important. You may get slightly less saturated colors but brightness values will be most stable with this rendering intent. This makes it the ideal choice for near-neutral and black and white images.
Absolute Colorimetric
Use an absolute colorimetric rendering intent for making a proof of one device on another, like making a proof of an offset press on an inkjet printer. It’s not useful for making the best inkjet print; it will limit the results the printer delivers. Note, you can’t simulate a printer with a greater gamut than the device you’re printing on, only one with a smaller gamut.
Saturation
Use a saturation rendering intent for eye-catching graphics where color impact is more important than color accuracy , like pie charts. It will so much saturation it will distort continuous tone images in an adverse way.
Here’s the color geek explanation.

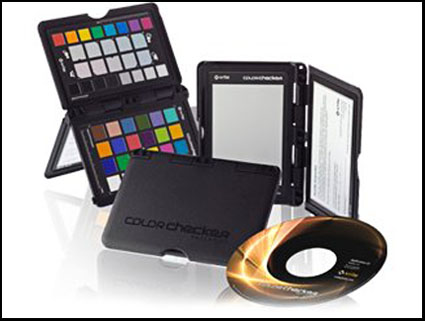
X-Rites’ Color Checker Passport can be used to quickly deliver more accurate color in a variety of ways.
Set White Balance, White Point, and Black Point
The X-Rite Color Checker Passport is the industry standard target that can be used in several ways to render color in your digital images more accurately – setting white balance, creative enhancement, and visual confirmation.
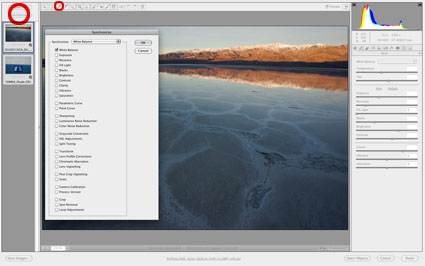
It’s easy to use. Shoot the Color Checker once at the beginning of each shooting session and you can use that exposure as a target for all exposures made under the same light. The exposure of the target doesn’t have to be perfect. Just, roughly fill the frame with the target; it doesn’t even have to be focussed. To use the exposure of the target, use your choice of Raw conversion software to open it along with other exposures you’d like to apply the same measurements to; click on the appropriate color patches (black for black point, white for white point, gray for gray point); and sync all of the files. It’s that simple.

Create A Camera Profile
The X-Rite Color Checker Passport can also be used to make custom profiles for your individual camera. You can create a camera profile with the same exposure of the target that you use to set white balance. While camera profiles are generated with the same target, the resulting exposures are not used to set white balance, instead, they are used to deliver significantly improved color rendition and saturation, providing the best starting point for any color adjustment strategy you choose. Camera profiles are created with the X-Rite software supplied with the Color Checker Passport, stored, and later applied with your choice of Raw conversion software, typically Adobe Camera Raw or Adobe Lightroom.
For optimum results, exposures used to generate camera profiles need to be made under the light (color temperature and spectral distribution) that subsequent exposures are made in. Using two exposures of the target made under different light temperatures, you can create a dual illuminant camera profile that can be used for all exposures made under a wide range of color temperatures. Single illuminant profiles are recommended for exposures made under very warm or very cool light temperatures – below 3600K (golden hours) and above 6800K (twilight).
How do you make a camera profile? First, convert one or more exposures of the Color Checker Passport from the manufacturer’s proprietary Raw format to Adobe’s open standard Raw format – DNG. (Use either the free Adobe DNG Converter, Adobe Bridge, or Adobe Lightroom.) Open X-Rite’s Color Checker Passport software. Click DNG or Dual Illuminant DNG. Drag one or two DNG files into the open window. Once the software has identified the specific color patches it needs to build the profile, click Create Profile. The profile will automatically be stored for you in Camera Profiles and will be available for your use the next time you convert a Raw file in either Adobe Camera Raw or Adobe Lightroom. You’ll find it under the Camera Calibration tab/panel under Camera Profile. Save New Camera Raw Defaults and your new camera profile will be automatically loaded when you open Raw files and previews in Adobe Bridge will be rendered with it.
Using a Color Checker Passport target or a camera profile generated with it doesn’t mean that you are locked into the results they generate, they simply give you the best starting point possible for adjusting your images.

