If you’d like to use HDR techniques for your mobile photographs you’ve got choices. Moving from simple and limited to more complex and robust, consider these three: first, the iPhone Camera app’s built in HDR function; second, the app Pro HDR; and third the app TrueHDR. I use all three, moving from one to another as the contrast of the scene increases.
The strength of HDR renderings and the artifacts they tend to produce can be varied to suit individual tastes. Regardless of whether you favor a light touch or a heavy hand, if you photograph, with or without a smart phone, sooner or later you’ll need HDR. It’s an essential technique … Read more on The Huffington Post. Learn more in my digital photography and digital printing workshops.
To one degree or another, we’ve all been underexposing our digital photographs, even if we’ve been exposing to the right (ETTR). Imagine a day when every ƒ-stop had as much data as the lightest ƒ-stop. It’s here now. Here’s how.
Make a series of bracketed exposures where each ƒ-stop in a scene is placed in the far right of the histogram or recorded with half the data in a single digital file. Combine all the exposures into a single 32-bit file using either the Merge To HDR Pro feature in Adobe Bridge/Photoshop or Lightroom. Save or import this 32-bit file into Lightroom (4 or higher) and apply adjustments with its Develop module to avoid many common tone-mapping artifacts.
You may be surprised to find that you’ll benefit from using this technique even for images with significantly more restrained dynamic ranges.
NIK recently announced a new version of their exceptional software for HDR imaging – NIK’s HDR Efex Pro 2. It’s the HDR solution with the best visual interface, one that helps you compare your options at a single glance.
Use the code JPCNIK to get a 15% discount on all NIK software
NAPP’s RC Concepcion (Check out his HDR book here.) demonstrates the latest version in this video.
New features include … Improved Tone Mapping Engine – Develop superior results with better color rendering and improved natural styles Interface, Interaction, and Workflow – Benefit from improvements to the merging interface, tone mapping and enhancement controls, visual presets, and more Depth Control – Enjoy added depth and realism in images with the new and proprietary Depth control, which helps counteract the flattened look commonly associated with HDR images Full GPU Processing and Multi-Core Optimization – Gain even faster performance with GPU processing that takes full advantage of the processors found on modern display adapters Ghost Reduction – Improved ghost reduction algorithm ensures that artifacts created by moving objects are removed with a single click Chromatic Aberration Reduction – Reduce color fringes around objects Graduated Neutral Density Control – Access the full 32-bit depth of the merged image, providing a natural effect especially on images with a strong horizon line Full White Balance Control – Take full advantage of the white balance in an image with a new Tint slider, which along with the Temperature slider, can be applied both globally as well as selectively using U Point technology History Browser – Easily review adjustments and different HDR looks via the History Browser which records every enhancement used in an editing session Extended Language Support – International users benefit by the addition of Brazilian Portuguese and Chinese (Simplified and Traditional) to a list of languages that includes English, French, Spanish, German, Italian, and Japanese Find out about even more features here. Learn more in my digital photography and digital printing workshops.
Get 15% off Photomatix with this code – johnpaulcaponigro.
Beyond Photoshop, there are a number of HDR software options, both plug-ins and stand-alones. Some of the better-known programs include Artizen HDR, easyHDR, FDRTools, pfstools, HDR Efex Pro, and Photomatix. HDRsoft’s Photomatix is the longest standing and perhaps most robust and sophisticated solution.
Photomatix can be used either as a Photoshop plug-in or as a stand-alone product. It offers a variety of ways of combining exposures, including some non-HDR options. Photomatix offers impressive controls over essential image elements affected by HDR merges. Chief among these are control over halos, micro-contrast accentuation, micro-smoothing and control of saturation in highlights and shadows (areas that tend to need aggressive tone mapping).
With a little care and attention, the effect you produce with these tools can be one of your choosing. If used aggressively, you can produce a contemporary HDR effect that can give your images a new look. If used conservatively, you can produce a classic effect that’s virtually unnoticeable.
Every photographer can benefit from learning HDR techniques … Read my review of Photomatix here. Stay tuned for the update. Read more about HDR techniques here. View more about HDR in my DVD Extending Dynamic Range – HDR Imaging. Learn more in my digital photography workshops.
“Apple 3GS marks a career passage for me in that I felt the need to quiet all of the gear aspects of image making and get right down to perspective, light and composition – nothing else. It was so helpful that I have felt such an improvement in how I see an image or should I say pre-visualize an image before actually taking it. Adding the tools on top of this advanced my work greatly.
I recently showed a small portion of this body of work at a workshop with John Paul Caponigro in Maine. To my surprise and enjoyment, the work was so well received by all it lead me to go a bit deeper and continue the quest of simplifying the process.” Find out more about Chris Alvanas here.
Learn what you need to do during exposure to make the best HDR merges.
And what to look out for.
I cover a full range of techniques to extend dynamic range in my DVD. XDR – Extending Dynamic Range – HDR Imaging.
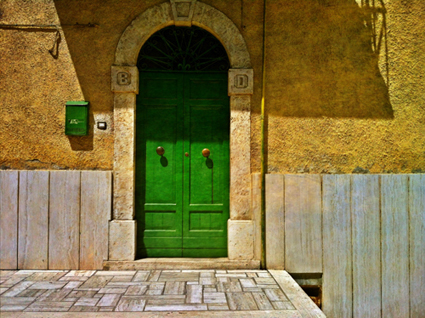
Chris Alvanas’ image (above) is an excellent example of heavy HDR.
Last week I taught my most advanced Fine Art Digital Printing Advanced workshop ever. We talked not only about how to use HDR tools but also the visual effects they produce. HDR processing creates several identifiable artifacts. Going to extremes will help you identify the possibilities and the artifacts more clearly. After that, you can better decide just how far you want to go. Clearly identifying these artifacts can help you control them and craft your own HDR style. 1 Full detail in shadows and highlights
This is the reason special software was invented.
Pushed far blacks and whites can get gray. 2 Accentuation of contour
Images look sharper and clearer. It’s Clarity on steroids.
Pushed far this leads localized vignetting. 3 Accentuation of texture
Talk about detail.
Pushed far it gives objects a stained (“grunge”) appearance and boosts noise. 4 Distortion of relative saturation relationships
Sometimes it’s beautiful, sometimes it’s unnatural, sometimes it’s beautifully unnatural.
A little post-production work will help you get the balance that’s best for you. Learn more in my free Lessons. Learn more in my HDR DVD. Learn more in my Workshops. Next FADP Advanced workshop 2/1-5