Use HDR Techniques To Get The Best Image Detail

Download your free copy now!


Use high dynamic range techniques to capture detail in highlights and shadows even in scenes with extreme contrast.


Why Everybody Needs HDR … Sometimes | Coming Soon

What In The World Is HDR ?

What Is Exposure Value ?

Using Histograms – ETTR

Why Your Camera’s Auto HDR Feature Is Inferior 

How To Set Your Camera To Auto Bracketing 

How Many Exposures Do You Need For HDR Merges ? 

Making HDR Merges Is A Four Step Process

5 Photoshop Tools To Make The Most of Shadows & Highlights Without HDR

3 Ways HDR Software Can Benefit Single Exposures | Coming Soon

Using HDR Software To Sharpen Photographs

HDR With One Exposure

HDR With Two Exposures

HDR with Lightroom | Coming Soon

HDR With Photoshop | Coming Soon

HDR Panoramas | Coming Soon

Refine HDR With Photoshop Layer Blending | Coming Soon

7 HDR Artifacts & How To Avoid Or Cure Them 

8 HDR Myths Debunked 

Quick Answers To The 5 Most Asked HDR Questions 


7 HDR Artifacts And How To Avoid Or Cure Them

hdr_artifacts_425

Different HDR renderings accentuate different artifacts

HDR (high dynamic range) imaging captures extreme contrast ratios and subsequently renders them for LDR (low dynamic range) devices, monitors and / or prints. The very things that make HDR renderings appear natural can make them appear unnatural if taken too far.

Midtone compression
You can’t avoid midtone compression, they get caught in the middle when the relationships between highlights and shadows are compressed. But you can take steps to minimize it by being sensitive to this when choosing compression settings and amounts and by taking subsequent steps to expand it.

Tonal inversions
Some compression routines and settings can be so aggressive that they create inversions or solarizations of specific tonal relationships. Avoid this, there is no subsequent cure. If you like the overall effect of an aggressive setting and the inversion is contained to one area of an image you can render an image twice, once for the overall effect and once for a specific area, and then blend the two together using Photoshop’s layers and masks. 

Saturation Distortions
Saturation changes when lightness shifts but color stays the same. Because HDR produces effects that can be aggressive and localized to specific set of tones, the saturation shifts that accompany tonal compression often appear unnatural. Selectively adjusting the saturation of specific hues, with tools like the HSL panel in Lightroom or Camera Raw, can often convincingly cure a majority of these side effects and hide the rest.

Halos
HDR softwares help restore midtone contrast by accentuating contours. When used aggressively this edge contrast can produce halos.
Over the years, these algorithms have dramatically improved their ability to treat the halo (light line) separately from the line (dark line), suppressing the first more than the second. Sometimes, to avoid distracting halos at the border of skies, you may want to make a second rendering for the sky and blend it with another rendering using Photoshop’s layers.


Insights Members can login to read the full article.
Email:
or Sign up

8 HDR Myths Debunked

illuminationxxxviii_425
There are many misconceptions surrounding the practice of high dynamic range (HDR) photography. Here are eight – debunked.

HDR is new
Within the first five years of the invention of photography photographers began bracketing exposure to extend the dynamic range of photography. They used chemistry to process their negatives instead of software to process their files – but they still bracketed exposures to capture contrast ratios that exceeded paper, glass, and film.

HDR is hard
High dynamic range imaging has become so commonplace that cameras and software make it increasingly easy to practice HDR techniques – auto-bracketing, merging and rendering.

HDR requires the use of a tripod
While there are times when the use of a tripod is required, when exposures are long in duration, in a majority of cases current cameras’ auto-bracketing features and softwares’ image alignment algorithms make hand-held exposure bracketing highly practical.


Insights Members can login to read the full article.
Email:
or Sign up

How To Set Your Camera’s Auto-Bracketing

canon_autobracket_back_425

back LCD menu

canon_autobracket_top_425

top LCD menu

It’s easy to set your camera to auto-bracket. The hardest part of this process is navigating a camera manufacturer’s menu. Once you find it – and do it several times – you won’t forget it.

Here’s how to do it on current Canon cameras – the steps are similar for other cameras but the buttons and menus vary.

First, set the number of frames made in each bracketed sequence. Press the Menu button. Use the main command dial (top) to cycle through the menus on the LCD screen (back) Go to the 4th tab (small camera) > 1st list and then the use the jog wheel (back) to select the 5th item. Press the set button to select it. Use the jog wheel to select the number of shots and press the set button once again. While 3 is the most commonly used, it’s not unusual to use 5 or even 7. Because 3 is the most commonly used number, it’s likely that once you set this, you’ll reset it infrequently.


Insights Members can login to read the full article.
Email:
or Sign up

Why Your Camera’s Auto HDR Feature Is Inferior

salinas1_425
Today’s cameras have the ability to generate HDR merges on the fly. The problem is that they produce JPEGs with a smaller gamut (lower saturation), lower bit depth (fewer shades of gray), and compression artifacts (noise and jagged edges) and they offer no control over the tone mapping process.
If you want a better HDR file, choose to make multiple bracketed Raw files, then merge and tone map them manually. Remember, aside from exposure settings, in-camera settings that affect the look of your image have little or no affect on Raw files, which can be processed anyway you want to process them.

In camera HDR JPEGs can offer a fast and convenient preview of potential HDR results. You can get the convenience of one and the quality of the other by setting your camera to produce both JPEG and Raw files simultaneously.

Read more on HDR techniques here.
Learn more in my digital photography and digital printing workshops.

How Many Exposures Do You Need For HDR ?

Condensation X - Prelude

1 exposure

scenes like this won’t benefit from HDR

Incubation II

 3 exposures

scenes like this may be made with 1 exposure but benefit from more

Antarctica CXXX

5 exposures

scenes like this require HDR

How many exposures do you need for HDR images?

It depends.

It depends on the contrast ratio of the scene you’re photographing.

And, it depends on how many corners you’re willing to cut.

There is a case to be made for rendering all images with bracketed exposures. If the best data in a file is in the top stop of the dynamic range of a camera, then making one exposure per stop of dynamic range in the scene, each weighted to the top stop pf the camera (ETTR), will give you ideal data in every stop of the rendered scene, once the exposures are merged. So, ideally, you’d make one exposure per stop of dynamic range in the scene. In your first exposure place the shadows in the top stop of the histogram (to the right), without clipping. Then in subsequent exposures reduce exposure in one stop increments, making a new exposure each time, until the highlights are placed in the top stop without any clipping. Then stop.


Insights Members can login to read the full article.
Email:
or Sign up

Quick Answers To The 5 Most Asked HDR Exposure Questions

hdr_final_img_3327
hdr_3
How many shots do you need to make an HDR merge?
The most common answer is three.
The real answer is … it depends. First, it depends on the contrast ratio of the scene. Second, it depends on the exposure value (EV) increments you use between exposures. Third, it depends on the camera you use.
Many scenes only need 2 exposures. Most scenes need 3. Some scenes need 5. Only a few scenes need 7 or more.

How far apart in EV (exposure value) should separate exposures be?
1.5 stops. (Really any value between 1 and 2 stops.) While you won’t get better image quality if you use more shots separated by less exposure value (less than 1 stop), you also won’t compromise it. While you can also use higher increments (more than 2 stops) be careful – you may produce banding in smooth areas, particularly those with gradations.

Do you need to make HDR merges more frequently with some cameras and less with others?
Yes. Cameras that have a greater dynamic range can capture a higher contrast ratio and so don’t require HDR bracketing as frequently. While this can make a difference for images that would require two and occasionally three shots, for scenes with more extreme contrast ratios HDR merges will be necessary for all cameras.


Insights Members can login to read the full article.
Email:
or Sign up

XDR – HDR Merges Are A 4 Step Process

img_9854
Today’s cameras (including smart phones) can create great looking HDR images on the fly, but to get optimum results it’s best to do this manually. In camera solutions render artifacted JPEGs and give you little or no control over how the results look. For optimum results, make separate Raw exposures and render them manually. While the technology at work is wizardry, this four step process is easy to practice. It’s an essential skill for all photographers.

light

+2 stops

normal

average

dark

-2 stops

1       Expose
Today’s fast burst auto-bracketing cameras combined with software alignment make handheld HDR possible. However, it’s recommended that whenever practical you use a tripod to eliminate any alignment issues between frames that might arise; it’s necessary if exposures are long.
HDR merges require multiple bracketed exposures. The goal is to produce at least one exposure with great highlight detail and another with great shadow detail. You may need additional exposures in between your lightest and darkest exposures to help smooth tonal transitions between shadows and highlights. The most common number of images used is three because this is the default number for auto-bracketing on DSLRs. However, there is no ideal number of exposures for all scenes. Some scenes need as few as two, while others need as many as eight. In general, it’s best to have more than you need, not less. The wider the dynamic range of the scene the more exposures you’ll need. Make sure that separate exposures are between 1 and 2 EV (exposure value)(equivalent to one f-stop) apart. It’s typically recommended that you fix f-stop and change shutter speed to avoid depth of field issues, but other changes in EV will work.

merge

Merge in Lightroom

2       Merge
After producing multiple bracketed exposures, the next step is to combine them with software into a single 32-bit file.
Simply select the exposures you wish to include (You don’t have to use them all.) and use the software of your choice. The software you use to merge exposures will compensate for alignment and ghosting, from motion of either camera or subject. (Lightroom and Photoshop do excellent jobs.)
Rather than rushing to render this file at the same time, save it – you may want to render it multiple times.


Insights Members can login to read the full article.
Email:
or Sign up

What In The World Is HDR ?

evcrcomparisons

hdrevs_425

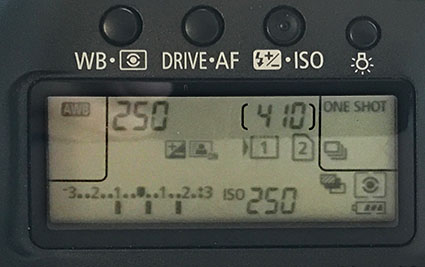
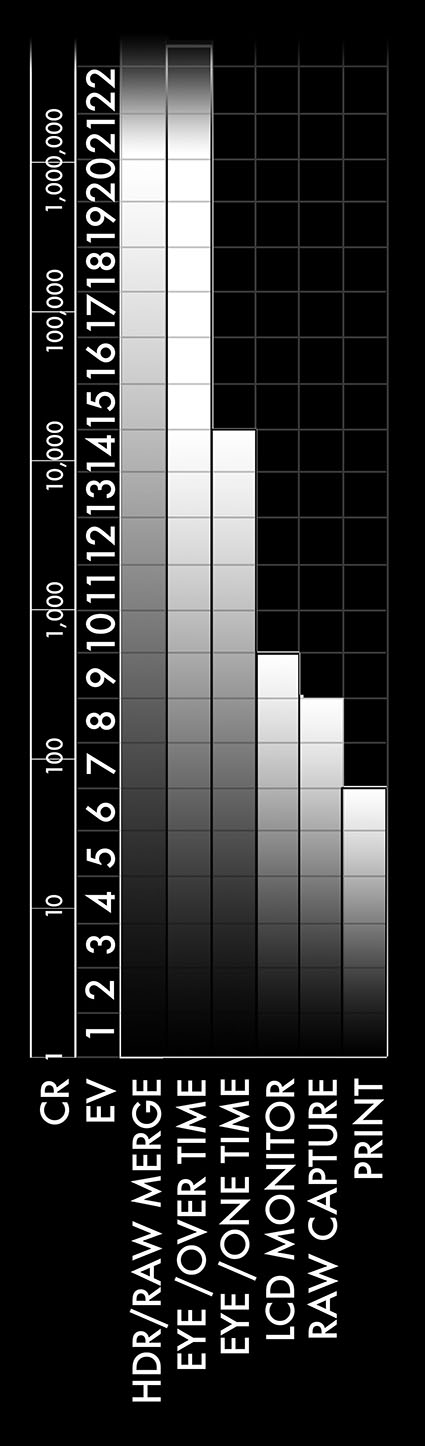
1 EV is equivalent to 1 F-Stop of brightness

hdr_crrough

These Contrast Ration (CR) figures are approximate
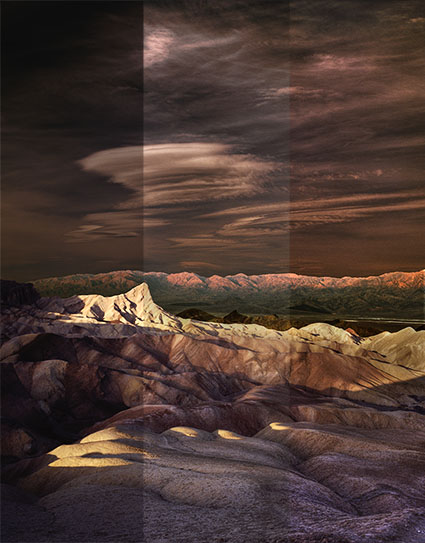
Dynamic Range
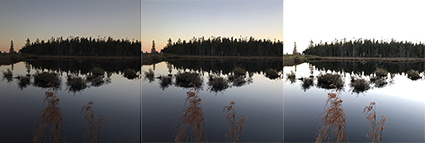
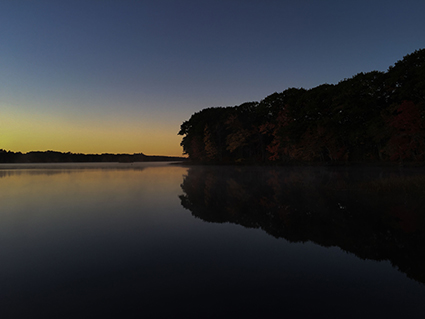
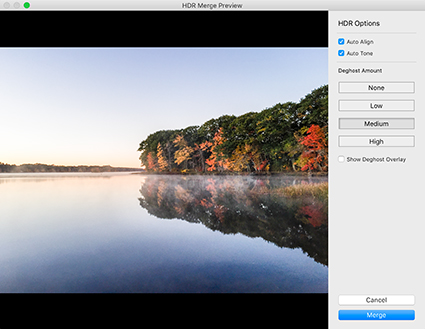
Today, many people think HDR refers to the practice of merging bracketed exposures with software, but HDR actually applies to everything in an imaging workflow - capture, processing, display, and printing.

What is HDR? HDR is an acronym that stands for High Dynamic Range. It’s the opposite of LDR or Low Dynamic Range Imaging.

What is dynamic range? In imaging, dynamic range (DR) is the highest overall level of contrast found in an image. In other fields, such as in the audio industry, dynamic range is used to describe similar phenomena. In audio, DR is defined as the logarithmic ratio between the largest readable signal and background noise. DR is akin to signal-to-noise ratio. In imaging, DR refers to the entire image. Consider an image a signal – and every signal has some noise.

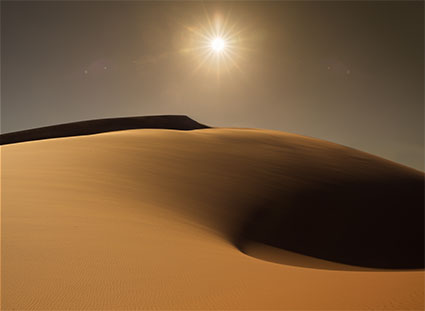
The values used to specify dynamic range can be charted on multiple scales. Whatever language is used to describe this phenomenon, two critical factors must be addressed; the total range of brightness and the fineness of the steps used within the scale.

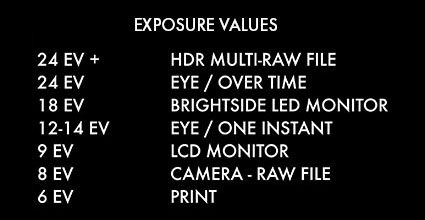
Two scales are most useful for images – exposure value and contrast ratio. Exposure value (EV) is easier to use while contrast ratios better display logarithmic increases in light intensities. Both refer to the same phenomenon – relative increase or decrease in brightness.

The EV scale makes it easy to compare the ratios rather than the big numbers of logarithmic progressions; each successive EV rating represents a doubling of values. The exposure value (EV) scale has been used by photographers for ages. The International Organization for Standards (ISO) defines EV 0 at an aperture size of 1 and a 1 second exposure time. The same EV can be achieved with any other combination of f-stop and shutter speed that produces the same amount of light.

‘The contrast ratio scale specifically delineates values; when you use this rating you instantly see how much greater each step in a progression is than the previous one because the numbers are so much bigger. You can convert EV to contrast ration or vice versa with the right formulas. 2 (power of EV) = contrast ratio (2*8=256 for a contrast ratio of 256:1) or EV=log10(contrast ratio)*3.32 (log10(4000)*3.32=12EV

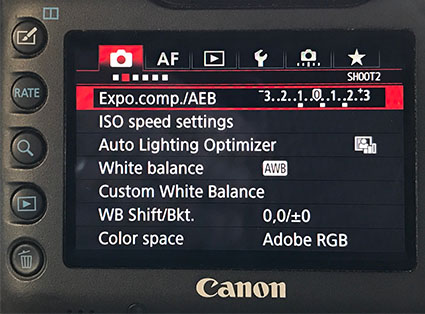
Dynamic range, gamut, and bit-depth are often confused. Though related, they’re all different. Dynamic range refers to a total range of luminosity values. Gamut refers to a total color capacity, including saturation. Bit depth refers to the number of points of data between values or the fineness of the increments in the scale. Just because an image is wide gamut doesn’t mean it is HDR or has high bit depth, but it will contain more and potentially better data if it does. Just because an image is HDR doesn’t mean it is wide gamut and has high bit depth, but it will contain more and potentially better data if it does. You can’t convert low dynamic range, small gamut, low bit depth information to high bit depth, wide gamut, high dynamic range information. To get it and use it, you have to capture high-quality information upon exposure and preserve it throughout your workflow.


Insights Members can login to read the full article.
Email:
or Sign up

5 Tools You Can Use To Make The Most Of Shadows & Highlights Without HDR

BeforeAfter
There are many things you can do in Photoshop to make the most of shadow and highlight detail in images, even if you didn’t bracket exposures for HDR.

Curves
Curves, the most precise tool for modifying brightness and contrast, allows you to target and adjust shadows and highlights independently of one another. You can use it to reduce contrast and render more detail in very bright highlights and/or very dark shadows. The Curves interface has a feature (The icon looks like a finger with up and down arrows.) that allows you to click on any area of an image to place a point and adjust those values. If you’re adjusting highlights and shadows, it’s quite likely that you will also have to adjust values in the other end of the tonal scale and possibly midtones to generate the best results. Keep it simple; it’s surprising what you can do with just two or three points. Keep it smooth; avoid posterization by not flattening areas of a curve. The Blend Mode Luminosity can be used to remove any unintended shifts in saturation; more contrasti increases saturation while less contrast decreases saturation.


Curves_425

Curves can be used to lighten shadows and/or darken highlights

before_curves

Before Curves

after_curve

After Curves


Insights Members can login to read the full article.
Email:
or Sign up