I Use – X-Rite ColorChecker


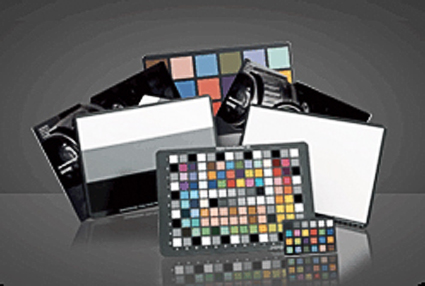
The X-Rite ColorChecker is the standard target for getting accurate color in the studio. But, it’s useful in any shooting situation. You can create a custom calibration setting for your camera using the X-Rite ColorChecker and Tom Fors Adobe Camera Raw camera calibration script. Do this once for significantly different lighting situations; daylight, overcast, full shade, tungsten, florescent, etc. You only have to do it once for each lighting situation. The calibration is model specific and chip specific, so do it for every digital camera you use. Performing this routine makes an appreciable improvement in color rendition. Saturated hues will be represented more accurately.  In the field, I use the credit card sized ColorChecker.
I demonstrate these kinds of techniques in all of my field workshops.
Click here for a step-by-step guide to using the X-Rite ColorChecker and the Tom Fors script.
Download Tom Fors script here.
Find my Review of the X-Rite ColorChecker here.
Get Insights free here, for upcoming alerts of new Reviews.
See more of the products I use here.
Check out my field workshops here.
Get a 20% discount on my Iceland (8/18-22) workshop here – expires 8/10.
Get a 15% discount on my Fall Foliage (10/17-20) workshop here – until 8/17.
The first 5 Insights Members get $1000 off South America (2/2-14/09), thereafter $250.

I Use – 3 Filters / Polarizer, ND, IR


Because it offers so many more options, digital imaging may change the way you use your tools.
For instance, I use only 3 filters – a circular polarizer, a neutral density filter, and a infrared filter.
No other filter is as useful to me as a polarizer. Polarizers remove glare making colors more saturated and reflections allowing you to reduce or remove images on the surface of reflective surfaces. No software filter can do this. I use Canon’s circular polarizer. Whenever possible, I prefer to match filters to the manufacturer of the lens,
I’ve been experimenting with long exposures. Singh Ray makes a unique neutral density filter – the Vari-ND filter. Rotate it and you can slow reduce light between 2 and 8 stops. This eliminates the need to carry multiple filters and to stack them during exposure. It’s fantastic. (As an aside, I prefer all graduated filtration to be done with software because you can control both the effect and the graduation precisely.)
For infrared imagery I use an infrared filter. It’s not exactly the same as converting a camera to infrared, but it’s closer than simulating IR effects with software and it’s doesn’t permanently change your camera. I prefer to carry as little equipment as possible, move freely, and take long walks. Because I prefer to keep my options open, many times I will shoot in full color and use software to create an IR effect. If you take both a full color and IR filtered exposure of the same subject you have many more options.
I demonstrate these kinds of techniques in all of my field workshops.
See more of the products I use here.
Check out my full Review on the Singh Ray Vari-ND filter here.
Get Insights free here, for upcoming alerts of new Reviews.
Read about essential camera tests techniques here.
Check out my field workshops here.
Get a 20% discount on my Iceland (8/18-22) workshop here – expires 8/10.
Get a 15% discount on my Fall Foliage (10/17-20) workshop here – until 8/17.
The first 5 Insights Members get $1000 off South America (2/2-14/09), thereafter $250.

Jane Davenport – Alumni Success Story


Australian artist Jane Davenport returned this week for a second workshop with me – The Fine Digital Print Expert. I love to hear success stories from my alumni. Jane’s is exceptional. “In 2001 I took my first workshop with John Paul and decided to follow my bliss. Since then I’ve published 4 books, had 30 solo exhibits, and over 4,000,000 people have attended my large scale outdoor art installations. I know how incredibly lucky I am to be doing this. I also know that you create your own luck.” Jane’s passionate, committed, works hard and smart. It’s a winning combination. She’s gone very far in a relatively short time.
“Workshops make me reassess what I’m doing and why I’m doing it. If you don’t stop and take the time to discover new tools you could miss out on something amazing, something that adds a new dimension to your work. Getting feedback from peers is extremely helpful, particularly people who don’t know you and your work.”
Jane’s created a unique niche focussing on insects. She works with zoos and environmental organization to raise awareness of and promote affection for her subjects. She also licenses her images in interesting merchandising opportunities giving here cause a broader reach.
This week she explored a new developing theme – kites.
Find out more about Jane Davenport here.
Find out about my workshops here.

Test Your Palette – Fine Digital Print Expert Workshop


One of the exercises we do in my Fine Digital Print Expert workshop is to test our palettes. Take your signature image, or the strongest image in a body of work, and make many variations of it. Neutral, semi-neutral, low saturation, average saturation, high saturation, super saturation. Ideal color, ambient color, synthetic color. Etc. Compare the results side-by-side. By process of elimination choose the best solution. Then take your second strongest related image and see if the same palette is equally strong for it. If it is, you’ve found your zone for a body of work.
Many students are astonished at how much potential their images have. Consider John Myer’s image here. He’s torn between the fully saturated and semi-neutral versions. So he’s testing those two palettes on several other related images. With a just little more exploration, he’ll soon have his answers. Too often we commit to a solution before we explore our options. Sometimes we’re too timid with the kinds of explorations we allow ourselves. Take these steps at the beginning of every new body of work. The time you take to explore your options is well spent. It’s extremely rewarding.
Find out about my Fine Digital Print Workshop series here.
Find out about The Fine Digital Print Expert workshop here.

Color Management & Proofing – Workshops, DVDs, Radio


We go into the ins and outs of advanced color management in my workshop series The Fine Digital Print. No matter what their level, it helps everyone participating. In my workshop The Fine Digital Print Advanced we take it step by step from concept to practice. In my even more advanced printing workshops The Fine Digital Print Expert and the Fine Digital Print Master we assume a higher level of knowledge and go into what doesn’t work perfectly. Here are a few examples. 1 – LCD monitors are too bright for precise prediction to print. 2 – Photoshop’s softproofing Simulate Paper Color is too aggressive.  3 – Printer drivers overink prints delivering slightly dark prints, typically losing subtle shadow detail. 4 – A majority of users don’t view their proofs and prints in ideal light. The cumulative effect leads many to think they’re doing something wrong (They might or might not be.) or that color management doesn’t work. It does. It just doesn’t work perfectly. And it’s important to know what the limitations are.
In my workshops, seminars, and DVDS, I cover what you can do to overcome these imperfections through proofing and then move on to other issues you can only address through proofing. Traditional photographic printing master John Sexton saw my demonstrations during the Epson Print Academy and remarked that watching them felt like deja vu because while the tools have changed the core concepts remain the same.
It’s been my mission to make color management relatively easy to understand and implement without dumbing it down. It can be done. No one else I know takes a more systematic and thorough an approach to proofing as I do.
I sat down several weeks ago with Scott Sheppard of Digital Photo Radio to talk about key Color Management and Proofing. Scott’s a great guy. Easy to talk with. Asks all the right questions. Scott’s one of the little guys doing big things. Digital Photo Radio is done entirely by one man. But the product is so good it seems like it’s created by an entire media team. I love to see individual entreprenuers go for it and succeed big. Scott’s done that.
Check out the audio cast and find out more about Digital Photo Radio here.
Check out my DVD 6 Simple Steps to Good Color Management here.
Check out my DVD The Art of Proofing here.
Check out free Color Management and Proofing resources on my website here.
Sign up for Insights enews to find out when new content is available here.

Appropriate Scale – Fine Digital Print Expert Workshop


One of the many things that it’s valuable to test is optimum scale. Images affect us differently at different scales. Small prints draw you close to them providing an intimate experience. Large prints envelope you in an immersive experience requiring a greater distance to see the entire image. One of the things my workshop students do is find optimum scales for their images. While there are many practical considerations that may modify their final choices (like final presentation space), determining an optimum scale reveals an artist’s intention and the nature of their work more clearly. How do you determine optimum scale? Test it! There’s no substitute for fully experiencing the effects of changing scale. Make different sized prints and compare them side by side. Alternately, projecting an image on a wall at different scales can be similarly revealing. Here, again, side by side comparison reveals more. Then, put your impressions into words – verbally or in writing.
Here veteran professional landscape and garden photographer Roger Foley shows two prints of the same image at different scales. While he feels a larger scale is ideal for his imagery, he’ll sometimes make smaller prints to accommodate smaller presentation spaces and client requests.
Find out more about Roger Foley here.
Look for my upcoming article on Scale in Photoshop User magazine. Find out about PSU here.
Find out about my Fine Digital Print Workshop series here.
Find out about The Fine Digital Print Expert workshop here.

Reviewing Images – Fine Digital Print Expert Workshop


We started my Fine Digital Print Expert workshop today with extensive group portfolio reviews. The reviews are useful for unveiling issues that need resolution and for helping frame how to apply techniques in ways that are appropriate for and sensitive to an individual’s vision (rather than applying technique formulaically, which tends to make everyone’s images look the same). My workshop participants not only get my feedback, and the feedback from other participants, but they also learn a lot of ways to approach looking, commenting on images. The right questions can be just as important as the answers. Sometimes they’re best left open for future revisitation because more can come to light. And activating collective intelligence in group sessions can be very helpful. You get to see when you do and don’t have consensus and many more ideas come to light.
You can’t take a one size fits all approach. You have to take into account the experience level of the person and their artistic goals. Rather than criticism, I prefer to offer useful feedback. The new field of Appreciative Inquiry (born out of the science of qualitative analysis) has a lot to offer when it comes to making valuable statement about quality. It opens dialogs by first identifying core strengths and then discusses how to make them stronger.
How participants present their work alters the type of feedback they get. You can present work without commentary and get spontaneous responses or you can speak about your work and get more focused commentary. You can present your images one at a time (this often highlights singular images, linear progressions of thought, and reveals memorable images – it’s best for more resolved work and when you want comments on broader issues and general thematic concerns) or many all at once (this makes it easier to see more subtle and complex connections between images, either formally or thematically, that might otherwise remain sensed but unseen – it’s best for more specific feedback). One isn’t better than another. They’re just different. The point is it’s important to decide what kind of feedback you’re looking for and to present your work in a way that encourages that type of feedback. Either way, you’ll often be surprised by the feedback you receive. That’s one of the great things about getting feedback from other people. You get exposed to new perspectives on your work.
Here, Claudia Rippee presented two bodies of work – a smaller set sequentially and a larger set contextually. She got very different kinds of feedback. At the end, she discovered that when the viewers understood that the two very different bodies of work were created by one artist that knowledge modified the responses of viewers to both bodies of work. Your images may be seen in reference to other artist’s images, but most importantly your images are seen in reference to all the other images you create.
Whether an individual’s goals are professional or purely personal I emphasize the development of an authentic voice and personally relevant themes. Signature Styles, Singular images and Bodies of Work are all core concepts that I reinforce. You can find out more about these keys to artistic fulfillment in my free Creativity Downloads.
See my PDF Portfolio Reviews and Artist’s palette here.
See my PDF Singular Images and Body of Work here.
Check out my column in AfterCapture magazine to read more.
Sign up for Insights to receive alerts when new free resources are posted.
Find out about my Fine Digital Print Workshop series here.
Find out about The Fine Digital Print Expert workshop here.

Birgit Neiser – How Far Is Too Far?


A few times a year I do one-on-one private sessions. Birgit Neiser came from Germany to take an HDR workshop with Dan Burkholder at MMW this week. A few days ago, she spent two mornings with me consolidating her knowledge base. We covered a lot of ground. An alumn of mine, Birgit stayed current and was well-prepared for the session. Private sessions are great for going over specific topics and spending as much or as little time as possible.
Learn more about workshops here.
Learn more about private sessions here.
After color adjusting a challenging image and taking it through the proofing process to a final 8×10″ print, she wanted to resolve a very interesting image. It was somewhat atypical of the rest of her work, but she was strongly attracted to it. So was I. She thought she’d like to correct some distortion, expand the canvas, and add add a cropped arm. It worked out handsomely, but when compared to the original it seemed less contemporary and edgy. We went too far. You don’t know how far to go, until you go to far. This answered a lot of questions for her about what to photograph, where to go to photograph, and how to photograph. We listed many elements that made this image work, with the idea of finding more like it – amputation, enjambment, off-kilter compositions, reflections, distortion creating abstraction, etc. Our heavy retouching session failed. Or did it? It’s not failure if you learn from it and then turn that failure into future success. At the end of the sessions, Birgit felt as if she was well along her way. Seeking outside feedback from trusted sources can greatly accelerate growth.
See more of Birgit’s work here.
How many trusted sources can you go to for feedback?
Can you think of times when feedback has helped your growth.
Tell us about it! Comment here.

Focus on Nature / Iceland – Destinations

Our Icelandic day trips are divided into “whole day” and “half day” trips. The variety of the destinations is truly stunning; waterfalls, glaciers, icebergs, hotsprings, geysers, volcanic debris fields, valleys, high mountain passes, and on and on. Here are a few highlights.
Here are some of the highlights of our day trips.

The Domadals route includes rugged mountains, deep valleys, and volcanic craters.
The South Coast includes fertile farmlands and two stunning waterfalls leading to black sandy coasts and a dramatic sea arch.
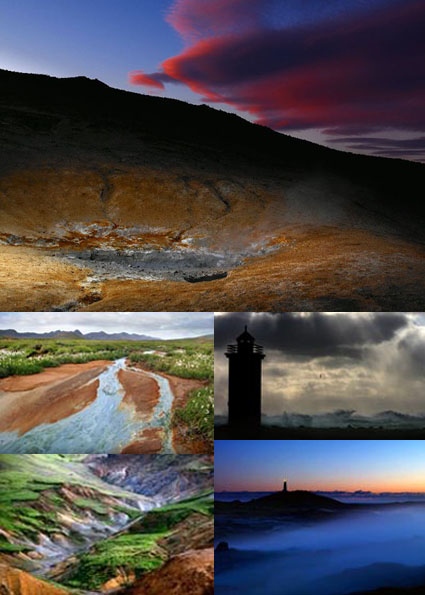
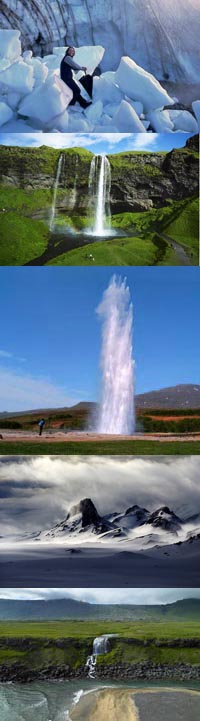
The Golden Circle is an area of intense geothermal activity with geysers, rapids, and waterfalls.
The Cold Valley is an area of extremes including glaciers and lava fields.

The diverse and mysterious Snaefellsnes Peninsula crescendos in a stratovolcano with a glacier at the top.
Find out about destinations even closer to our home base in these half day trips.
Read more about John Paul’s Iceland workshop (August 18-22) here.
Focus on Nature (Photography Workshops in Iceland) recently announced 15% discounts on their 2008 workshops. The discounts are made possible by excellent response from sponsors.
Enroll now! Space is limited.