Choose A Wide Gamut Editing Space

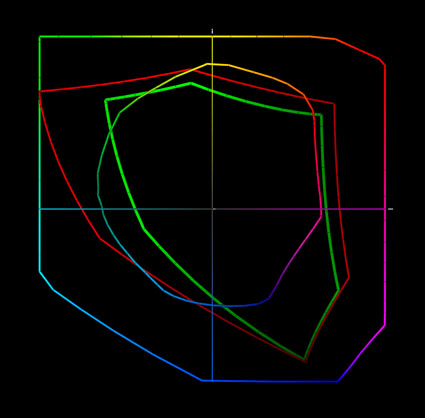
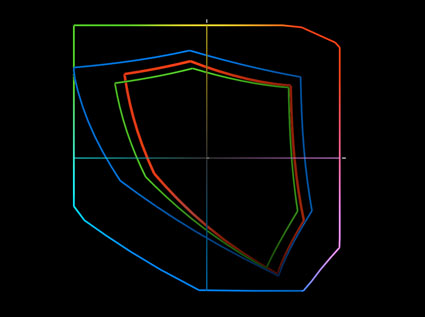
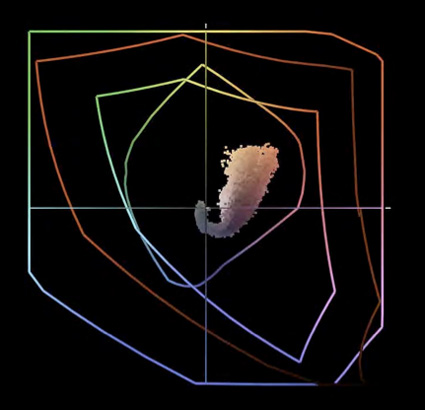
Today’s inksets can exceed the gamut of even the best monitors in yellows, oranges, and blues. Epson UltraChrome HDR ink on Epson Exhibition Fiber is plotted against sRGB, Adobe RGB (1998) and ProPhoto.

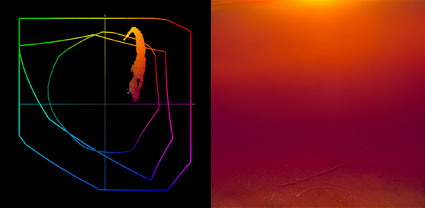
The gamut of this image and the print made from it exceeds the gamut of Adobe RGB (1998) and the monitor. You have to make a print to see the most saturated color possible.


Choose a wide gamut editing space to make the best prints possible. If a file’s color space is smaller than the printer’s color space, you won’t be able to realize the full saturation your printer is capable of.

Today’s inksets exceed the gamut of all but one of the standard editing spaces (sRGB, Colormatch, and Adobe RGB (1998)), making ProPhoto the best choice for creating files in. Since ProPhoto exceeds the gamut of human vision, it’s unlikely that you’ll ever need a wider gamut editing space than ProPhoto. If you create your files in ProPhoto you’ll be well-positioned to take advantage of future advances in printer and media technology. So, choose ProPhoto.

How do you do this?

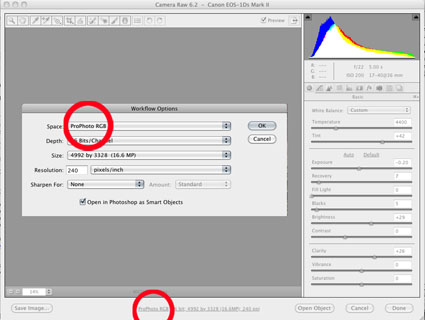
1         If you’re converting a Raw file, choose ProPhoto in the Raw converter’s interface.

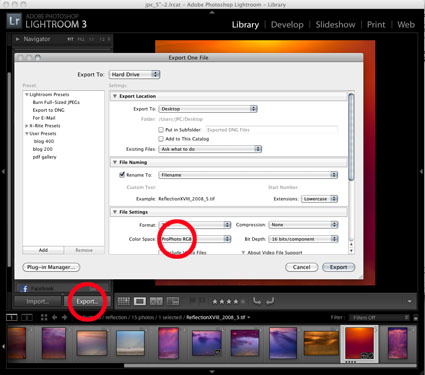
2         If you’re exporting a file from Lightroom, choose ProPhoto.

3         If you’re creating a new file in Photoshop, set ProPhoto as your default color space.

4         If you’re scanning an image, choose ProPhoto in the scanner’s interface.

Read More

Editing Spaces Compared

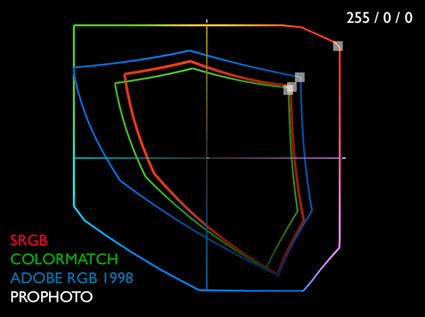
Four standard device-neutral RGB editing spaces compared
sRGB – red; Colormatch – green; Adobe RGB – blue; ProPhoto – full color


From small to large, standard RGB editing spaces include sRGB, Colormatch, Adobe RGB (1998), and ProPhoto. Only ProPhoto RGB can contain as much or more color as your camera can capture. This is why I recommend ProPhoto RGB as my first choice of these editing spaces. ProPhoto RGB has the widest gamut.

The term gamut is used to describe the total capacity of a color space. Wider gamut color spaces are capable of containing more saturated color than smaller gamut color spaces. ICC profiles are used to describe color spaces. ICC profiles can be graphed as XY chromaticity diagrams, which can be used to compare the gamuts of color spaces. On the center, axis are neutral colors. As you move away from the center color becomes more saturated. A larger area indicates a greater ability to hold more saturated data. The contour defining that area marks the gamut boundary, the limit of saturation that color space is capable of holding.

Capture your images in wide-gamut color (Raw) and edit them in wide-gamut color (ProPhoto RGB). Convert only copies of your master files into smaller gamut spaces for output-specific uses. Converting images from wider gamut spaces to smaller gamut spaces reduces saturation. Converting images in smaller gamut spaces to wider gamut spaces doesn’t increase saturation.

Why? Think of a bucket full of water. If the water is color, then the bucket that holds it is the editing space. If you pour water from a big bucket into a small bucket, some of the water will be lost. Pouring the smaller volume of water back into the larger bucket won’t make the total volume of water larger; it will be the same amount of water sitting in a larger bucket. Start wide and stay wide.


Read more on Color Management here.

Read more on digital Printing here.

Learn more in my digital photography and digital printing workshops.

Using ICC Profiles


ICC profiles define a meaning for the numbers used to represent colors in digital images. Without an ICC profile digital files will produce unpredictable and inconsistent results.

As a rule, always use ICC profiles. There are a few rules for using ICC profiles. Always assign ICC profiles (the correct ICC profile) when you create a digital file. Always use ICC profiles when converting digital files from one color space to another. Never remove an ICC profile from a digital file without replacing it. Use accurate high-quality ICC profiles. While there are exceptions to these rules, they’re rarely encountered.

Here’s one of the single most confusing things about color management. The same numbers in different color spaces produce different colors. Why? Because while RGB color spaces (including the standard device neutral editing spaces sRGB, Colormatch, Adobe 1998, ProPhoto) all use the same numbers from 0–255 to describe color, each color space is capable of different things. For instance, wider gamut color spaces are able to represent more saturated colors. The numbers used to produce the most saturated red (255/0/0) will produce a more saturated red in a wider gamut color space than they will in a smaller gamut color space. So the same numbers in different color spaces produce different results.

Here’s another way of saying the same thing: Change to stay the same. Use ICC profiles to define a source and destination so you can change numbers precisely to make sure colors stay the same. Once you know what numbers you need to produce the same color in two different color spaces (like a monitor and a printer), you can precisely change the numbers to produce the same color appearance as you move a digital image from one color space to another. If you don’t change the numbers, the appearance of the colors will change when you move a digital image from one device/color space to another.

Some change is inevitable when moving from a larger color space to a smaller gamut color space and ICC profiles can be used to predict how color will change. They can be used to show you what must change and can’t be restored (out of gamut colors) and what will change and can be restored (in gamut colors). While you won’t gain color quality when converting from smaller gamut spaces to larger gamut color spaces, you’ll lose a tiny bit of data, which if done a number of times can degrade an image. So, keep color conversions to a minimum. (Optimally, convert once when you acquire an image; a second temporary conversion will be made while you print an image).

Use ICC profiles. ICC profiles are recipes for color that clearly define numbers making color consistent and predictable. They’re the foundation for working with color in digital imaging.

How important is this?
See what can happen below if you don’t use ICC profiles correctly.

Read More

7 Simple Steps To Good Color Management


Color management is rocket science. But you don’t have to be a rocket scientist to drive the rocket. Instead, be an astronaut. With a few simple steps you can achieve consistent, high-quality color with your images every time.

These are the seven simple steps to good color management.

1 – Make Profiled Conversions
Assign an ICC profile to all image files either during Raw conversion or scanning. Use appropriate profiles to make conversions into other color spaces with derivative files only. Minimize the number of conversions made.

You won’t be doing this that often, once you standardize your workflow (creating all files in one color space)

2 – Use Hardware To Calibrate Your Monitor
Once a month, use a colorimeter to build an ICC profile for your monitor. Minimize the influence of other light sources during characterization. Use the colorimeter’s software to help you set monitor brightness between 90 and 100 and choose White Point D65 and Gamma 2.2. Check the results with know target images afterward.

Do this roughly once a month.

3 – Set Better Photoshop Color Settings
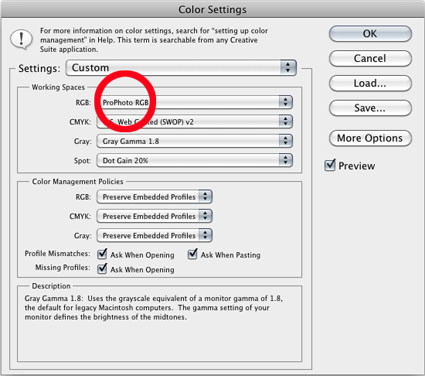
In Photoshop’s Color Settings (in the Edit Menu) Set Color Management Policies to Preserve Embedded Profiles and Ask When Opening / Pasting. And, choose a wide gamut device neutral editing space. Start with North American Prepress Defaults and then change RGB to ProPhoto RGB.

Do this once … and check it whenever Photoshop is updated.

4 – Profile Your Paper
Using a high-quality device make an ICC profile of your ink and paper combination. Or, have someone make a profile for you. Then make your prints with your custom profile. You’ll need different profiles for different papers. Consider profiles you download from websites suspect, sometimes ok but rarely great. (Skip this step if you’re printing on Epson paper with Epson printers. Their profiles are excellent.)

Do this once. Do it again when you change your paper type or printer ink.

5 – Softproof Before You Proof
Simulate the appearance of a print before printing. Go to View : Proof Setup : Custom and choose the profile you intend to print with. Check Simulate Paper Color and choose a rendering intent of either Perceptual or Relative Colorimetric. Make output-specific adjustments before printing. Use these adjustments only when printing these media.

Do this before you print individual image, but not multiples of the same image.

6 – Check The Correct Boxes In Your Printer Driver
Use Photoshop / Lightroom or your printer driver to manage color – not both. In general, favor using Photoshop/Lightroom as this is the most versatile allowing you to use custom output profiles.

Do this every time you print. Save custom settings so you can check multiple boxes with one click.

7 – Control Your Viewing Environment
Edit and evaluate your images in neutral surroundings. Minimize the effect of extraneous light sources, such as glare on monitors or backlighting. Evaluate proofs and prints in appropriate lighting.

Do this once.

There’s much more that can be said about each of these topics – but, not much more to do. Take these steps and you’ll be well on your way to achieving consistent, high-quality results with your images.


Read more on Color Management here.

Learn more in my digital photography and digital printing workshops.

Evaluate Your Monitors' Performance – X-Rite i1Photo Pro

;
Now there’s a quick and easy way to evaluate what your monitor can do with the Q&A functions in X-Rite’s latest version of i1Photo Pro. Calibrating and profiling your monitor is the first step.  After that, you can identify which colors are displaying well and which have issues. You can use this information to identify the your best monitor for critical color work and even when it’s time to replace a monitor.
Read more in my digital photography ebooks here.
Learn more in my digital printing and digital photography workshops here.
 

X-Rite i1Photo Pro


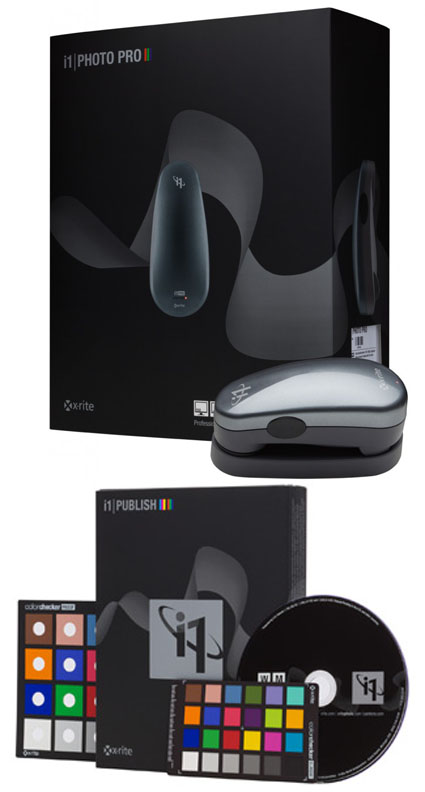
“The long awaited day is here!  X-Rite i1 Professional solutions, which includes the new i1Photo Pro, are now available. Each solution features the all-new i1Profiler software application designed to delivers superior color results!  i1Profiler is driven by a new color engine, sports a dual mode interface (basic and advanced) and new quality assurance features, plus so much more. The new i1Photo Pro was designed specifically for discerning photographers to attain the highest quality color results and color control throughout your complex digital photo workflow, at a very attractive price.
The new portfolio is comprised of three software/hardware/target bundles ­– i1Basic Pro, i1Photo Pro, i1Publish Pro – and i1Publish, a software/target solution. All four feature groundbreaking new i1Profiler software technology designed to accommodate all levels of proficiency and expertise, and provide the power and control needed to create the highest quality color profiles. The new PANTONE Color Manager color swatch bridging software,  ColorChecker Proof, a new ColorChecker target for direct viewing analysis against a printed target and ColorChecker camera calibration system are also featured.
Upgrade packages are available for those who have i1Pro devices as well as MonacoPROFILER 4 and ProfileMaker 5 users. Read more about the upgrade opportunities and review the features of i1Profiler software at www.xritephoto.com.”
The advances in software make every function more precise.
Printer profiling takes a major leap forward with easy to make light temperature and image specific profiles.
If you haven’t invested in X-Rite technology do it now.
If you have, upgrade now.
This is a major upgrade that all users should seriously consider.
Find out more about i1Photo Pro here.
View more in my DVD 6 Simple Steps to Good Color Management.
Learn more in my digital printing and digital photography workshops here.