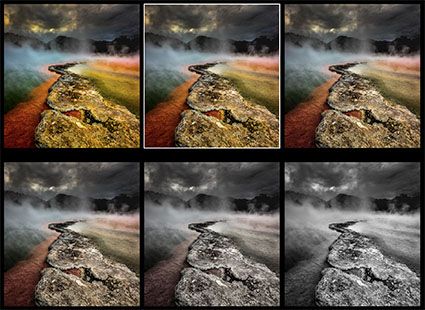
Reducing Noise with Adobe Camera Raw and Lightroom

1_Antarctica_2009-XC
2_LRACRnoise

Lightroom’s Detail panel

Reducing noise in Adobe Camera Raw and Lightroom (the controls and results are identical) is easy.

The Detail panel provides tools to reduce two kinds of noise – Luminance (light and dark) and Color. Results can be targeted with the Detail slider into smoother (low setting) or more textured (high setting) areas. The effects for luminance noise reduction can be further modified by adjusting the Contrast slider; a higher setting affects only high contrast noise, while a lower setting affects even closely matched values. And finally, the effects for color noise an be further modified with the Smoothness slider, a higher setting creates a more aggressive effect.
Zoom into an image at 100% magnification and move the sliders until noise is reduced, but image quality isn’t compromised. Use restraint. In a majority of situations, it’s better to preserve a little noise than to blur the image substantially.

All noise reduction blurs images. Sharpening after noise reduction during RAW conversion is recommended. Knowing that you’ll sharpen an image after noise reduction, you may reduce noise slightly more aggressively initially.

3_noNRorsharp

no noise reduction

5_appropriateNR

appropriate noise reduction

7_excessluminanceNR

excessive noise reduction

There are limits to how far you’ll want to go. Noise can be so aggressively reduced that surfaces within images become textureless and begin to seem synthetically rendered with software rather than optically captured photographically. This effect may become more pronounced if contours are strongly exaggerated during sharpening. While sharpening, take care not to accentuate noise further. Develop a sensitivity to texture and contour, and use your best judgment. You know what things look like. Make your images look convincing to you, and you’ll quickly convince others.

RAW converter tools have limits. RAW converter tools do a good job with moderate amounts of color noise. Even high settings don’t tend to compromise image quality; sharpness, saturation and hue variety are all preserved. But sometimes they don’t go far enough. For aggressive noise reduction, especially for larger noise produced by Bayer pattern demosaicing, turn to Photoshop and possibly third-party noise-reduction software.

RAW converter tools do a reasonable job with luminance noise, but aggressive applications may compromise sharpness (some, but not all of this can be compensated for with RAW converter sharpening tools), and at times they don’t go far enough. When you encounter situations like this, turn to Photoshop and third-party noise-reduction software.

Most images can benefit from a little noise reduction and sharpening during RAW conversion. For many situations, this is all the noise reduction you’ll need. Many exposures don’t require substantial post-processing. However, some exposures require more power and finesse than these tools can deliver. When you encounter these, move to more sophisticated tools found in Photoshop and third-party plug-ins. But always start here.

Use Adobe Lens Profiles To Improve Your Image Quality

LensProfiles_Profile_425
Do you wish you could improve the quality of the images your lenses deliver after exposure? You can, using software. Adobe’s Lens Corrections feature uses a digital image file’s EXIF metadata about camera and lens to automate cures for standard lens distortions, including geometric distortion, chromatic aberration, and vignetting.


Insights Members can login to read the full article.
Email:
or Sign up

Capture Sharpening With Lightroom & Adobe Camera Raw 

01_CaptureSharpen

02_CaptureSharpen
Adobe Camera Raw's Detail panel

Optimal image sharpening is best done in three stages – capture (Do it during Raw conversion.), creative (Do it in Photoshop.), and output (Automate it.).

This article covers the first stage of sharpening – capture sharpening.

Capture sharpening benefits all images. Capture sharpening compensates for inherent deficiencies in optical and capture systems. All lenses and sensors have specific characteristics and deficiencies. They do not all have the same characteristics or deficiencies.

To speed your workflow, default settings for the best starting point for capture sharpening can be determined for all images created with the same lens/chip combination and saved for subsequent use. To optimally sharpen an image, you’ll need to modify these settings to factor in additional considerations – variances in noise (ISO, exposure duration, temperature), noise reduction settings, and the frequencies of detail (low/smooth to high/fine texture) in an image.


Insights Members can login to read the full article.
Email:
or Sign up

How To Avoid Common Over-Sharpening Artifacts

over sharpened

You can easily see the artifacts digital sharpening produces by intentionally overdoing it.

Here are the seven most common digital sharpening artifacts.

1         Noise
2         Exaggerated Texture
3         Visible Light Halos
4         Visible Dark Lines
5         Loss of Highlight Detail
6         Loss of Shadow Detail
7         Increased Saturation

These artifacts can be reduced in one or more ways. Here’s a list of options for each.

1         Noise
Raise Unsharp Mask’s Threshold.
Use High Pass sharpening.
Blur High Pass layers.
Mask select image areas.

2        Exaggerated Texture
Reduce Unsharp Mask’s Amount.
Use High Pass sharpening.
Blur High Pass layers.
Mask select image areas.

3       Visible Light Halos
Reduce Unsharp Mask’s Radius to make halos thinner.
Reduce Unsharp Mask’s Amount to make halos darker.
Set the Blend Mode of the Unsharp Mask filter or layer it is applied to Darken.
Use High Pass sharpening for softer more feathered contour accentuation.

4        Visible Dark Lines
Reduce Unsharp Mask’s Radius to make halos thinner.
Reduce Unsharp Mask’s Amount to make halos darker.
Set the Blend Mode of the Unsharp Mask filter or layer it is applied to Lighten.
Use High Pass sharpening for softer more feathered contour accentuation.

5         Loss of Highlight Detail
Use a sharpened layer’s Layer Styles / Blend If sliders to recover it.
Mask the highlights.

6        Loss of Shadow Detail
Use the Blend If sliders in Layer Styles to recover it.
Mask the shadows.

7         Increased Saturation
Change the blend mode of the filter or sharpened layer to Luminosity.
Desaturate High Pass layers.


Insights Members can login to read the full article.
Email:
or Sign up

How To Avoid Over Sharpening

Antarctica CLXXI
Identifying and developing a sensitivity for the artifacts digital sharpening produces will help you choose a sharpening method and what settings to use during any stage of your sharpening workflow. You can easily see the artifacts digital sharpening produces by overdoing it. Apply a filter like Unsharp Mask at maximum strength and look closely at what happens.
Following are the seven most common digital sharpening artifacts.
1. Noise
2. Exaggerated Texture
3. Visible Light Halos

4. Visible Dark Lines
5. Loss of Highlight Detail
6. Loss of Shadow Detail
7. Increased Saturation
These artifacts can be reduced in one or more ways.
Read more on Digital Photo Pro.
If you know what to look for, you’ll know what path to choose and how far down it to go. Training your eye for what to look for and understanding the upper limits of what other people find to be naturalistic, or at least not distracting, is the first step to developing your unique sharpening style. The second step is learning how to produce certain effects and avoid others with the tools at your disposal. Once you’ve taken these steps, you can take the third and final step, knowledgeably putting craft in the service of your vision to make compelling visual statements. Enhancing detail is one area of expertise that’s well worth mastering for all photographers.
Learn more in my digital photography and digital printing workshops.

Seeing in Black and White

Color
BW_DarkR
BW_LightR
Learning to see in black and white has changed. Prior to the 21st century, black and white photographers developed a heightened sensitivity to intensity and direction of light as well as tonal relationships between highlights and shadows. For the most part, they discounted the appearance of hue and saturation, with a few exceptions.

These perceptual skills are still very important for 21st century digital black and white photographers. But, today, previsualizing possibilities becomes much more challenging. Because you can make any hue light or dark, globally or locally, dramatically extending the variability of an image's tonal structure, the two additional variables, hue and saturation, need to be factored in rather than factored out.


Insights Members can login to read the full article.
Email:
or Sign up

DPD’s New Advanced Lightroom & Photoshop Seminar

Hand_BeforeAfter
Learn how to make the most of your images!
Come join us for a 3 day no-holds-barred seminar on digital image processing led by two long-time industry leaders!
Demonstrations will include essential new features you need to know about in Lightroom 5 and Photoshop CC. Master the most advanced cataloging, keywording, searching, and filtering capabilities of Lightroom. Learn best practices for using Lightroom at home, on the road, and even on a network. See how you can efficiently share your images in slideshows, web galleries, social networks and print. You’ll know what to do in Lightroom and what to do in Photoshop, when to do it, and how to move back and forth seamlessly between the two.
We’ll cover all the ins and outs of developing Raw files. You’ll see what every slider in Lightroom’s Develop Module / Adobe Camera Raw does. And then we’ll show you how to double process and even use Camera Raw as a filter allowing you to use all of Photoshop’s advanced masking capabilities. You’ll see two top pros process their own files and each other’s files.
You’ll be dazzled by game-changing multi-shot processing techniques – including HDR, panorama, focus-stacking and more. You’ll be wowed by our creative uses of Photoshop’s most advanced sharpening and blurring tools. Witness the most advanced color adjustment strategies you’ll find anywhere. Combine them with the most sophisticated selections and masks to master the interpretive art of dodging and burning.
You’ll be able to take your files to a whole new level!
Register now!
Sossusvlei_BeforeAfter

The Complete Photography Bundle II – Sale Ends 10/20

5DayDeal-Photography-Contributors-No-Title

These 21 photographers have bundled together 39 different photography products; including training, tools, and much more.

Over 70 hours of training video

14 Photography ebooks

300+ Lightroom Presets

500+ Textures

And much more more!

It’s an incredible value!

Purchase The Complete Photography Bundle II here now!

bunlde-value-bundle-price

5daydeal-sale-dates

It’s only available for 5 days!

The sale ends Oct 20 at noon EST.

Purchase it here now!