John Paul Caponigro On Printing – Epson
In this video, I share my thoughts and feelings on photography and printing.
Find out more about printing here.
Read other interviews here.
Read my artists statements here.
In this video, I share my thoughts and feelings on photography and printing.
Find out more about printing here.
Read other interviews here.
Read my artists statements here.
This one day seminar is one of the best values in the industry!
Thousands of dollars of free giveaways are provided by Adobe, X-Rite, NIK, OnOne, HDRSoft, Imagenomic, Chromix and more!
Find out about the latest advances in digital printing. You’ll learn to evaluate printers, inks, media, RIPs, and profiles. See the latest Epson printers and media in action. Take the results home!
Discover what’s unique about a fine art workflow designed to maximize quality. See it in action. See it detailed step-by-step. See the results. John Paul and Mac will build a file from the ground up and show you the final results in print.
You’ll learn to seamlessly integrate Adobe software Lightroom, Bridge, Camera Raw, and Photoshop. You’ll learn a variety of tools and techniques that will help improve and refine both your digital files and prints. We’ve heard time and time again, “That one tip was worth the price of admission.” And there are dozens of these!
You’ll leave with the knowledge you need to get the results you’re looking for and the confidence that it’s the very best.
Topics include:
Preview our DVDs Fine Art Digital Printing and Fine Art Digital Workflow.
Learn more in our Fine Art of Digital Printing Workshop.

Epson recently announced a new addition to it’s line of photo printers.
It’s a smaller version of the Epson R3880.
Epson Ultrachrome K3 with Vivid Magenta Ink Technology
13″ wide
It lists for $849.99.
Find it at B&H for $834.95 here.
Industry-leading pigment ink technology
Epson UltraChrome K3 with Vivid Magenta Ink Technology for stunning color and black-and-white prints with intense blues and violets and improved skin tones
Individual high-capacity ink cartridges
Change cartridges less often with nine 25.9 ml individual ink cartridges
Advanced Media Handling
Offers consistent, reliable performance with front-in, front-out paper path; accommodates cut-sheet and roll paper in sizes up to 13″ wide; supports photographic and fine art paper, canvas, art boards and CD/DVDs
Unparalleled connectivity
Hi-Speed USB 2.0, wireless 802.11n and 100 Mbit Ethernet support
Auto-switching Black inks
achieve the highest black density and superior contrast on glossy, matte or fine art papers from either Matte or Photo Black ink
Leading-edge image-quality architecture
Smoother color transitions and outstanding highlight and shadow detail with AccuPhoto™ HD2 imaging technology
Precision 9-color, 8-channel print head technology
Innovative MicroPiezo® AMC™, one-inch wide print head with ink-repelling coating for more accurate dot placement and reduced maintenance
Professional control
Advanced Black-and-White Photo Mode to easily create neutral or toned black-and-white prints from color or monochrome images
Learn more about the Epson R3000 here.
Find the tools I use here.
Read more in my digital printing lessons.
Learn more in my digital printing workshops.
This one day seminar is one of the best values in the industry!
Thousands of dollars of free giveaways are provided by Adobe, X-Rite, NIK, OnOne, HDRSoft, Imagenomic, Chromix and more!
Find out about the latest advances in digital printing. You’ll learn to evaluate printers, inks, media, RIPs, and profiles. See the latest Epson printers and media in action. Take the results home!
Discover what’s unique about a fine art workflow designed to maximize quality. See it in action. See it detailed step-by-step. See the results. John Paul and Mac will build a file from the ground up and show you the final results in print.
You’ll learn to seamlessly integrate Adobe software Lightroom, Bridge, Camera Raw, and Photoshop. You’ll learn a variety of tools and techniques that will help improve and refine both your digital files and prints. We’ve heard time and time again, “That one tip was worth the price of admission.” And there are dozens of these!
You’ll leave with the knowledge you need to get the results you’re looking for and the confidence that it’s the very best.
Topics include:
Preview our DVDs Fine Art Digital Printing and Fine Art Digital Workflow.
Learn more in our Fine Art of Digital Printing Workshop.
The folks who make the software I use pass on great discounts to my readers.
That’s you!
Here’s a list of links to the codes you’ll need to get them.
Discount Adobe
Discount Epson
Discount FotoQuote
Discount Imagenomic
Discount OnOne
Discount PhotoKit
Stay tuned! There are more discounts coming!
You’ll find a growing list of links on my blog sidebar.
Learn more about the tools I use here.
Successfully managing color for digital printing requires that the color in an image file be converted from its device-neutral color space to a device-specific color space. (Typically this occurs by converting from Adobe RGB 1998 or Pro Photo RGB to a device-specific color space defined by an ICC profile characterizing a specific combination of printer, ink, paper, and driver.)
Using Photoshop, you can either convert color in an image before you send it to a printer driver or after you send it to a printer driver.
Choose one method of color management – not two. Easily made, a classic mistake is using both. Double color management typically results in a print that is too light and magenta.
The Epson printer driver provides many ways to manage color conversions and get reasonably good color. Two methods offer the best results; the Photoshop route and the Epson route.
How do you choose either of these methods?
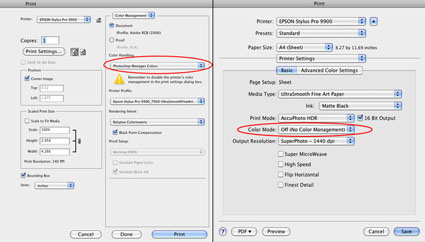
Let Photoshop’s Print window (under Color Handling) guide you – Let Photoshop Determine Colors and Let Printer Determine Colors. (While the principle is the same for most printers, interfaces will vary. Here’s information for the most current Epson interface.)
If you choose Let Photoshop Determine Colors under Color Handling, select a profile for Photoshop to make the conversion with (a paper/ink/driver specific profile not the interface default of Working RGB) under Printer Profile, choose a Rendering Intent of either Relative Colorimetric or Perceptual, and then click Print Settings. In the Print window choose the correct Printer and then change Copies and Pages to Print Settings. Select the correct Media Type, uncheck High Speed, and choose the highest printer resolution available. Finally, change Print Settings to Color Management and select Off (No Color Adjustment). The Photoshop route turns Photoshop’s color conversion on and turns the printer’s color conversion off.
The Photoshop route tends to hold slightly more saturation but it’s rendition of neutral colors and gray balance is usually not as good as the Epson route. The Photoshop route is the route to take when you want to use a custom profile. Use it if you are printing with either third-party inks or papers which require the use a custom profile to accurately describe the behavior of the alternate media.
If you choose Let Printer Determine Colors under Color Handling, choose a Rendering Intent of either Relative Colorimetric or Perceptual, and then click Print Settings. In the Print window choose the correct Printer. Change Copies and Pages to Print Settings to select the correct Media Type, uncheck High Speed, and choose the highest printer resolution available. Finally, change Print Settings to Color Management, choose EPSON Standard (sRGB) under Mode, and select Color Controls. The Epson route turns Photoshop’s color conversion off and turns the printer’s color conversion on.
The Epson route tends to deliver a significantly improved rendition of neutral colors and gray balance with slightly less saturation. Try it when printing neutral colors. Use the Epson driver’s Advanced B&W Photo feature for black and white images.
Each route works well. Each route yields slightly different results. Test them to see the differences. (Note that you cannot see the differences between printing routes when softproofing; you have to make physical proofs to see these differences. They can significant.)
Read More
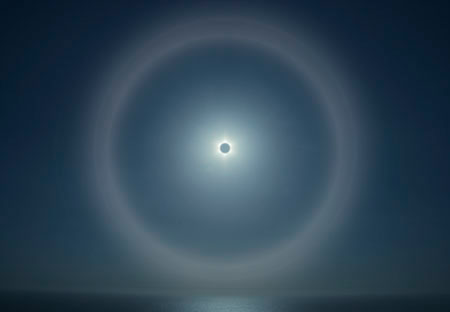
Get This – Correct Color Management
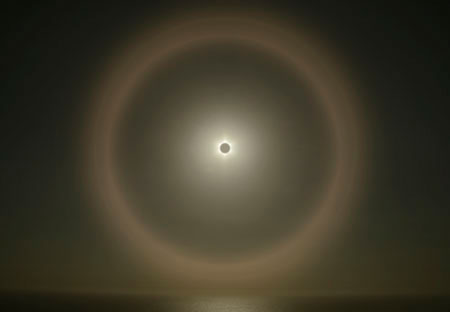 Avoid This Double Color Managed
Is your print too light and magenta? Double color management. It’s a classic mistake. I sometimes make it myself when I’m working too fast. So that you know what to look for, I recommend that you make the mistake deliberately, once, and only once, if possible.
Don’t do this …
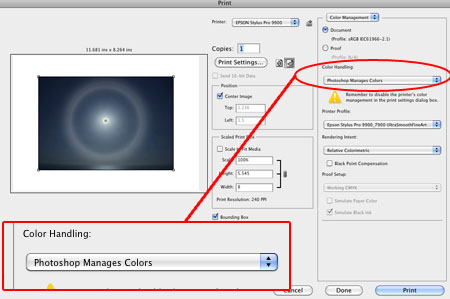
And this …
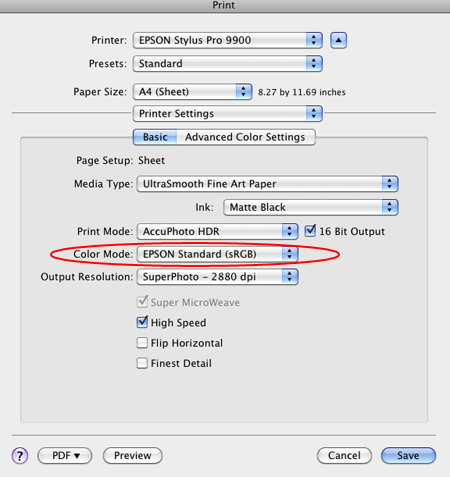
What’s the right solution?
Check your software (Photoshop or Lightroom) and printer software (Epson driver) settings, reset them, and print again. Choose one method of color management – not two.
Read more in my online resources.
Learn more in my digital printing workshops.

Looking for ICC profiles for Epson’s Signature Series of papers for their Pro level printers?
Find them here.
Find more digital printing resources here.
Learn more in my digital printing workshops.
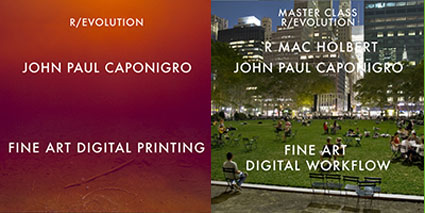
Mac Holbert and I concentrate on Fine Art Workflow in our Epson sponsored seminar today in Seattle for ASMP.
Free giveaways include Adobe CS5, NIK HDR Efex Pro, Pixel Genius Photo Kit Sharpener Pro, OnOne Plug In Suite, X-Rite Color Passport, and more.
Find out more about the event here.
View our DVD content here.
Read more in my digital printing lessons.
Learn more in my digital printing workshops.
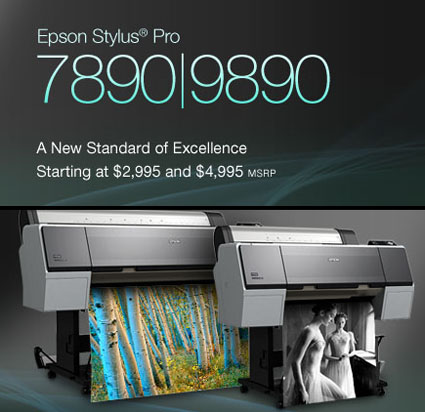
Find out about Epson’s two new fast printers.
Epson Stylus Pro 7890 and 9890.
24″ and 44″ loaded with Epson UltraChrome K3 with Vivid Magenta ink.