Exploring Motion – Andrew Nixon


In my Maine Islands digital photography workshop, Andrew Nixon explored creating a dynamic tension between the still and the moving. He typically uses long exposures of moving subjects. But he tried a few new twists on his standard practices, like moving the camera. While he explored other ideas and tried many new things, he always returned to the same theme which gave his images a distinctive quality that stood out from his peers.
What themes make your images distinctive?
What experiments will help you explore and develop this further?
Find out more about Andrew Nixon here.
Read more in my creativity lessons.
Find out more about my Maine Islands digital photography workshop here.
Learn more in my digital photography workshops.

Capture Sharpening


Optimal image sharpening is best done in three stages— capture (do it during RAW conversion), creative (do it in Photoshop) and output (automate it).
Capture sharpening benefits all images. It compensates for inherent deficiencies in optical and capture systems. All lenses and sensors have specific characteristics and deficiencies. They don't all have the same characteristics or deficiencies.
To speed your workflow, default settings for a best starting point for capture sharpening can be determined for all images created with the same lens/chip combination and saved for subsequent use. To optimally sharpen an image, you'll need to modify these settings to factor in additional considerations—variances in noise (ISO, exposure duration, temperature), noise-reduction settings and the frequencies of detail (low/smooth to high/fine texture) in an image.


Insights Members can login to read the full article.
Email:
or Sign up

Photoshop Exchange


“Where do you go to access over 10,000 unique Photoshop presets, templates, tutorials, plug-ins and more? Visit Photoshop Exchange, the Adobe hosted website for customers who want to discover and share Photoshop content with each other. They recently crossed the 10,000th item milestone, adding 600 new submissions since January. The majority of the content is free, and those few paid pieces of content average about $4.
If you’re looking for inspiration, or just want to try out some new styles, effects or practically anything else that can be customized in Photoshop, you will find Actions (51% of Exchange’s content), followed by Styles (15%) and Brushes (10%), as well as shapes, tutorials and patterns, and many elaborate and useful Templates (.PSD files, ranging from Web components and complete site designs, brochures, flyers, 3D presentation graphics, print ads and the like), which can save you time and even help you explore how advanced users build complex and beautiful files.”

Visit Photoshop Exchange here.

Publish Your Photography Book – Himes & Swanson


Darius Himes and Mary Virginia Swanson’s book Publish Your Photography Book offers clear cogent advice that will help anyone interested in navigating the waters of book publishing. This is true whether your goal is to work with a major publisher or to self-publish or both.
The book covers everything you need to know; concept and mission, financing and contract negotiation, editing and sequencing, design and production, marketing and more.
The countless case studies in this book give it a flair unlike any other. David Maisel, Daniel Milnor, Alec Soth, and Alex Webb are just a few.
The voices of experts in the industry give this volume a broad diversity you’re unlikely to find anywhere else. Eileen Gittens (Blurb), Michelle Dunn Marsh (Aperture/Chronicle), Rixon Reed (PhotoEye) are just a few.
I can’t think of a better duo than Himes and Swanson to help you understand the world of book publishing.
I can’t recommend this book more highly.
Find Publish Your Photography Book here.
Visit Darius Himes’ website here.
Visit Mary Virginia Swanson’s website here.
Find more bookmaking resources here.

What It Takes To Be A Great Workshop Leader


What does it take to be a great workshop leader? The same things that it takes to be a great leader in any field.
A great leader communicates passionately. Then they fan the flames of other people’s passions. The one thing you don’t want to do with passion is hide it. Passion creates energy, commitment, and endurance. Passion is contagious.
A great leader walks his talk. Leaders demonstrate. They tell you the rules of the game and they also show you when exceptions prove the rules. It’s important to see how theory is modified by practice. It’s even more important to see when and how practice is customized by individuals.
A great leader offers guidance and direction. Leaders share why they do what they do and show what’s worked for them. Then they ask a set of guiding questions that help others frame what’s most relevant to individuals. Leaders help others frame their own unique set of guiding questions in ways that are most personally relevant.
A great leader listens. Different people want and need different things at different times. Leaders ask questions and look at results to find out what other people want and need most. Leaders don’t give other people their voice, they help others make their own voices stronger. Leaders understand that different people want different results.
A great leader helps others activate all their resources. Leaders help others consolidate and build upon their core strengths. You start with where you are and you move to where you want to be. You develop the vision to know where you want to go and the skills to get there. Leaders know that if you want to raise the level of your game, you need to improve both your inner game and your outer game.
A great leader recognizes and reveals group resources. Every group has a unique set of resources, because every group is a collection of unique individuals. Leaders bring out the often hidden resources within a group. When they do this, everyone becomes both a student and a teacher; everyone learns more, including the leader.
A great leader expands other people’s comfort zone. By inspiring people with more possibilities and demonstrating tangible results, leaders show others what’s possible. They challenge other people to periodically get out of their comfort zones and try new things. Conscious experimentation is a key to continued success.
A great leader empowers other people. Leaders offer optimum ways of thinking and working. They think clearly. They act decisively. They do this because they have experience. And, they share their experience to help others become more personally fulfilled.
A great leader brings all of their resources with them (passion, philosophy, history, education, connections, technique, tools, results), ready to make the most of every moment – and every individual.
So, being a great digital photography workshop leader involves far more than making sure people get to great locations at great times. (Of course, that’s really important too!)
 
Find out what people say about my workshops.
Learn more in my digital photography and digital printing workshops.

New X-Rite ColorMunki Display and i1Display Pro


X-Rite’s new ColorMunki Display and i1Display Pro make major leaps forward in color managing displays.
Technologically Advanced Hardware
Both ColorMunki Display and i1Display Pro devices feature an advanced, high-end, optical system with custom-designed filters that provide a near perfect match to the color perception of the human visual system, delivering superior color measurement results.  Both devices fully support all modern display technologies, including LED backlight and wide gamut displays. Both devices are spectrally calibrated, making them fully field upgradeable to support future display technologies.
The ergonomic all-in-one design combines three important functions …

Ambient Light Measurement – an integrated ambient measurement diffuser allows you to to take ambient light measurements of your work environment.
Display Profiling – rotate the ambient diffuser arm and adjust integrated counterweight, with push button action, along the USB cord for display profiling ease.
Projector Profiling – rotate the ambient diffuser arm to use as a tabletop stand for device positioning, or use the built-in threaded tripod mount for larger venues.
Next Generation Profiling Software
Ambient Light Measurement – automatically determine the optimum display luminance for comparing prints to your display, based on a measurement of the lighting conditions where prints will be viewed.
Ambient Light Smart Control – the intensity or amount of ambient light surrounding your workspace affects the way you perceive colors on your display. These solutions can compensate for this effect and provide the option to automatically adjust your profile or simply notify you as ambient light conditions change.
Flare Correct™ measures and adjusts your display profile for reduced contrast ratios caused by flare light (or glare) falling on surface of display. By accurately measuring your effective display contrast ratio, you’ll have an even more accurate display profile.
Intelligent Iterative Profiling, an adaptive technology that produces optimized results for maximum color accuracy on each unique display every time you profile.
Automatic Display Control (ADC) technology automates the adjustment of your display’s hardware (brightness/backlight, contrast, and color temperature) to speed up the profiling process and eliminate manual adjustments to ensure highest quality results.
Find out more about ColorMunki Display here.
Find out more about i1Display Pro here.
Read more in my color management ebooks.
Learn more in my digital photography and digital printing workshops.

What To Do With Photoshop’s Color Management Dialogs

Knowing what to do with the color management dialog boxes you encounter while you’re editing your digital images in Photoshop is the key to making sure that the rich, saturated, wide-gamut color you choose to master your files in stays wide-gamut and doesn’t change – unless you want it to.

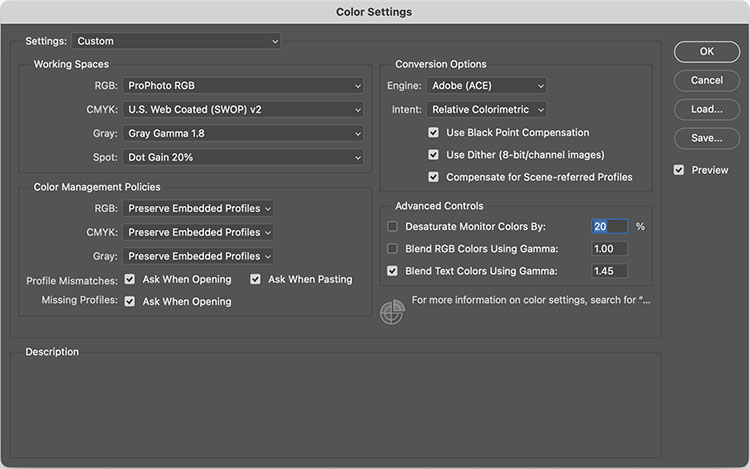
When you set Color Settings in Photoshop (Edit : Color Settings), you not only choose Working Spaces (RGB, CMYK, Gray, and Spot) to create new files in (Choose ProPhoto RGB for the widest-gamut color space.), you also set Color Management Policies that determine what happens when you’re dealing with files that are not created or edited in the same color spaces.


For RGB, CMYK and Grayscale files you can choose to turn Color Management Off, to Preserve the Embedded Profiles, or to Convert to Working color spaces. You rarely, if ever, want to turn color management off; you only do this when you want to ensure that no color space conversions take place, for example when opening target files for creating printer profiles. Similarly, you typically don’t want files automatically converted to a default working color space without your knowing that it’s happening, as they are when you set the policy to Convert to Working; you’d only want this to happen when you’re batch converting a number of files to quickly bypass color management dialog boxes. In the vast majority of cases, you’re better off served leaving the default settings at Preserve Embedded Profiles. This way, any time a color management operation is about to take place, you’ll get one of three dialog boxes that not only alert you but also give you control over how the operation is handled.

So what do you do when you encounter these three dialog boxes – Missing Profile, Profile Mismatch, and Paste Profile Mismatch?

Read More

Photoshop Color Settings

Excellent Photoshop Color Settings can be set up in a few seconds.

1  Go to Photoshop’s Edit Menu select Color Settings.

2  Start with Settings of North American Prepress 2 and then change RGB to ProPhoto RGB. (Optionally change Gray to Gray Gamma 1.8.)

3  Click OK.

Here’s a little more about the underlying assumptions of this recommendation.

1. Choose a device-neutral wide gamut editing space to create your images in. Wide gamut editing spaces can contain all the data your camera or scanner delivers. Smaller gamut editing spaces may not. Preserve your high-quality information. ProPhoto is today’s preferred wide gamut RGB editing space. It’s the only default that can contain all the colors your camera can capture.

2. Minimize the number of color conversions applied to your files. Set Photoshop to Preserve Embedded Profiles. Always keep your master file in the color space it was created in. Convert only derivative files.

3. Make sure you know about all the color conversions your file goes through. Set Photoshop to alert you whenever a color conversion may take place. Check Ask When Opening / Pasting with Profile Mismatches and Missing Profiles.

Standardize your workflow, using these settings for all your work (with few exceptions).


Read more on Color Management here.

Learn more in my digital photography and digital printing workshops.