Neon Light Effects In Photoshop
Use Photoshop to create neon light effects and relight surrounding areas.
Learn more in my digital photography and digital printing workshops.
Use Photoshop to create neon light effects and relight surrounding areas.
Learn more in my digital photography and digital printing workshops.
A simple accent of light can take any image up a notch … or two.
Find out more from Colin Smith at Photoshop Cafe.
Find more from Unmesh Dinda at PixImperfect.
Learn more in my digital photography and digital printing workshops.
Learn how to add rays of light to your photographs using Photoshop with these three videos.
Find out more from Colin Smith at Photoshop Cafe.
Find more from Unmesh Dinda at PixImperfect.
Learn more in my digital photography and digital printing workshops.
Colin Smith of PhotoshopCafe and Jesus Ramirez of Photoshop Training Channel both show how to enhance or create rim light in Photoshop.
Find out more from Colin Smith’s Photoshop Cafe.
Find more from Jesus Ramirez’s Photoshop Training Channel.
Learn more in my digital photography and digital printing workshops.

Explore ways to use blur in your images creatively.
The Top 5 Reasons To Blur Your Images
Quick & Easy Depth Of Field Effects With Photoshop’s Depth Blur
How To Combine Focussed & Defocussed Images Using Photoshop
A Quick Visual Comparison Of All Of Photoshop’s Blur Filters
A Grand Overview Of Photoshop’s Blur Filters
Control Blur FX In Photoshop With Amazing Precision
Create Sophisticated Motion Blur Effects With Photoshop’s Path Blur Filter
How To Create More Realistic Blur Effects By Adding A Little Noise
3 Color Tweaks To Improve Image Blur’s Depth Of Field
2 Ways To Quickly Add Bokeh Flares To Your Images
Enhance Blur Effects With Selective Sharpening | Coming

Purchase the full ebook above.
Purchase individual chapters below.
Create compelling atmospheric effects in your images with Photoshop.
Photographers use blur (or bokeh) for a variety of reasons: to enhance space through depth of field; to add interesting visual artifacts; to simplify them; to change the quality of their expression. In the past, blur was controlled almost entirely through exposure; now it can also be controlled during post-processing, giving photographers an unprecedented array of options and ways to customize the look and feel of their images. Knowing what you can do, how far you can go, and when you can do it may change the way you shoot, one time, sometimes, or all the time.
There are many blur filters in Photoshop; Field Blur, Iris Blur, Tilt-Shift, Gaussian Blur, Lens Blur, Motion Blur, Radial Blur, Shape Blur, Smart Blur, Surface Blur (in order of appearance in the Filter: Blur drop down menu. The choices are extensive and it pays to familiarize yourself with your options by experimenting with them; you’ll find you have an extraordinary set of options that you can modify and combine creatively. If you only use the filters Gaussian Blur and Lens Blur, you’ll still have game-changing control at your fingertips, once you learn how to extend and modify them.
There are several important non-destructive strategies you can use to gain more control over all filter effects that will enable you to go further in your explorations and generate more sophisticated and compelling results Try one or all of the moves in this classic progression. Apply a filter to a duplicate layer and then modify its Opacity, Blend Mode, Blend If Sliders, and add a layer mask …
Read more on Digital Photo Pro.
Learn more in my digital photography and digital printing workshops.
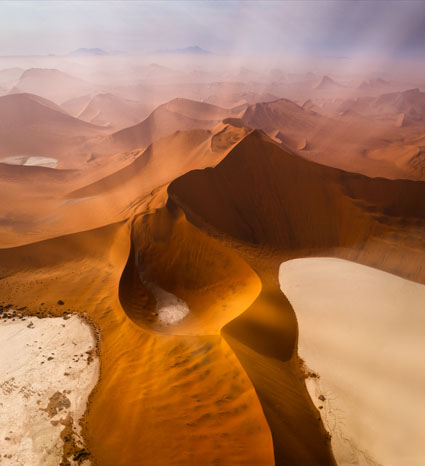

Illumination II, Sossusvlei, Namibia 2012
In 2010, during my third trip to one of the oldest desert’s in the world, Namibia’s Sossusvlei dune field, I enjoyed one of the most sublime hours of my life, from a helicopter. Moments of grace like this fill you with reverence for the miracle world we live in and a deep abiding gratitude to be a part of it all. I was prepared for it, but nonetheless surprised.
Before arriving, to plan where to go and how to maximize my time this magnificent dune field, I had done a considerable amount of virtual aerial research with Google Earth, zooming and panning images made from the combination of thousands of satellite images at various magnifications, to familiarize myself with where it started and stopped, how it changed in character, and the relative location of landmarks such as the dunes Big Mama and Big Daddy and the famous clay playa Deadvlei. This was a new way of scouting a location for me and it paid dividends making the limited time I had there more efficient and productive.
None of that could have prepared me for the changing angle of light or weather. On site, I had to assess the impact of current conditions. We were on the second flight of the day, an hour after sunrise. All week long, the air was filled with dust from far off sandstorms that scattered the rays of the sun, permeating the sky with a white gold light. Was this a liability or an asset? How could I make it one and not another?
Even at an altitude of 3,000 feet, twice the height of the largest dunes, I found I couldn’t fit the vast dune field into my viewfinder. So I improvised and started making multi-shot exposures for panoramic stitches while moving. It seemed like a bold move, if the two or three shots did not merge successfully then both would be lost. Then, one of my companions, made an even bolder move, requesting we do a 360-degree stationary rotation so that he could make a panoramic image of the entire dune field. Would it work? To my delight both methods worked.
Neither experiment would have been successful were it not for new image processing software that provided better image stitching capabilities. (Not long ago, it wouldn’t even have been possible to convincingly combine two separate exposures.) More new image processing features aided the final realization of this image. I used new lens profile corrections, designed to remove optical distortions, to expressively distort the image. Quite different than a change in angle of view, which reveals and obscures information, these distortions offered complementary but distinctly different visual effects, changing relative proportions and spatial relationships within the image. This furthered my ongoing experiments to compare and contrast the two and so learn to fully utilize them in tandem with one another intuitively.
Ever since that day, I don’t see things in the same ways. Now I also see in new ways. It’s important to try new things. Trying new things stimulates new growth.
Questions
How do new developments change your experience?
How do new developments change your thinking?
How do new developments change your actions?
How can you use new developments to innovate?
Which new developments are likely to impact your creations most?
Find out more about this image here.
View more related images here.
Read more The Stories Behind The Images here.

As far as magic moments go, few can compare to those fleeting moments when light streams from the heavens or wraps around objects, as if making visible some some divine presence. Kings and priests would pay dearly for the ability to place such signs at their command. You can have it for the simple price of an app.
Rays identifies highlights within an image and uses them as sources to render rays of light from …
Read more here.
Plus find more app reviews.

When it comes to photography, you can do a lot with a little light. Adding light into your images offers many creative possibilities: add a sparkle to someone’s eyes, make highlights shine, enhance an atmospheric effect, trace a constellation in the sky, render a cinematic special effect, and much, much more. In short, you can enhance the center of attention in any image or create a new one.
Adding light into your photographs after exposure just got easier on your iPhone. Brain Fever Media makes two apps that can add light fx to your images: Lens Flare and Lens Light.
Lens Flare offers 45 different effects — mostly star patterns, some edge flares, and a few linear streaks.
Lens Light offers 54 different effects including rays, spotlights, streaks, scratches, and even suns, moons, and lightning.
Read more on The Huffington Post.