See What You’re Missing – 2 Ways To Non-Destructive Crops

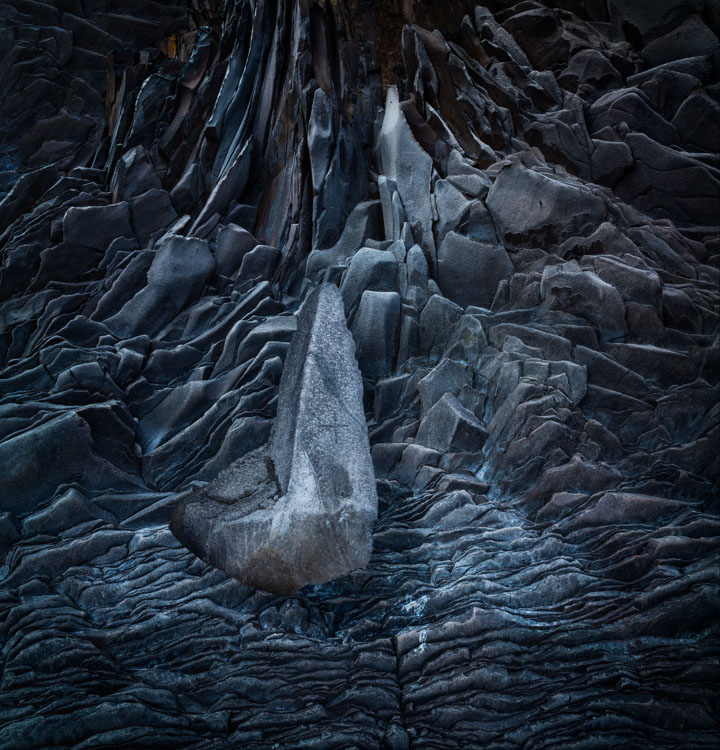
We’re responsible for everything that’s in the frame. We’re also responsible for everything that’s not in the frame. Deciding what’s in the frame and what’s out is a critical decision that can make or break an image. Framing and cropping are critical. If you miss a key element during framing you’re out of luck. However, if you overcrop you’re not, if you crop non-destructively and you remember to reconsider your crop from time to time. After you crop, you forget what you’re missing. It’s out of sight and out of mind. But it doesn’t have to be.

Lightroom and Photoshop’s crop tools allow you to see the image information you’re missing Here’s how …

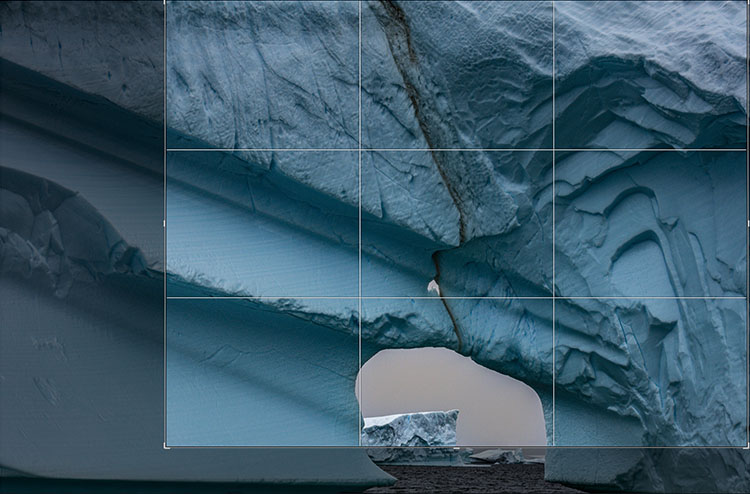
In Lightroom, highlight an image and tap R. You’ll see the areas eliminated with a darker overlay. You never lose image information when you use Lightroom. It couldn’t be easier. What’s hard is remembering to do it.

Photoshop also makes almost as easy. First you have to open an image. Then press C (or click on the crop tool). Then click on the Crop tool control handles and you’ll see the missing information, again under a darker overlay. When you use Photoshop, be careful. Unlike in Lightroom, you can eliminate image areas permanently. Here are two ways. One, check the Crop tool’s option Delete Cropped Pixels. Two, flatten the file or merge other layers with the Background layer. You may think this has happened when you first look at a file that has been cropped in Photoshop as when you first click on the crop handles you won’t see the larger canvas but simply drag the right corner of the window out and you’ll see the bigger canvas.

Why would you need to reconsider your crop? To make future improvements as your vision evolves. In the analog darkroom photographers never (almost) cut their negative’s or transparencies. They masked them during printing. This means every time them made new prints they reconsidered their crops. Sometimes, after their seeing matured, they changed their minds – significantly. I’ve witnessed the greats reviewing their top images. One day, Arnold Newman adjusted his crop on his portrait of igor Stravinksy. Another day, my father reconsidered his crop for Running White Deer, making subtle but significant shifts in their final compositions.  Those two images are both dramatically influenced by the way they’re cropped. If the masters do it, you may want to consider doing it too.

Small changes can make big differences. But you won’t think to make them if you don’t see what you’re missing. So make it a habit to reconsider your crops from time to time. It only takes a few moments and if you do, perhaps even your best images will improve.

Read more in my Creative Composition resources.

Learn more in my digital photography and digital printing workshops.

3 Tips To Gain Greater Control Of Adobe’s New Neural Filter Colorize

.
“Colin Smith gives you 3 tips to make Adobe’s new Neural filter Colorize do exactly what you want it to.”
.

Remove Strong Color Casts By Quickly Colorizing Photographs With Photoshop?

.

“How to instantly remove an impossible color cast / multiple colored lights in photoshop. Use the Colorize filter in an unexpected way. This new feature in Photoshop 2021 makes it easy to fix colors in photos. Colin Smith walks you through these exciting new features in the latest Adobe Photoshop update. ”

Find out more from Colin Smith at Photoshop Cafe.
Learn more in my digital photography and digital printing workshops.

Brand New Photoshop Features That Shouldn’t Even Be Possible


“Photoshop June 2021 update has amazing new features. Colorize black and white photos instantly, and automatically. Change focus on a photo instantly, fixed the save a copy and all new features. Colin Smith walks you through these exciting new features in the latest Adobe”

Find out more from Colin Smith at Photoshop Cafe.
Learn more in my digital photography and digital printing workshops.

6 Ways To Get Better Shadow & Highlight Detail In Your Photographs

You want your photographs to glow - right? So what’s better than one kind of glow? How about three?

You can get there by not succumbing to the classic temptations to clip shadows and/or highlights to produce a more obviously dramatic but a less lively, nuanced, and expressive tonal scale. Instead, hold the full dynamic range with a real black and white and also create gorgeous separation in the values nearest to them.

So many times we give the lion’s share of the contrast to the midtones. Midtone contrast is really important. But that doesn’t mean we have to sacrifice the light in highlights by making them too hot to look at comfortably or in shadows making them so dark they turn to murky mud. You can hold separation in these extreme ends of the tonal scale and produce beautiful qualities of light that complement not just contrast. Here’s how.


Insights Members can login to read the full article.
Email:
or Sign up

One Filter To Quickly Remove Most Halos In Photoshop

.
“Learn how to easily fix and remove halos easily and fast using a hidden Photoshop slider.”
.

Photoshop’s New Filter Depth Blur Helps You Control Depth Of Field

.
“Just one slider to Add Background Blur & Shallow Depth of Field! Besides, you can also control where to focus! All of this, in a brand new feature called “Depth Blur” which is a part of Neural Filters in Photoshop. In this video, we will be testing this new feature against a variety of images; from simple single-subject ones to images with random objects or a group photo. In this lesson, we will also learn and discover in what scenario this feature can be useful and how you can make the best out of it, along with some best practices and advanced techniques. We’ll also learn how to use depth maps for better results.”
.

A Fast Way To Create Flares In Photoshop | Unmesh Dinda

.
“See how you can easily add flares to your photos using Photoshop in this quick tip from Unmesh Dinda of PiXimperfect.”
.

The One Simple Trick I Use To Improve All Of My Images With Photoshop

Before

After

Curves offers more precise tonal control than any other tool. So when I need precision dodging and burning (about 80% of the time) I use Curves, which means I use Photoshop (PS).

I look forward to the day we can make local adjustments with Curves in Lightroom and Camera Raw. But currently, Lightroom (LR) and Camera Raw (ACR) don’t have this feature, yet. But can’t you do something similar in Lightroom (LR) or Adobe Camera Raw’s (ACR) using the six Basics sliders (Exposure, Contrast, Highlights, Shadows, Whites, Blacks), in combination with the Adjustment Brush, Graduated Filter, or Radial Filter, even in combination with Color, Luminance, or Depth Range Masks? If close is good enough, yes. If you want to make your images really shine, no.


Is it hard to dodge and burn with Curves in Photoshop? No. It’s easy.


Insights Members can login to read the full article.
Email:
or Sign up

5 Reasons Why You Still Need Photoshop


Let’s say you’re not interested in compositing or adding FX or inserting text or painting on your photographs. Do you still need Photoshop? Short answer – yes. If so, why?

One Big Reason, Look No Further

One reason alone ends the discussion for me. The single biggest reason is precise localized tone control or dodging and burning with Curves. Nothing but Curves offers as precise control. It can add a special glow into all areas of an image, any one area, and treat different areas differently. I can’t think of anything more useful than that.

But can’t you do something similar in Lightroom (LR) or Adobe Camera Raw’s (ACR) using the six Basics sliders (Exposure, Contrast, Highlights, Shadows, Whites, Blacks), in combination with the Adjustment Brush, Graduated Filter, or Radial Filter, even in combination with Color, Luminance, or Depth Range Masks? If close is good enough, yes. If you want to make your images really shine, no.

Is it hard to do in Photoshop? No. It’s easy.


1  Open your image in Photoshop.

2  Make a selection.

3  Make a Curves adjustment layer.

4  Double click on the layer mask and slide Feather to the right.

5  Repeat if you want to make a different adjustment to another area of an image.

6  Save your file, when you’re done.


If you only use Photoshop to do this one thing, most of your images will improve. I can’t say I use this with every image I process, but it’s close. I can say the number of images I don’t want to do this for is very small. It’s a simple thing really, and I look forward to the day we can do it in Lightroom and Camera Raw.

Go Ahead, Look Further, And Find More Reasons

Want to go a little further? Let’s revisit the question, “Why do you need Photoshop?” Every time Adobe’s Raw processor(s) become more fully featured it is worth asking. Or, you might rephrase it as, “What can Photoshop help me do that Lightroom / Camera Raw can’t do as well?”

Here are five reasons.


1  Fine Retouching

2  Precise Masking

3   Advanced Color Adjustment

4  Creative Sharpening

5  Plug-Ins


Let me go into a little more detail for each one.


Insights Members can login to read the full article.
Email:
or Sign up