The Art Of Workflow

An optimum workflow will ensure you produce the best quality images possible.
8. 5 Reasons You Still Need Photoshop
1 Fine Retouching, 2 Precise Masking, 3 Advanced Color Adjustment, 4 Creative Sharpening, 5 Plug-Ins
An optimum workflow will ensure you produce the best quality images possible.
8. 5 Reasons You Still Need Photoshop
1 Fine Retouching, 2 Precise Masking, 3 Advanced Color Adjustment, 4 Creative Sharpening, 5 Plug-Ins
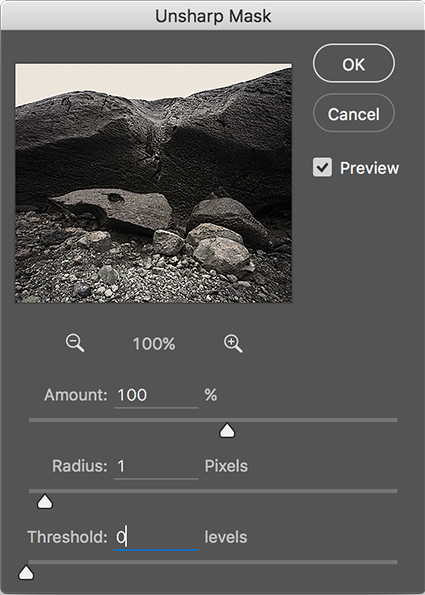
The vast majority of photographic images benefit from sharpening.
Before you decide how and when to sharpen images, you need to decide why you’re sharpening them.
The goal of sharpening is to enhance detail rendition without producing distracting visual artifacts.
You’ll find many conflicting philosophies and their accompanying strategies for sharpening images. The seemingly conflicting advice can be hard to reconcile.
Should you sharpen once or multiple times? Should you sharpen differently for different subjects? Should you sharpen differently for different sizes? Should you sharpen differently for different presentation materials or supplies? Should you view your files at 100% or 50% screen magnification?
Capture source, output device, substrate or presentation device, presentation size, subject, and artistic intention all play a role in sharpening. The characteristics and solutions for many of these factors can be objectively defined for everyone; at least one of these factors, perhaps the most important, your artistic vision, can only be decided individually.
So, if sharpening is a complex subject, how do you simplify your sharpening workflow to one that’s practical without compromising quality?
Bruce Fraser and Jeff Schewe offer the best advice in their definitive volume on sharpening, Real World Image Sharpening, which I highly recommend you read. Instead of sharpening your images for you, they teach you how to sharpen.
Their philosophy of sharpening is the soundest in the industry, which is why it has been adopted by so many in the industry. They recommend that images be sharpened in a progression of three stages; once for capture sharpening, a second time for creative sharpening, and a third and final time for output sharpening. The objectives and methods of each of these stages vary considerably. When mastered, the whole process can be streamlined to achieve sophisticated results with a minimum investment of time.
Here's a quick synopsis ...


There are at many ways to convert an image from color to black and white. Here's a roundup and evaluation of the top seven plus a set of considerations to help you choose the best one for your needs.
1 Desaturate
Desaturate or use the Saturation slider to make all the channels the same without control over the mix. Desaturaton is useful for near neutral images, otherwise it produces compressed tonal structure.
2 Convert Mode To Grayscale
Grayscale conversions eliminate all channels but one. The default mix is 59% Green, 29% Red, 11% Blue. This can be customized by targeting a single channel before conversion, to get 100% of any channel in any color space, including Lab. Quick and direct, this method eliminates future flexibility; its limited use is to create Grayscale images for reproduction but it's not the best way to make a conversion from color to black and white.
3 Channel Mixer
The Channel Mixer set to Monochrome allows you to customize the mix of channels and can be used as an adjustment layer, which allows you to change the mix at any time in the future.

Seth Resnick shares his favorite quotes.
This one’s my favorite from his selection.
“When two dogs fight for a bone , a third dog runs away with it.” – My Father
Which one is your favorite?
Read all of his selected quotes here.
Find out more about Seth Resnick here.
Learn more in Seth’s D-65 Lightroom Workflow workshops.
Join Seth and I on a Digital Photo Destination here.


Optimal image sharpening is best done in three stages— capture (do it during RAW conversion), creative (do it in Photoshop) and output (automate it).
Capture sharpening benefits all images. It compensates for inherent deficiencies in optical and capture systems. All lenses and sensors have specific characteristics and deficiencies. They don't all have the same characteristics or deficiencies.
To speed your workflow, default settings for a best starting point for capture sharpening can be determined for all images created with the same lens/chip combination and saved for subsequent use. To optimally sharpen an image, you'll need to modify these settings to factor in additional considerations—variances in noise (ISO, exposure duration, temperature), noise-reduction settings and the frequencies of detail (low/smooth to high/fine texture) in an image.

Color management is rocket science. But you don’t have to be a rocket scientist to drive the rocket. Instead, be an astronaut. With a few simple steps you can achieve consistent, high-quality color with your images every time.
These are the seven simple steps to good color management.
1 – Make Profiled Conversions
Assign an ICC profile to all image files either during Raw conversion or scanning. Use appropriate profiles to make conversions into other color spaces with derivative files only. Minimize the number of conversions made.
You won’t be doing this that often, once you standardize your workflow (creating all files in one color space)
2 – Use Hardware To Calibrate Your Monitor
Once a month, use a colorimeter to build an ICC profile for your monitor. Minimize the influence of other light sources during characterization. Use the colorimeter’s software to help you set monitor brightness between 90 and 100 and choose White Point D65 and Gamma 2.2. Check the results with know target images afterward.
Do this roughly once a month.
3 – Set Better Photoshop Color Settings
In Photoshop’s Color Settings (in the Edit Menu) Set Color Management Policies to Preserve Embedded Profiles and Ask When Opening / Pasting. And, choose a wide gamut device neutral editing space. Start with North American Prepress Defaults and then change RGB to ProPhoto RGB.
Do this once … and check it whenever Photoshop is updated.
4 – Profile Your Paper
Using a high-quality device make an ICC profile of your ink and paper combination. Or, have someone make a profile for you. Then make your prints with your custom profile. You’ll need different profiles for different papers. Consider profiles you download from websites suspect, sometimes ok but rarely great. (Skip this step if you’re printing on Epson paper with Epson printers. Their profiles are excellent.)
Do this once. Do it again when you change your paper type or printer ink.
5 – Softproof Before You Proof
Simulate the appearance of a print before printing. Go to View : Proof Setup : Custom and choose the profile you intend to print with. Check Simulate Paper Color and choose a rendering intent of either Perceptual or Relative Colorimetric. Make output-specific adjustments before printing. Use these adjustments only when printing these media.
Do this before you print individual image, but not multiples of the same image.
6 – Check The Correct Boxes In Your Printer Driver
Use Photoshop / Lightroom or your printer driver to manage color – not both. In general, favor using Photoshop/Lightroom as this is the most versatile allowing you to use custom output profiles.
Do this every time you print. Save custom settings so you can check multiple boxes with one click.
7 – Control Your Viewing Environment
Edit and evaluate your images in neutral surroundings. Minimize the effect of extraneous light sources, such as glare on monitors or backlighting. Evaluate proofs and prints in appropriate lighting.
Do this once.
There’s much more that can be said about each of these topics – but, not much more to do. Take these steps and you’ll be well on your way to achieving consistent, high-quality results with your images.
Read more on Color Management here.
Learn more in my digital photography and digital printing workshops.


Adobe’s lens profile corrections are simply amazing. Lens Corrections automate correction of standard lens distortions, including geometric distortion, chromatic aberration, and vignette. In addition to correcting lens distortions, this feature can also be used to adjust perspective and rotation.
Adobe provides support for a growing list of camera manufacturers, camera models, and lenses: Canon, Nikon, Pentax, Samsung, Schneider, Sigma, Sony, Tamron, and Zeiss.
Adobe Lens Profile Creator
If Adobe doesn’t supply a lens profile for your particular lens you have three choices.
First, you may be able to access a lens profile created by another user on the Adobe Lens Profile Creator forum. Find and share lens profiles at Adobe labs. Of course, these lens profiles will only be as good as the creators were diligent about creating them.
Second, you can visually adjust the parameters of an existing lens profile and save the new settings under a new name for future use. There’s plenty of room for user error with this method but it’s more efficient than creating manual corrections from scratch. Expect to check the results frequently when you apply these settings to different types of images.
Third, you can create your own custom lens profile with the free Adobe Lens Profile Creator utility. Download the Adobe Lens Profile Creator at Adobe Labs.Adobe Lens Profile Creator is a utility designed for photographers who want to create custom lens profiles for their own lenses. The process of creating a custom lens profile for your lens involves capturing a series of images of a printed checkerboard pattern with your specific camera and lens, converting that set of raw images into Digital Negative (DNG) file format (using the Camera Raw plug-in, Lightroom, or the free Adobe DNG Converter), and importing the raw DNG images (or JPEG/TIFF images when creating lens profiles for a non-raw workflow) into the Adobe Lens Profile Creator to generate a custom lens profile. If you create new lens profiles, you can share them with the rest of the user community on the Adobe Lens Profile Creator forums, publishing them directly from inside the Lens Profile Creator. These profiles will then be available via new versions of the Adobe Lens Profile Downloader. This is an extended and complex process few photographers will want to go through, but for those using unsupported cameras and lenses worth the time and effort in the long run.
Using Adobe’s Lens Profile Corrections
You can access Adobe’s Lens Corrections in three locations; Adobe Camera Raw, Lightroom 3, or Photoshop CS5’s Lens Correction filter. (Lens profile corrections were first introduced in Lightroom 3. To get Lens Profile Corrections in Adobe Camera Raw CS5, you need to download a version that has been updated after the release of Lightroom 3. You can download the latest free update at adobe.com.
It’s far less destructive to make these types of adjustments to Raw files during conversion rather than after conversion. It’s also more flexible. (Use a smart object and reaccess the controls any time by simply by double clicking the smart object.) However, if you want to apply Lens Corrections within Photoshop, after a file has been rasterized, you can use CS5’s updated Lens Correction filter.
In ACR and Lightroom, you’ll find two tabs under Lens Corrections; Profile and Manual.
Under Profile, click Enable Lens Profile Corrections to activate this feature. Using the EXIF data in your Raw file, the software will automatically select the Make (of your camera), Model (of your lens), and the Profile (for that lens). You can use the supplied lens profiles, download a custom profile made by another user, or create your own (manually or with Adobe’s Lens Profile Creator).
Checking Enable Lens Profile Corrections will also allow you to access three sliders – Distortion, Chromatic Aberration, and Vignetting – for manually fine tuning the results. If you like the results of one correction but not another, you can decrease or increase the effects in one or more of the three fields.
Under Manual, you’ll find controls for visually creating your own lens profile corrections …
Read more on Digital Photo Pro.
Read more in my online lessons.
Learn more in my digital photography and digital printing workshops.
Mac Holbert and I will be presenting content from our DVD Fine Art Workflow today at ASMP Philadelphia.
Learn more in my DVDs, workshops, and ebooks.

Seth Resnick and Jamie Spritzer, the Co-Founders of D65 announce their new book, D65’s Lightroom Workbook, Workflow, Not Workslow in Lightroom 3. D-65’s workflow is accomplished by using Adobe Lightroom. D65’s Lightroom Workbook, Workflow Not Workslow details everything you ever wanted or needed to know about the five modules in Lightroom, including setting up preferences for optimal results and organizing catalogs. Included is an entire chapter which details the D-65 legendary workflow; an advanced, yet simple workflow from capture through editing, tweaking, processing and exporting. The book also covers many digital concepts such as color space, shooting raw, file naming and archiving. D-65 was one of the first and foremost companies teaching Lightroom workflow, and the incredibly successful program has taught thousands of photographers worldwide. Seth Resnick and Jamie Spritzer are the perfect guides to lead you through the maze of technical problems and practical challenges that stand between you and a seamless digital workflow with Lightroom at the core.
• The essential guide to setting up an efficient workflow with Photoshop Lightroom from two of the industry’s most respected photography trainers
• Insider tips and tricks explain not only how to use Lightroom but also how best to work pre-capture to ensure you get the best out of Lightroom post-capture
• Over 500 pages packed with essential advice and stunning images to illustrate and inspire, Seth and Jamie explain technical concepts with ease in a way only pro trainers can–buy the book and see why their workshops sell out in a flash!
“Seth and Jamie have laid the chapters out in a quick read style that follows Lightroom’s architecture from beginning to end. And you can fit their guidelines to your own style of shooting and your own way of organizing your digital image archive. It doesn’t matter how expensive your camera is, or how many megapixels are on its sensor, because this book gives you the knowledge and the discipline to make the most of the tremendous possibilities of digital photography.” – Eric Meola, Photographer
“No one knows more about keywording than Seth and Jamie. As an English major and a writer, I thought I knew a thing or two about words, but I learn new words and new ways to use words all the time from Seth and Jamie. What’s that mean to you? It means if you learn to use words like they do, everyone will be able to find your pictures easily – including you.” – John Paul Caponigro
Get your copy here today!
Find more of the best Photoshop and Lightroom books here.

3 New DVDs!
Fine Art Digital Printing
Fine Art Workflow
Extending Dynamic Range – HDR Imaging
Preorder discounts apply for a limited time only. Save $10.
Read more on Printing in my free Lessons.
Learn more in my Fine Art Digital Printing Workshops.
