An Easy Way To Turn Day Into Night Using Photoshop
.
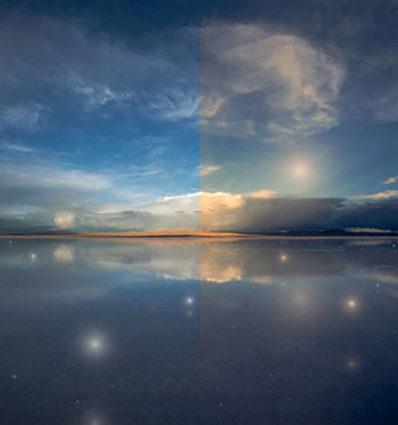
Jesus Ramirez shows how to use the Lookup Adjustment Layer to turn your bright daylight photo into moonlit nighttime in Photoshop.
.

Get powerful color grades in a click. Learn how to download, install, apply and modify LUTS in Photoshop. Plus, find out how easy it is to make your own 3D LUTs.
Find out more from Colin Smith at Photoshop Cafe.
Learn more in my digital photography and digital printing workshops.
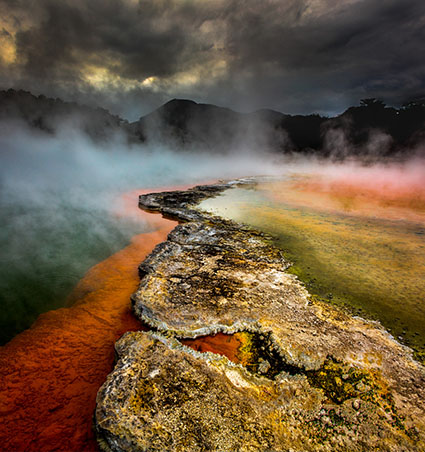
There was a time when color crosses were thought of as poor form, as so many were struggling to remove color casts consistently and accurately while managing the inaccuracies inherent in analog color photographic media. When you saw these kinds of effects, it was hard to ascertain whether the artist was not in control of their craft or insensitive to color or whether they deliberately deviated from the norm. But over time color effects like these have become celebrated both because their differences catch the eye, standing out amid a sea of images, and for their expressive capabilities. What used to require time-consuming chemical processing became quicker and easier digitally. Now there’s a new tool that makes it even easier and allows you to make these kinds of color choices more intuitively - Color Grading.
What Is It
Color Grading is the new Split Toning in Adobe Lightroom’s Develop and Photoshop’s Camera Raw processors. Color Grading offers major improvements including global, control, midtone control, blending sliders, luminance sliders, and the addition of color wheels for a more intuitive interface.
It’s Backwardly Compatible
Don’t panic. All of the Split Toning adjustments you’ve made with previous versions will be compatible with this improved tool if you choose to update files processed with older versions. The sliders will automatically be set new settings that generate the same results. All new controls (midtone, global, luminance) will be set to zero. Blending will be set to 100. You can also make the new tool behave like the old tool by setting Blending to 100 and moving only the hue and saturation of shadows and highlights.
How To Use It
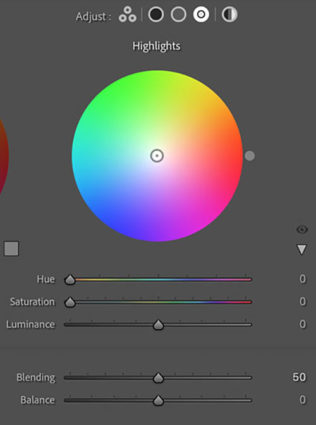
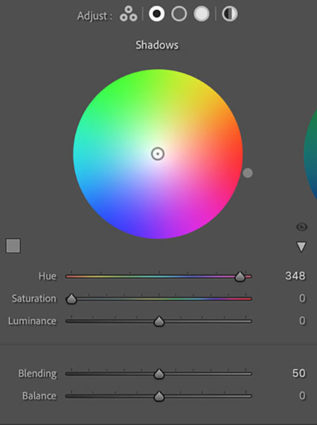
Accessed by clicking the five circles to the right of word Adjust at the top of the panel, you can choose the way you view the Color Grading tool. It’s likely you’ll spend a majority of your time in the first panel (3-Way), which condenses into one panel the next three panels (Shadows, Midtones, Highlights). The larger view of these separate panels offers only one additional feature, the ability to use the Custom Colors swatches to apply preselected colors or sample colors within an image. The fifth and final panel Global adds color to all values equally, for finishing touches rather than the grand effect.
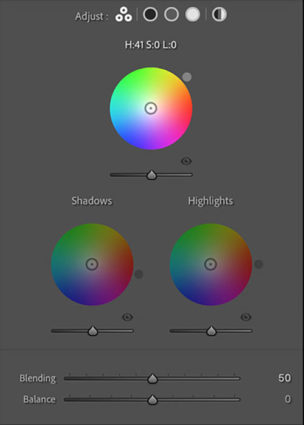
Color Wheels
The most eye-catching part of the new interface may present the biggest learning curve for those who have not used color wheels before but once you try it a few times you’ll find it’s incredibly intuitive.
Move the circle from the center of the color wheel towards the color you want to add, increasing saturation the further away from the center you go, and you’ll see the Hue and Saturation sliders move as you do. Rather than rendering them useless, they become fine control. The second circle on the edge of the wheel moves Hue only and is redundant but perhaps more intuitive to use. The Luminance slider affects brightness for the tonal range you’ve selected, but you’ve got to ask yourself why you wouldn’t use the more precise Tone sliders in the Basic panel. The Luminance slider is fine for some occasions, (It’s great for quickly lifting blacks or lowering whites so they’ll show color effects in ways that pure black and pure whites will not.) but don’t trade convenience for exceptional results.
Balance & Blending
The Balance and Blending sliders both control how the color you add fades into surrounding luminance values. What’s the difference? Balance places the middle of the transition while Blending affects how short or long it is. Blending sets whether the transition is short (Set low it affects fewer surrounding values thought the transitions it makes are still smooth.) or long (Set to 100 it’s capable of affecting all values but not equally.) Be careful setting both Balance and Blending high; you can create curious color cross-over effects.
You’ll find that the Blending setting will affect the saturation of your color choice significantly. A higher Blending setting with less saturated color allows more of the image to be affected less intensely. A lower Blending setting with a more saturated color affects less of the image more strongly.
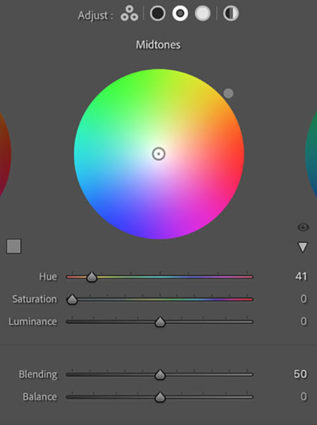
Midtone Control
One of the game-changing features of Color Grading is the ability to add a third color into the midtones, one that is different from the color added into the shadows and different from the color added into the highlights.

Global Control
You might think it strange to add Global Control to a tool designed to affect select levels of luminosity, but once you try it you’ll find it very useful, often as your last stop in this panel. The addition of an overall color effect frequently helps unify the disparate effects added into shadows, midtones, and/or highlights.
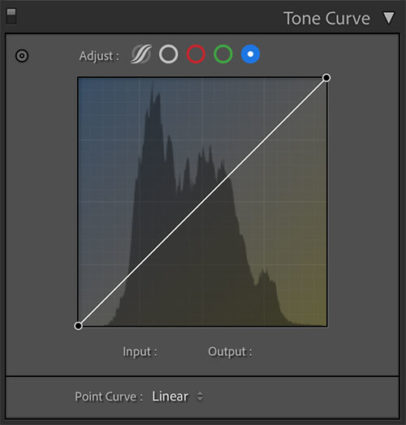
Curves
Color Grading’s interface is much more intuitive and direct than Tone Curve’s. Nevertheless, with a little more work, you can get very similar and even identical effects to Color Grading by using Tone Curve’s Red, Green, and Blue Point Curve feature, which allows you to add color into shadows, midtones, and highlights and control the blend of these effects into one another. I tend to use the Curve for its precision and often further refine Color Grading effects with it; the two are not mutually exclusive. But, you can get even stronger effects with Tone Curve than you can with Color Grading. So if you find yourself using these kinds of Color Grading effects frequently, you owe it to yourself to also see what you can also do with the Tone Curve panel.
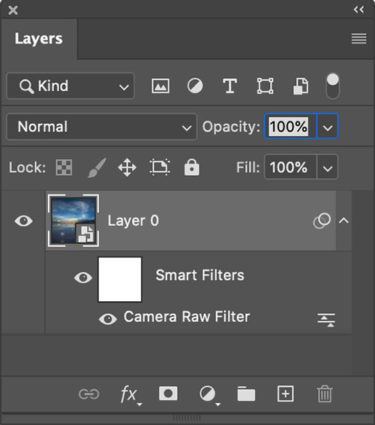
Use Photoshop's smart filters to apply Raw adjustments locally
Apply It Locally
Color Grading is a global effect, that is it will affect all shadows, midtones, and highlights equally – unless you apply it as a Camera Raw smart filter in Photoshop. If you do this, you can mask the Color Grading effect to apply it to any portion of an image in any percentage you choose and away from other portions.
Color Strategies
Before you apply Color Grading make your Basic adjustments first, setting black and white points, brightness, midtone contrast and white balance. How you set these things will change the subsequent settings you use in Color Grading. There are always exceptions but, usually, you’ll want to clear any color casts as a more neutral base will show Color Grading effects with fewer color influences and you can do more with less. Black and white images show Color Grading effects most quickly and even a tiny bit of color can produce significant differences.
Here are five strategies for applying Color Grading.
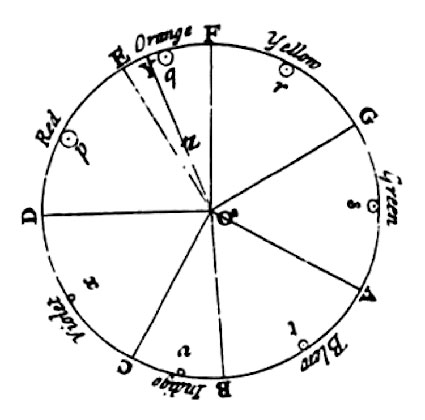 Newton
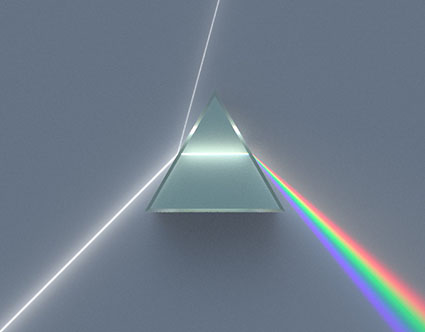
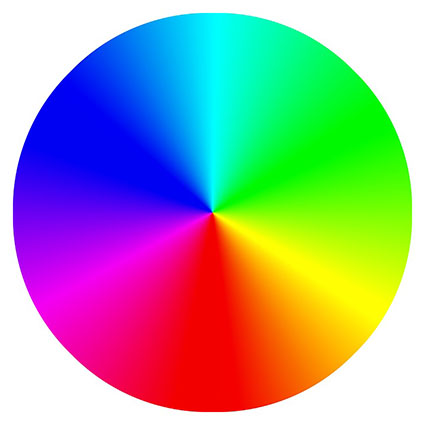
In 1666 the first color wheel was invented in by Sir Isaac Newton best known for his theories on gravity, motion, and light. (His theories on light are detailed in his seminal volume Optiks). Newton used a triangular prism to split a beam of white into a rainbow, proving that light is composed of a spectrum of hues – ROYGBIV. When he wrote down the different hues he made an influential decision to create a circle by connecting the opposite ends of the spectrum red and violet. (Unsurprisingly, if you spin the color wheel quickly, you’ll see white as the colors blend together.) Newton believed colors shared harmonious relationships with one another and went so far as to assign musical notes to each hue. Within this color wheel he rotated geometric shapes to identify different types of relationships.
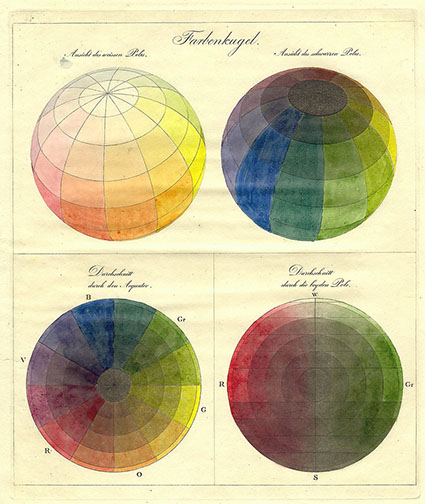
Runge
In 1807 painter Philip Otto Runge reimagined the color wheel as a color sphere by painting a color globe using three primaries plus black and white, complete with cross-sectioning.
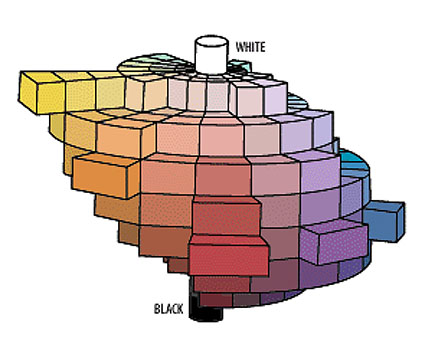
Munsell
In 1989 Albert Henry Munsell created a three-dimensional model of color in the form of a central cylinder graded from black to white surrounded by a ring of possible hues.
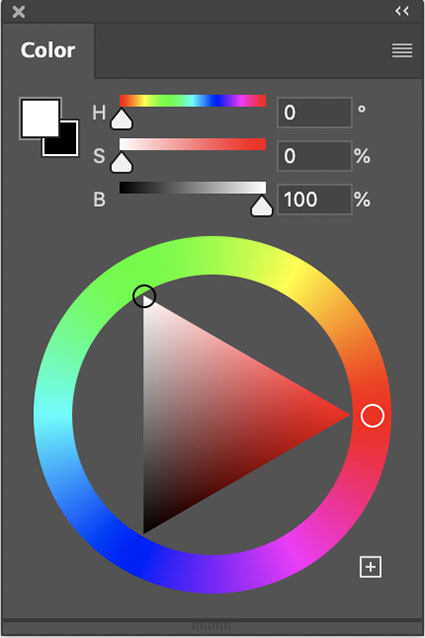
Adobe
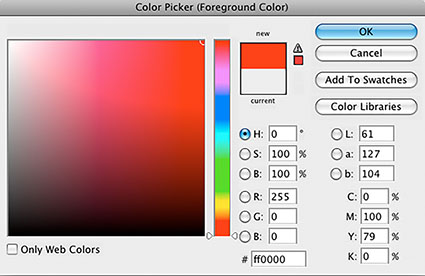
Adobe’s Color Wheel (Window > Color), one of the most used color wheels today, advances this tradition by refining the arrangement of complementary hues from subtractive (pigment or dye) to additive (light) ones, making color theory more precise. While sadly it does not offer a three-dimensional model, it offers other two dimensional graphs, including its classic square that plots all permutations lightness and saturation of a single hue plus a side-by-side rainbow slider to change the hue and gives numerical values for a given hue in four different color spaces – HSB, LAB, RGB, and CMYK.

Chromix ColorThink
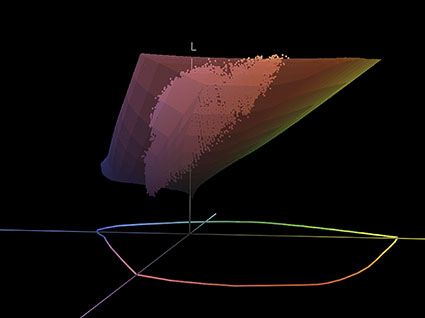
You can find virtual 3D color wheels in programs like Apple’s Color Sync which is designed to show and compare the shape of different color spaces or in Chromix’s Color which can also plot an image within the virtual volume. These models are even more informative because they show that color is not spherical but shaped more like a teardrop. One day we may be able to plot various shapes within them to design new color relationships and to more precisely identify the color relationships within existing images.
Follow up with Why Painters’ And Photographers’ Color Wheels Differ.
Read more in my Color Theory resources.
Learn more in my digital photography and digital printing workshops.

The language used to describe color has a long storied history; sometimes tied to its method of manufacture and sometimes tied to mental or emotional associations. What language lacks in precision it makes up for in expression. It’s great for poetry and marketing.
Contrast this with the numerical language of HSL (i.e. 13/48/76), which is better for precise identifying and communicating color.
Enjoy exploring this collection if you’re trying to find out what color a word refers to or if you’re looking for the right word to describe a color.
Red
apple, beet, blooming, brick, blood, blush, burgundy, burning, carmine, cerise, cinnabar, claret, cherry, cochineal, coral, crimson, damask, fire engine, fire hydrant, flame, florid, fox, garnet, glowing, gules, lipstick, madder, maroon, pink, poppy, rose, rouge, rubicund, ruby, rufous, rust, russet, sanguine, scarlet, strawberry, tomato, vermillion, wine
Pink
amaranth, blush, bubblegum, carnation, champagne, coral, crepe, flamingo, flesh, fuscia, hot, lemonade, lipstick, mary kay, neon, peach, powder, puce, punch, rose, salmon, taffy, tickle me, watermelon
Orange
apricot, basketball, burnt, cantaloupe, carrot, chanterelle, chestnut, citrus, copper, coral, creamsicle, flaming, fiery, ginger, gold, marmalade, merigold, minium, monarch, neopolitan, orangatan, papaya, peach, pumpkin, salmon, salamander, sandstone, sherbert, soda, starfish, straw, sunflower, sunrise, squash, tangerine, tiger, yam
Yellow
amber, banana, blonde, ash blonde, bottle blonde, strawberry blonde, bumblebee, butter, buttermilk, butterscotch, canary, corn, cream, daffodil, dijon, egg nog, flaxen, gamboge, golden, goldenrod, honey, imperial, indian, lemon, macaroon, medallion, mustard, naples, neon, ocher, orpiment, parmesan, pineapple, pollen, sandy, saffron, straw, topaz, tow-colored, tuscan, wheaten
Green
absinthe, acid, apple, army, artichoke, avocado, aquamarine, basil, bosky, bottle, celadon, chartreuse, clover, copper, crocodile, fern, grass, emerald, evergreen, fir, forest, grass, jade, jungle, juniper, kale, kelly, leaf, lime, lincoln, lush, malachite, mint, moss, neon, olive, parakeet, pea, pear, pickle, pine, sage, sap, sea, seafoam, seaweed, shamrock, spinach, spring, terre verte, verdant, verdigris, vert, viridian
Blue
admiral, agean, arctic, antarctic, aquamarine, azure, baby, berry, beryl, bice, bright, beryl, cambridge, cerulean, cobalt, copenhagen, cornflower, cupreous, cyan, cyanotype, deep, denim, egyptian, electrix, erubescent, frost, ice, incarnadine, indigo, kyanite, lapis lazuli, midnight, navy, opal, oxford, peacock, persian, prussian, robin’s egg, royal, sapphire, saxe, sea, slate, sky, spruce, steel, teal, titian, turkish, turquoise, ultramarine, vivid
Indigo
azure, blueberry, deep, glastum, indigotin, midnight, navy, prussian, ultramarine, woad, zaffre
Violet
amaranthine, amethyst, archil, berry, boysenberry, eggplant, grape, heather, heliotrope, iris, jam, lavender, lilac, mauve, magenta, mulberry, orchid, periwinkle, perse, plum, pomegranite, purple, raisin, royal, sangria, violet, violaceous, wine
Brown
allspice, auburn, bay, bran, beige, biscuit, bister, bottle, brick, brindle, bronze, brunette, buff, burnt sienna, burnt umber, cafe au lait, camel, caramel, carob, cayenne, cedar, chestnut, chocolate, cider, cinnamon, cocoa, coffee, copper, drab, dun, dust, ecru, espresso, fallow, fawn, ginger, gingerbread, granola, greige, hazel, henna, hickory, kasha, khaki, leather, liver, madiera, mahogany, mocha, mousy, mud, mushroom, nut, nutmeg, oak, oatmeal, ochre, peanut, pecan, penny, puce, russet, rust, saddle, sallow, sand, sepia, sorrel, spice, tan, taupe, tawny, terra-cotta, toast, tortilla, umber, wheaten, whey, wood
White
alabaster, albino, allysum, antique, ash, bone, bleach, bright, brilliant, chalk, chantilly, chiffon, cloud, coconut, cotton, daisy, dove, eggshell, gesso, ghost, putty, hoary, isabelline, ivory, lead, lace, lily, linen, lucent, milk, mother of pearl, parchment, pearl, porcelain, powder, pure, rice, salt, snow, swan, star, titanium, vanilla, whisper, winter
Gray
aluminum, argentine, ash, cinereal, charcoal, cloud, coin, cool, cove, clam, dolphin, dove, dusky, elephant, fog, fossil, frost, graphite, grizzled, gunmetal, gunpowder, harbor, hippopotamus, hoary, lead, iron, metal, mouse, neutral, nickle, oyster, payne’s, pearl, pebble, peppery, pewter, platinum, pigeon, powder, rhino, rice, sere, silver, tin, sidewalk, slate, smoke, squirrel, steel, stone, thunder, warm
Black
atramentous, calciginous, charcoal, coal, crepuscular, crow, dusky, ebony, flint, grease, ink, kohl, lamp, lava, jet, leather, mars, melanoid, metal, midnight, obsidian, oil, onyx, piceous, pitch, raven, sable, slate, soot, spider, stygian, tartarean, tenebrous
Read more in my Color Theory resources.
Learn more in my digital photography and digital printing workshops.
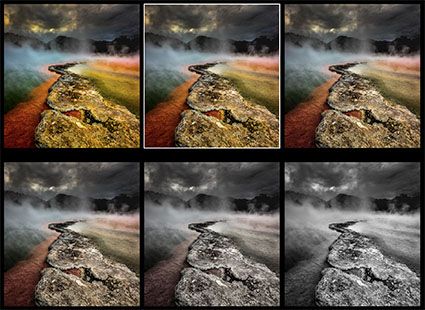
Any image can support an unimaginable number of color variations. So how do you find them? Systematically make many variations. Will it take a great deal of time? It will take a little time but not a lot (maybe five or ten minutes) – and it will take less time and you’ll more thoroughly explore the possibilities if you do this systematically. You’ll find this exploration will be time very well spent. Illuminating more possibilities than you imagined will help you find more creative and personally fulfilling solutions for your images. You’ll deepen your understanding of and personal relationship with color thus your images and by extension yourself. Those who view your works will feel the difference. I can tell you from many years of personal experience that it has made all the difference in the world to me. It will do the same for you.
Before you begin …
Start With Your Strongest Image(s)
When you’re processing a number of related images it’s likely that you’ll find the solutions you choose for the strongest image in the set will apply to the others, with minor modifications. It’s rare to have images in a series with widely divergent color palettes.
Plan To Make Many Copies
Don’t try and remember all of these possibilities; there will be too many to remember.
Instead make copies that you can make side-by-side comparisons with. (In Lightroom make virtual copies. Alternately, in Photoshop duplicate files.) It will help if you organize these copies into Collections in Lightroom or organize them (possibly with folders) in Bridge/Photoshop.
Find The Big Picture, Sweat The Details Later
Ditch your perfectionist tendencies – for now. Worry more about the moves you’re making in color that the tools you’re using to make them with. Don’t get lost in the details, instead focus on the big picture. Avoid getting distracted by one exciting possibility. Instead of rushing to finished results and committing to the most obvious solution too quickly, spend a few minutes exploring more possibilities hoping to find better solutions. More often than not, you will.
So what’s the best way to do this?
Proceed In This Order – Saturation, Luminosity, Hue
With only three elements of color, you wouldn’t think there could be so many possibilities, but the very things that generate them also make finding them manageable. You’ll quickly find the major moves that can be made if you make changes in these three elements in this order – saturation, luminosity, and hue.
The vast majority of resources you’ll find for creating successful color palettes, whether in print or online, will catalog a great number of compelling color combinations with some rhyme but little reason. When you look at them, not understanding the logic behind their choices, it’s tempting to think that anything goes. (And it might in certain contexts and for the specific reasons. But which ones?) Sometimes they drift into color psychology but quickly become so subjective they lose all sense of objectivity or universality. The best of them identify visual dynamics that you can use to exert some influence over the direction takes in and gives to your images.
What I’m offering you here is different. This is a strategy. Not a rule but a tool.
Use high contrast in one element of color, medium contrast in a second, and low contrast in the third.
It could be simplified to, make one element of color dominant by consistently putting more contrast in it than the other two.
With only three elements of color, this rubric offers you three main palettes that you can draw endless permutations from plus two notable exceptions.
When you reflect on your choice of palette, you’ll gain insights into the themes contained of your images.
Before I detail these five palettes …
It helps to understand some of the dynamics of color. Good things come in threes; there are three types of color, three elements of color, and three kinds of contrast.

3 Types Of Color
There are three types of color – ideal, ambient, and synthetic.