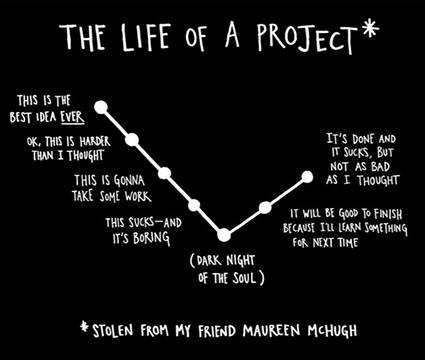
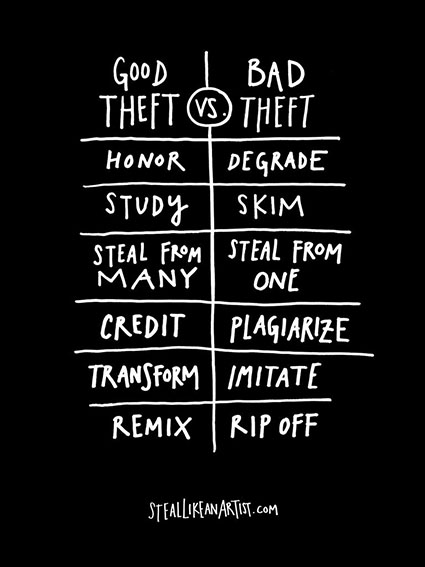
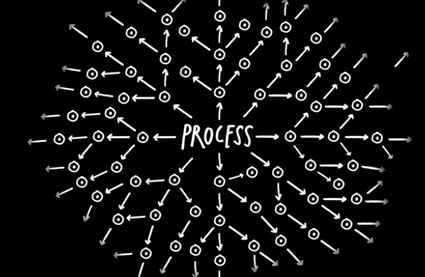
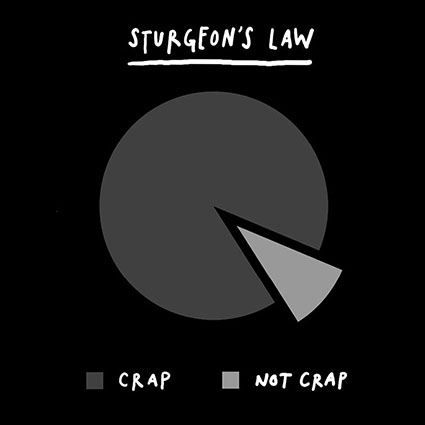
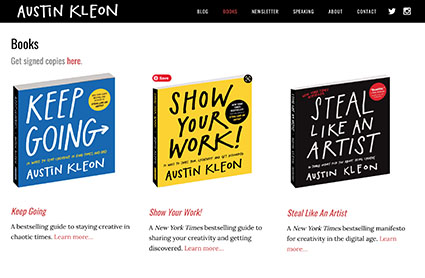
.

How To Choose Which Photoshop Mask Color To Start With

20170206_ANT_yalourislands _190_B$_425

Image before selective adjustment.

20170206_ANT_yalourislands _190_425

Image after selective adjustment (dodging).

Mask

It takes fewer white strokes than black strokes to make this mask.

20170206_ANT_yalourislands _425 copy

So, instead of starting with a white mask, start with a black mask.

LayerStack_425

The layer stack.

When you’re making masks in Photoshop, you can get the job done more quickly and easily by starting with the right color mask. When you make a mask, you can start with one of two colors – white or black. What’s the difference? A white mask shows everything on a layer as if it were at 100% opacity. A black mask hides everything on a layer as if it were at 0% opacity.
So use this simple strategy when you’re brushing in image adjustments with masks.
If you want to affect most of the image, start with a white mask and add a few black brush strokes to reduce the effect in smaller areas.
If you want to affect just a few areas of an image, start with a black mask and add a few white brush strokes to show the effect in only the areas you paint on.
For even more control, you can vary the opacity of the brush strokes you make to reveal or reduce effects partially. (Keep the Opacity of the layer being masked at 100% and then you can make the opacity of different areas vary based on the brush strokes you make.)
How do you make choose the color of the mask when you make it?
You can get a white mask when you target a layer and go to the menu Layer > Layer Mask > Reveal All. Or, simply click the mask icon at the bottom of the layers palette.
Alternately, you can get a black mask when you target a layer and go to the menu Layer > Layer Mask > Hide All. Or, hold the option/alt key before you click the mask icon at the bottom of the layers palette.
A mask is automatically created when you make an adjustment layer. By default an adjustment layer mask is white. If you want to start with at black mask instead, hold the option/alt key before you make an adjustment layer.
To make masking even more efficient, you can start with a simple selection (made with any selection tool, including the Lasso, Marquee, Magic Wand, or Quick Selection tools) and then, while the selection is still active, make a mask. If you do this, the selected areas will appear in white and everything else will be blacked out on the mask. You can then brush the mask to refine it further.
But wait, there’s more! Remember, you can always invert a mask (making black white and vice versa) by going to the menu Image > Adjustments > Invert or pressing the keys Command I. So if you forget to start with the right color mask, just invert it.
These simple techniques will save you a great deal of time.
Read more about masking here.
View more in my DVD Drawing With Light.
Learn more in my digital photography and digital printing workshops.

Photoshop’s Quick Mask Combines All Selection And Brush Tools

Masking_QuickMask_Selection_425

Edit In Standard Mode (Press Q) shows selected areas inside an active selection outline.


Masking_QuickMask_Red_425

Edit In Quick Mask Mode (Press Q) shows masked areas with a red overlay.


Masking_QuickMask_Options_425

Quick Mask Options can be activated by double-clicking it.


Masking_QuickMask_Channels_425

Quick Masks appear temporarily in the Channels palette.

Consider Photoshop’s Quick Mask feature as an easy-to-access nexus point that allows you to make and modify selections by efficiently moving between all selection and brush tools.

In addition to being fast and flexible, Quick Mask makes it easy to see both the image and the mask at the same time – and this view can make it easier for you to make more precise selections and masks. When you’re in mask mode, you’ll see the mask as a transparent red overlaying the image. You can change the color of the overlay and its opacity with the window activated by double-clicking on the Quick Mask icon. This is particularly useful when masking images with red colors.
When you use Quick Mask you can start with either a selection or a mask.

To start with a brush tool, click on the Quick Mask icon and you’ll see a temporary (Its title will be in italics.) alpha-channel appear in the Channels palette. Use a black brush and you’ll see the masked areas appear over the image in a transparent color. When you’re finished brushing, click once again on the Quick Mask icon and the mask will become a selection; the temporary alpha-channel will disappear, so if you want to save your work click the Save selection as channel icon or use the menu item Select > Save Selection; you can tell the resulting alpha-channel is permanent because its title is not italicized.

Or, you can start with a selection before clicking on the Quick Mask icon and using a brush to make modifications. When you’re done click on the icon again to return to selection mode and save the results.

You can move back and forth as many times as you like between selection tools and brush tools to create any result you desire. That’s the beauty of Quick Mask feature. When you hit the limits of one tool you can move to another.

Just remember, after you finish refining a selection, if you want to use it later, save it. And if you save many results along the way to a final solution, delete the ones you don’t plan on using again, so that you don’t get confused with too many choices.

Read more about Selections & Masks.
Learn more in my digital photography and digital printing workshops.

How To Be More Creative

076_LandInLand_425
Want to be more creative? Whether you can’t seem to get going, find yourself stuck in a rut, or you want to break through to your next level, you’ll find these articles both inspiring and useful.
7 Simple Ways to Be More Creative in 2018
Why Exercise Makes You More Creative
Need a Creative Boost? Take a Look at Your Diet
Want to Be More Creative at Work? Take a Vacation
Why Meditating Might Make You a Better Artist
Some People Can See Sound, or Taste Color. Does It Make Them More Creative?
When Timothy Leary Got Artists to Take LSD
Fixed vs. Growth: The Two Basic Mindsets That Shape Our Lives 
The Creative Learning Spiral Envisioned
How Creativity is Measured—And Why It’s So Difficult
Pour your favorite drink, relax, and enjoy.
Hungry for even more?
Explore my creativity resources here.
Sign up for my newsletter Insights for more great content.

8 Useful Tips For Brushing Masks In Photoshop

Mask_Mask_425

Some tools in Photoshop make the marks for you, like the Gradient Tool and Paths.

When it comes to masking, there’s no reason to fear drawing in Photoshop. Often, it amounts to little more than tracing. Plus, the History palette gives you an unlimited number of undo’s and redo’s. Still, there a number of painting strategies that can help you make masks more efficiently and precisely.

Mask_Uneven_Opacity_425

Use colors other than true black and white only when you want to reduce opacity.

Keep it black and white.
Before you start painting masks, use the reset icon to make sure you’re painting with a true black and a true white. It’s not uncommon to find out too late that you’ve been painting with some other shade of gray. If you find out too late, you may be able to modify the contrast of the mask by applying an adjustment like Levels or Curves.
Illustrate
Mask_Uneven_425

Watch for unevenness created by scrubbing with too small a brush.

Check for uniformity.
It’s a good idea to check masks (Option click the mask to see it. Do that again to hide it.) for uniformity and to eliminate (Fill, brush, or filter.) unintended gaps between brush strokes (black specks in a white field, white specks in a black field) and unintended unevenness when brushing with opacities lower than 100%. Remember, this speckled appearance can happen not only when brushing but also when the Magic Wand Tool or Color Range has been used as the foundation for a selection.

Fill broad areas.
Avoid painting broad areas. Instead, select and fill them. Filling an area ensures that it will be uniform, where building up multiple overlapping brush strokes sometimes leads to uneven results. You don’t have to precisely select the edges of broad area you’d like to fill; after the lion’s share of the work is done, you can refine areas that require more care with a brush.

Mask_Brush_Cursors_425

Paint with the edge of the brush except for those rare occasions you need to paint with its center, then use the caps lock crosshair .

Be mindful of the edge of a brush.
The appearance of a brush will help you better see the marks you make. Normal Brush Tip (Preferences > Displays and Cursors) will show you the circumference of a brush allowing you to see the placement of its edges. You can press the Caps Lock key to change this to a crosshair that will pinpoint its center when necessary.

Use soft-edged brushes when you’re painting general areas. The feathered edges will blend into one another. Use hard-edge brushes when painting along specific contours. You’ll see the accuracy of your marks as you make them. When you’ve finished, you can soften them more precisely (Favor using Properties > Feather; you can reset the values at any time. Use the Blur tool for local effects.)

CommandKey_425

Key commands make repetitive actions quicker and easier.

Use key commands.
Key commands make repetitive tasks easier. You’ll use these a lot. Use the X key to reverse foreground and background colors. Use the bracket keys to make a brush smaller ( [ ) or larger ( ] ). Use the Shift and bracket keys to make a brush softer ( [ ) or harder ( ] ). Use the number keys to change the opacity of a brush; press 1 for 10%, 2 for 20%, 3 for 30%, etc.

Get a list of useful masking key commands here.

HistoryBrush_425

The History palette is great for multiple global undos.

The History Brush tool is great for undoing just one portion of an image.

Use the History Brush for local undos.
The History Brush tool can be very helpful when you want to undo changes in one area only. In the History palette, step back in history states to find a state you’d like to return to in one area; check the icon to the left of that state to set the source for the brush; return to the most current state; and use the History brush to paint back to a desired state in your file’s timeline.
Mask_StraightLine_425

Painting masks with a series of successive straight lines yields surprisingly good results quickly, even for contours that aren’t straight.

Start rough, then refine.
Draftsmen often “block in” a contour, using a series of straight marks that cut around a contour in progressively finer increments rather than trying to draw it perfectly the first time. It’s highly efficient. It also takes the wobble out of handmade marks. You can draw a straight line with any brush by clicking once, letting go, moving to another point, holding the Shift key, and clicking a second time.
Illustrate

Mask_Corner_425 Three strokes can fill a corner precisely; start by overpainting with the first stroke, then erase the excess with two more strokes.

Paint over corners, not into them.
Avoid painting yourself into a corner; instead, paint over a corner. It’s challenging and inefficient to paint into corners with a series of increasingly smaller brushes.

Instead, you can cut a corner with three strokes; with the first stroke paint over the area broadly; using the edge of an eraser (or a brush with the inverse color), make a second stroke to paint away the overspill on one side of the corner and finish the job with a third stroke for the overspill on the second side of the corner.
Adopt these simple practices and you’ll find that you’ll make better masks and make them faster too.

Read more about Selections & Masks.
Learn more in my digital photography and digital printing workshops.

Painting The Simplest & Most Useful Masks In Photoshop

Layers_Masks_425
So often, it’s the simplest things that are the most often used and so the most useful. You may find that you use this very simple three-step technique for a majority of the masks you make in Photoshop. (I do.)

1 In the Layers palette, highlight the layer you want to affect.

2 Click on the mask icon. (It looks like a Japanese flag.)

3 Use a brush to paint over the areas you want to remove an effect from.

The marks you make with a brush will determine how broad or precise your mask becomes. While you can use any brush tool, a simple round feathered brush is the most useful. Vary the brush size as needed. (You can use the square bracket keys to quickly make your brush smaller or larger.) Zoom in or out as needed.
Mask_Brush_Size

Brush marks can vary in size and shape.

To partially mask areas vary the opacity of the brush (You can use the number keys to quickly change a brush’s opacity.) You can stroke an area multiple times to build up a desired effect.
Mask_Brush_Opacity

You can control the opacity of any brush.

If you make a mistake, step back in history with the History palette. Or, switch the foreground and background colors (Use the X key to quickly toggle them.) and paint with the opposite color; the Eraser tool, a brush, essentially paints with the current background color. Masks can be made of any shade of gray between black and white but they cannot contain saturated color; while you’re painting, if you see a foreground color that is a saturated hue you’re painting on a layer, not a mask. Again, stepping back in time with the History palette will provide you with an easy do-over.

While you’re brushing, favor soft-edged brushes; hard-edged brushes may introduce unwanted contours.

Mask_Brush_HardnessThe edges of brushes can be hard or soft.

If you plan to make a mask that eliminates a layer’s effect for a majority of an image’s area, it’s faster to start with a black mask and use a white brush to paint the layer’s effect into the other smaller areas. You can start with a black mask by holding the Option key when you click the mask icon. Or, you can use the menu command Layer > Add A Layer > Hide All. Or, you can fill a mask with any color – in this case black. All of these methods will achieve the same result.

Mask_BorW_425

Masks can start with a white or black base.

While there are many methods that can be used to modify a mask after it has been created brushing remains the most common and is often the most effective way.

You might be tempted to think that this technique is too easy and only for beginners – don’t. Simple is not simplistic. This is a go-to technique everyone uses, beginner and master alike. Remember, you can achieve much greater precision with a mask and a brush than anything you can achieve in the analog darkroom.

Read more about Selections & Masks.
Learn more in my digital photography and digital printing workshops.